


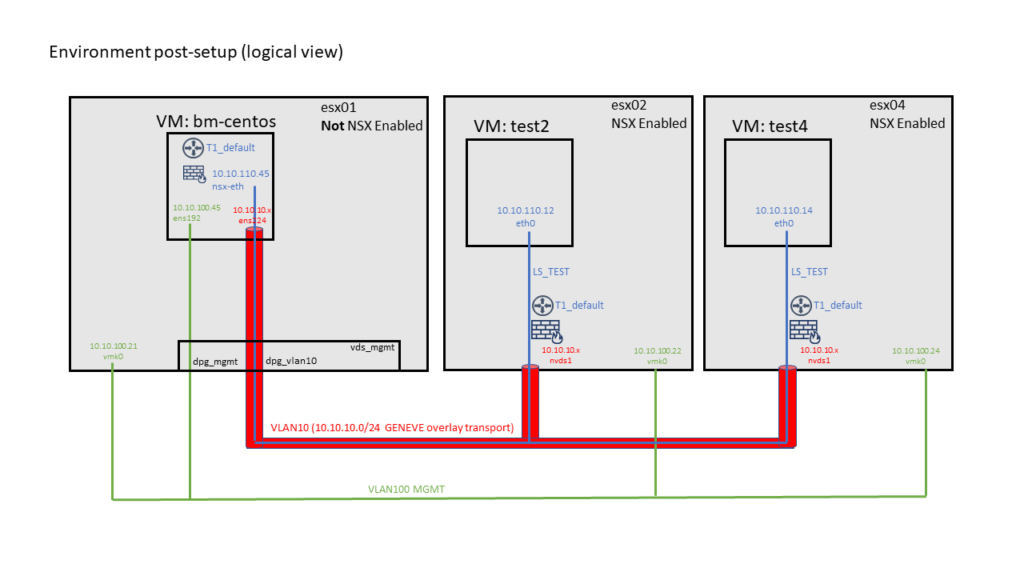
This post demonstrates how to integrate a bare-metal server on OS-Level into NSX-T overlay networking and security. As there was no bare-metal system in my demo environment available I created a CentOS 7.5 VM on a non-NSX enabled ESXi Server. Topology shown below

After successful installation it should look like this
Pre-Requisites:
- Have NSX-T up and running
- Read the NSX-T Bare-Metal Integration Documentation https://docs.vmware.com/en/VMware-NSX-T-Data-Center/2.5/installation/GUID-1B199883-EAED-45B2-B920-722EF4A54B33.html
- prepare a CentOS 7.5 system (bare metal or VM), integrate 2 NIC [referenced here as ens192 and ens224]
- one NIC [ens192] needs a configured IP address [10.10.100.45/24] and should be connected to your management network
- setup a ssh server on your CentOS 7.5. It should start on boot. Password based SSH root login must be enabled
- the second NIC needs to be connected to your NSX overlay transport network [VLAN10]. Don’t configure IP or anything else yet.
- have a Management System ready which is allowed to ssh to your CentOS system. git & ansible need to be installed
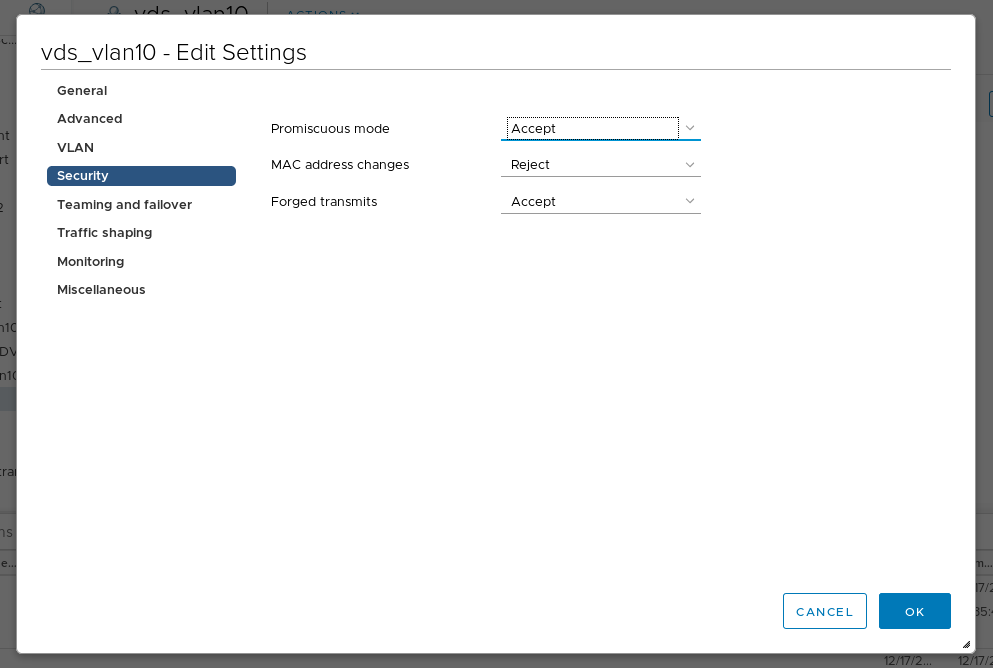
If you do this in a CentOS VM don’t forget to change the VDS Port Group Security settings in vCenter for the overlay interface [VLAN10]. Enable “Promiscous mode” and “Forged transmits”. NSX will later create virtual interfaces. If not changed the ESXi will drop packages from these interfaces.
Information needed:
| Value | Example (in my demo) |
| NSX Manager API User | admin |
| NSX Manager API Password | VMware1!VMware! |
| NSX Manager API thumbprint | 66f[…cut…]f507 |
| NSX Manager IP | 10.10.100.11 |
| NSX TEP Pool | tep-pool |
| NSX Logical Segment the CentOS Server connects to | LS_TEST |
| Application Interface IP Address for this segment | 10.10.110.45/24 |
You can get the NSX Manager API certificate when you ssh as admin into your NSX Manager IP and run
nsxmgr1> get certificate  api thumbprint
 66f[...cut...]f507
OS Setup:
SSH into your CentOS system and login as root.
It can be useful to disable network-manager on the second interface. So add “NM_CONTROLLED=no” to /etc/sysconfig/network-scripts/ifcfg-ens224 and restart the interface.
ifconfig should show both interfaces, just one is configured with management IP
[root@bm-centos-mgmt ~]# ifconfig
 ens192: flags=4163  mtu 1500
         inet 10.10.100.45  netmask 255.255.255.0  broadcast 10.10.100.255
         inet6 fe80::250:56ff:feb3:6f9  prefixlen 64  scopeid 0x20
         ether 00:50:56:b3:06:f9  txqueuelen 1000  (Ethernet)
         RX packets 5028  bytes 7566950 (7.2 MiB)
         RX errors 0  dropped 0  overruns 0  frame 0
         TX packets 3625  bytes 280022 (273.4 KiB)
         TX errors 0  dropped 0 overruns 0  carrier 0  collisions 0
ens224: flags=4163  mtu 1500
         ether 00:50:56:b3:0e:bc  txqueuelen 1000  (Ethernet)
         RX packets 3  bytes 180 (180.0 B)
         RX errors 0  dropped 0  overruns 0  frame 0
         TX packets 0  bytes 0 (0.0 B)
         TX errors 0  dropped 0 overruns 0  carrier 0  collisions 0
lo: flags=73  mtu 65536
         inet 127.0.0.1  netmask 255.0.0.0
         inet6 ::1  prefixlen 128  scopeid 0x10
         loop  txqueuelen 1000  (Local Loopback)
         RX packets 0  bytes 0 (0.0 B)
         RX errors 0  dropped 0  overruns 0  frame 0
         TX packets 0  bytes 0 (0.0 B)
         TX errors 0  dropped 0 overruns 0  carrier 0  collisions 0
NSX-T Documentation lists packages you should have installed. Additionally I recommend to add “vim-common” as it might be needed to run the documented command to extract the ssh thumbprint. I recommend to put all needed packages into a textfile and install them:
[root@bm-centos-mgmt ~]# echo "tcpdumpboost-filesystem PyYAML boost-iostreams boost-chrono python-mako python-netaddr python-six gperftools-libs libunwind libelf-dev snappy boost-date-time c-ares redhat-lsb-core wget net-tools yum-utils lsof python-gevent libev python-greenlet libvirt-libs vim-common" > packagelist.txt
[root@bm-centos-mgmt ~]# yum -y install $(cat packagelist.txt)
Optional: get the SSH SHA256 thumbprint.
[root@bm-centos-mgmt ~]# awk '{print $2}' /etc/ssh/ssh_host_rsa_key.pub | base64 -d | sha256sum -b | sed 's/ .*$//' | xxd -r -p | base64
 DUA[...cut...]WcQ=
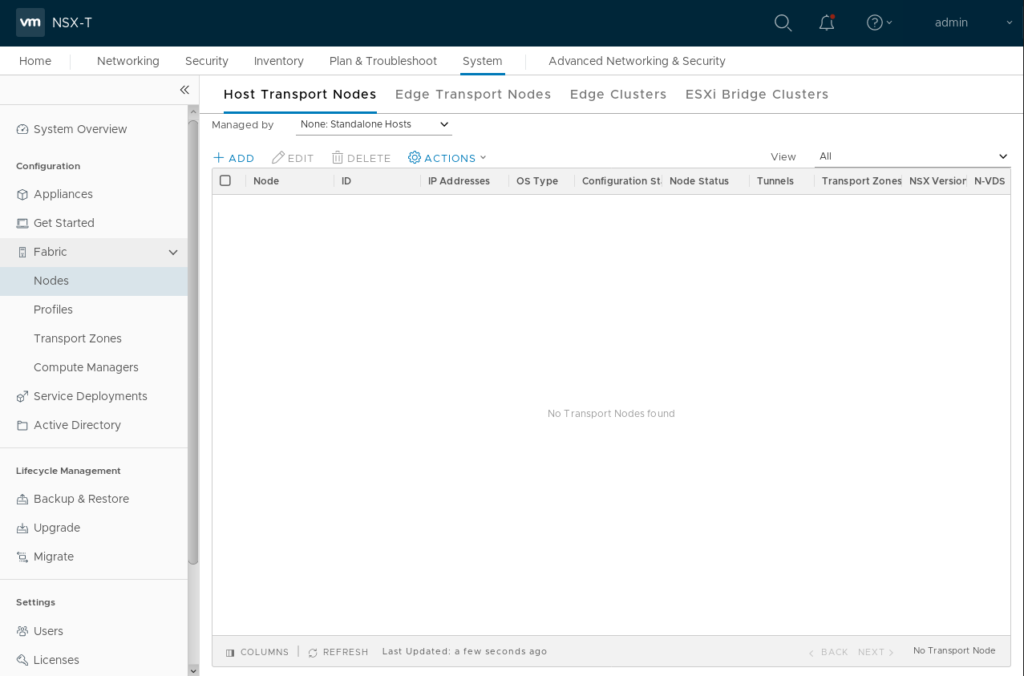
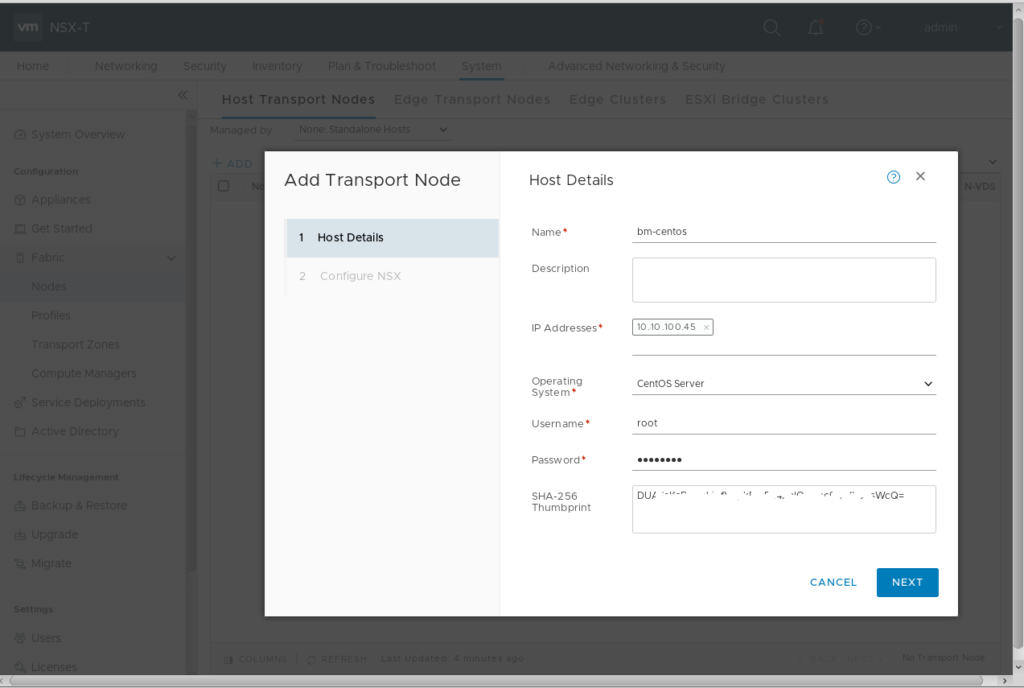
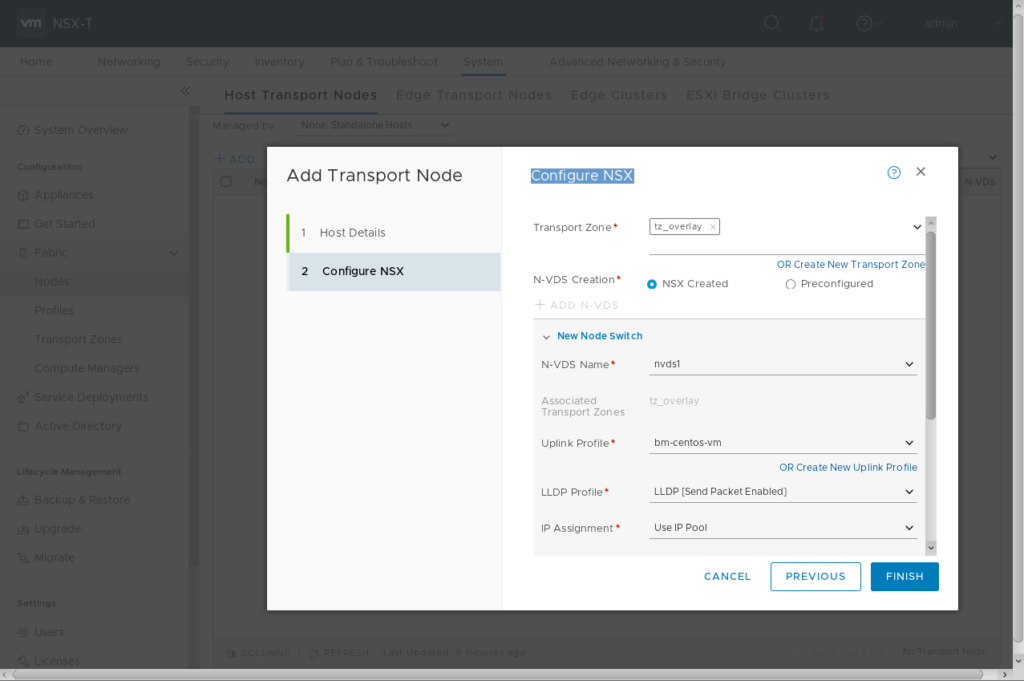
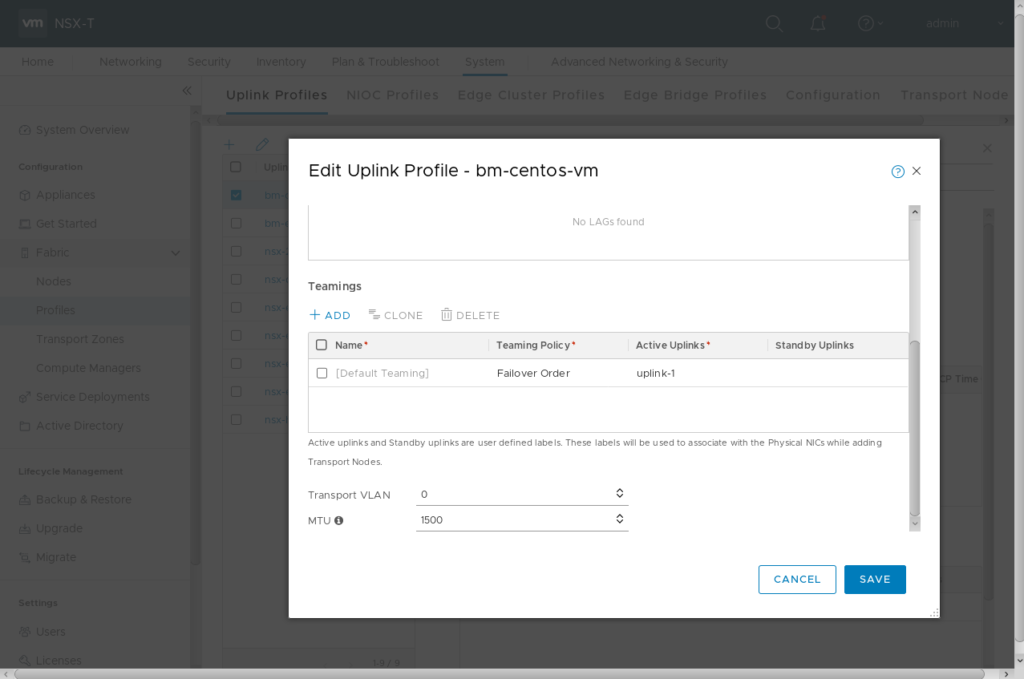
Now you can prepare your CentOS system as NSX-T Transport Node. Login to NSX Manager GUI, goto System -> Fabric -> Nodes and add a standalone Host Transport Node. I’ve also pre-created a new uplink profile shown in the last picture.

Uplink profile for my setup
It can take several minutes to complete.

Now you can login to your Management System.
Clone the VMware Bare Metal Git Repository
vmware@mgr:~$ git clone https://github.com/vmware/bare-metal-server-integration-with-nsxt.git
change into directory
vmware@mgr:~$ cd bare-metal-server-integration-with-nsxt/bms-ansible-nsx/
edit the following parts of the “hosts” file.
[TransportNodes:vars]
ansible_ssh_user=root
ansible_ssh_pass=VMware1!
[servers_static]
server1 ansible_ssh_host=bm-centos-mgmt.corp.local static_ip=10.10.110.45 netmask=255.255.255.0 ls_name=LS_TEST
[NSX]
nsxmanager ip=10.10.100.11 username=admin password=VMware1!VMware1! thumbprint=66f[...cut...]f507
Now you can run the ansible playbook
vmware@mgr:~/bare-metal-server-integration-with-nsxt/bms-ansible-nsx$ ansible-playbook -i hosts static_config.yml
Should finish with something similar like that
PLAY RECAP *
 server1                    : ok=34   changed=21   unreachable=0    failed=0
ifconfig now shows the VTEP Interface [10.10.10.18], the application interface [10.10.110.45]. Overlay networking now should work, so you should be able to connect to VMs residing in NSX Logical Segments.
[root@bm-centos-mgmt ~]# ifconfig
ens192: flags=4163  mtu 1500
         inet 10.10.100.45  netmask 255.255.255.0  broadcast 10.10.100.255
         inet6 fe80::250:56ff:feb3:6f9  prefixlen 64  scopeid 0x20
         ether 00:50:56:b3:06:f9  txqueuelen 1000  (Ethernet)
         RX packets 14159  bytes 62060667 (59.1 MiB)
         RX errors 0  dropped 0  overruns 0  frame 0
         TX packets 15443  bytes 2379513 (2.2 MiB)
         TX errors 0  dropped 0 overruns 0  carrier 0  collisions 0
ens224: flags=4163  mtu 1500
         ether 00:50:56:b3:0e:bc  txqueuelen 1000  (Ethernet)
         RX packets 2938  bytes 291354 (284.5 KiB)
         RX errors 0  dropped 0  overruns 0  frame 0
         TX packets 1920  bytes 260447 (254.3 KiB)
         TX errors 0  dropped 0 overruns 0  carrier 0  collisions 0
genev_sys_6081: flags=4163  mtu 65470
         inet6 fe80::505d:acff:fef9:9231  prefixlen 64  scopeid 0x20
         ether 52:5d:ac:f9:92:31  txqueuelen 1000  (Ethernet)
         RX packets 1400  bytes 72800 (71.0 KiB)
         RX errors 0  dropped 0  overruns 0  frame 0
         TX packets 1491  bytes 77548 (75.7 KiB)
         TX errors 0  dropped 8 overruns 0  carrier 0  collisions 0
hyperbus: flags=4163  mtu 1500
         inet6 fe80::acf4:3cff:fe75:6d7  prefixlen 64  scopeid 0x20
         ether ae:f4:3c:75:06:d7  txqueuelen 1000  (Ethernet)
         RX packets 8  bytes 648 (648.0 B)
         RX errors 0  dropped 0  overruns 0  frame 0
         TX packets 8  bytes 648 (648.0 B)
         TX errors 0  dropped 0 overruns 0  carrier 0  collisions 0
lo: flags=73  mtu 65536
         inet 127.0.0.1  netmask 255.0.0.0
         inet6 ::1  prefixlen 128  scopeid 0x10
         loop  txqueuelen 1000  (Local Loopback)
         RX packets 184269  bytes 47619581 (45.4 MiB)
         RX errors 0  dropped 0  overruns 0  frame 0
         TX packets 184269  bytes 47619581 (45.4 MiB)
         TX errors 0  dropped 0 overruns 0  carrier 0  collisions 0
nsx-eth: flags=4163  mtu 1500
         inet 10.10.110.45  netmask 255.255.255.0  broadcast 10.10.110.255
         inet6 fe80::5855:e7ff:fe5a:9d19  prefixlen 64  scopeid 0x20
         ether 5a:55:e7:5a:9d:19  txqueuelen 1000  (Ethernet)
         RX packets 8  bytes 648 (648.0 B)
         RX errors 0  dropped 0  overruns 0  frame 0
         TX packets 8  bytes 648 (648.0 B)
         TX errors 0  dropped 0 overruns 0  carrier 0  collisions 0
nsx-eth-peer: flags=4163  mtu 1500
         inet6 fe80::5497:61ff:fe34:a1ce  prefixlen 64  scopeid 0x20
         ether 56:97:61:34:a1:ce  txqueuelen 1000  (Ethernet)
         RX packets 8  bytes 648 (648.0 B)
         RX errors 0  dropped 0  overruns 0  frame 0
         TX packets 8  bytes 648 (648.0 B)
         TX errors 0  dropped 0 overruns 0  carrier 0  collisions 0
nsx-vtep0.0: flags=4163  mtu 1500
         inet 10.10.10.18  netmask 255.255.255.0  broadcast 10.10.10.255
         inet6 fe80::a088:7bff:fed1:a43c  prefixlen 64  scopeid 0x20
         ether a2:88:7b:d1:a4:3c  txqueuelen 1000  (Ethernet)
         RX packets 2840  bytes 243974 (238.2 KiB)
         RX errors 0  dropped 0  overruns 0  frame 0
         TX packets 1517  bytes 170578 (166.5 KiB)
         TX errors 0  dropped 0 overruns 0  carrier 0  collisions 0
Hello, thanks for this help.
Do you know how to add persistent route pointing to this new interface that is created (nsx-eth)?
Hi, thanks for your comment. When editing the “hosts” file from the “VMware Bare Metal Server Integration repository” you can add a “routing_table” parameter.
Example:
[servers static]
server1 ansible_ssh_host=bm-centos-mgmt.corp.local static_ip=10.10.110.45 netmask=255.255.255.0 ls_name=LS_TEST routing_table=”-net 172.16.11.0/24 gw 10.10.110.1″
Hope this helps?
Best,
Daniel
Hi Daniel,
With your setup, did you try l3 connectivity of 10.10.110.45? like vm resides in another segment, or even outside of T0?
Hi, if L3 connectivity for the overlay segment (LS_TEST) is configured there should be no problem for the bare metal system to use L3 connectivity like any other (VM) Workload on the segment. But keep in mind to modify the routing table to use the gateway provided by overlay network. Just check the first comment on my blog post how to use “route_table” to configure L3 overlay routing during setup.