


This post is also available in:
 German
In this Blogpost I will explain how to add or remove a Tag in NSX-T.
If the VM is not tagged before it is very easy to set a new Tag, but if the VM has already been tagged and you don’t want to loose the existing Tags, it becomes more complicated, because the NSX API will overwrite all Tags if a new one will be set.
If you would like to learn how to use PowerCLI with NSX-T Policy API you can read my Blog: Creating Objects in NSX-T Policy API with VMware PowerCLI
6. March 2020 !!!Important Information!!! The Script discover only the first 1.000 VMs. I am in contact with the Product Managers to find a Solution to discover more than 1.000 VMs and as soon if I have a Solution, I will update this post.
Complete Script
This Script will add a “quarantine” Tag to a VM, with interactive User Input to define which VM should be tagged. The VM name is Case Sensitive and can be found in NSX Inventory -> Virtual Machines.
$display_name = Read-Host -Prompt 'VM Name'
$SecTag = "quarantine"
$secscope = ""
if ($vmdataentrytags) {Remove-Variable vmdataentrytags}
$vmdata = Get-NsxtPolicyService -Name com.vmware.nsx_policy.infra.realized_state.enforcement_points.virtual_machines
$vmdatavmid = @([PSCustomObject]$vmdata.list("default").results | select-object -property display_name, external_id | select-string "display_name=$display_name")
$vmdatavmid = $vmdatavmid -replace ("@{display_name=$display_name; ") -replace ("}")
$vmdataid=$vmdatavmid|ConvertFrom-StringData
$vmdataentry = @([PSCustomObject]$vmdata.list("default").results | select-object -property display_name, tags | select-string "display_name=$display_name")
if ($vmdataentry -like '*scope*') {
$vmdataentrytags=$vmdataentry-replace ("@{display_name=$display_name; tags=(\[)struct ") -replace'(\])'
$vmdataentrytags = $vmdataentrytags -replace ("struct ") -replace ("'") -replace ("}}"),("}") -replace (":"),("=") -replace (" ") -replace ("},"),("};")
#$vmdataentrytags = $vmdataentrytags -replace ("{scope=$secscope,tag=$SecTag};") -replace (";{scope=$secscope,tag=$SecTag}")
$vmdataentrytags = @($vmdataentrytags.split(";"))
$vmdataentrytags = $vmdataentrytags -replace ("{") -replace ("}")
}
$vmdataentrytags+="scope=$secscope,tag=$SecTag"
$vmdatacontent = $vmdata.Help.updatetags.virtual_machine_tags_update.Create()
$vmdatacontent.virtual_machine_id = $vmdataid.external_id
foreach ($item in $vmdataentrytags) {
$item=@($item.split(","))
$vmdatatags1=$item|ConvertFrom-StringData
$vmdatatags=$vmdata.Help.updatetags.virtual_machine_tags_update.tags.Element.Create()
$vmdatatags.tag=$vmdatatags1.tag
$vmdatatags.scope=$vmdatatags1.scope
$vmdatacontent.tags.Add($vmdatatags) |Out-Null
}
$vmdata.updatetags("default", $vmdatacontent)
Let dive into the script:
we will create a Variable, and with “Read-Host”, the Input can be tipped in after the “-Prompt” VM Name.
$display_name = Read-Host -Prompt 'VM Name'In my example I will set a Tag with the Name “quarantine” and no Scope.
$SecTag = "quarantine"$secscope = ""
We will store the Information from all VMs recognized in NSX to the Variable “$vmdata”.
$vmdata = Get-NsxtPolicyService -Name com.vmware.nsx_policy.infra.realized_state.enforcement_points.virtual_machinesFor each VM we will have now a lot of information.
In all examples I will use the Virtual Machine “DEV-DB”
$vmdata.list("default").results

----output omitted----
guest_info : struct {'computer_name': dev-db, 'os_name': Ubuntu Linux
(64-bit)}
compute_ids : {moIdOnHost:5, hostLocalId:5,
locationId:564d2f4a-05a3-3fc5-6afc-f839afad7dc1,
instanceUuid:52caf68c-335e-e4e9-18b3-221f5ffe0300…}
resource_type : VirtualMachine
external_id : 564d2f4a-05a3-3fc5-6afc-f839afad7dc1
source : struct {'target_display_name': esx2, 'is_valid': True,
'target_type': HostNode, 'target_id':
283c61ef-fcc0-481f-a881-027338e11654}
_last_sync_time : 1577041205593
type : REGULAR
display_name : DEV-DB
power_state : VM_RUNNING
host_id : 283c61ef-fcc0-481f-a881-027338e11654
local_id_on_host : 5
tags : {struct {'scope': 2, 'tag': dev}, struct {'scope': 1, 'tag':
internal}, struct {'scope': 3, 'tag': db}}
----output omitted----
To add a Tag to a Specific VM we need the external VM ID (VM UUID). We will store the VM Display Name and the ID in a Variable named “$vmdatavmid”
$vmdatavmid = @([PSCustomObject]$vmdata.list(“default”).results | select-object -property display_name, external_id | select-string “display_name=$display_name”)
With select-string “display_name=$display_name” we will choose the right VM.
But the Information cannot be used without some modification, because we only need the ID.
This will be the output from $vmdatavmid
@{display_name=DEV-DB; external_id=564d2f4a-05a3-3fc5-6afc-f839afad7dc1}
So we need to remove “@{display_name=DEV-DB; ” and “}“
$vmdatavmid = $vmdatavmid -replace (“@{display_name=$display_name; “) -replace (“}”)
Let us check the output again
$vmdatavmid
external_id=564d2f4a-05a3-3fc5-6afc-f839afad7dc1
The Information is still in the wrong format so we will convert the information into a table:
$vmdataid=$vmdatavmid|ConvertFrom-StringData
—- —–
external_id 564d2f4a-05a3-3fc5-6afc-f839afad7dc1
We will now retrieve the existing Tags and Scope from the VM and store the Information in $vmdataentry.
$vmdataentry = @([PSCustomObject]$vmdata.list("default").results | select-object -property display_name, tags | select-string "display_name=$display_name")
This is the Output from “$vmdataentry” and we need to remove a lot of information…
@{display_name=DEV-DB; tags=[struct {'scope': 2, 'tag': dev}, struct {'scope': 1, 'tag': internal}, struct {'scope': 3, 'tag': db}]}
$vmdataentrytags=$vmdataentry-replace ("@{display_name=$display_name; tags=(\[)struct ") -replace'(\])'
In the next Step we will remove and replace all other information
$vmdataentrytags = $vmdataentrytags -replace ("struct ") -replace ("'") -replace ("}}"),("}") -replace (":"),("=") -replace (" ") -replace ("},"),("};")
Let’s check the Variable “$vmdataentrytags”:
{scope=2,tag=dev};{scope=1,tag=internal};{scope=3,tag=db}
If you would like to remove a Tag/Scope, you need to insert here the following Line:
$vmdataentrytags = $vmdataentrytags -replace ("{scope=$secscope,tag=$SecTag};") -replace (";{scope=$secscope,tag=$SecTag}")
We will split the String now. The Identifier is “;”
$vmdataentrytags = @($vmdataentrytags.split(";"))
…and remove also the curly brackets.
$vmdataentrytags = $vmdataentrytags -replace ("{") -replace ("}")
The output from “$vmdataentrytags” should look like the following output.
scope=2,tag=dev
scope=1,tag=internal
scope=3,tag=db
We will add now our additional Tag/Scope we defined on the Top of the script. If you would like to remove the Tag/Scope you need to comment out this line.
$vmdataentrytags+="scope=$secscope,tag=$SecTag"
The output from “$vmdataentrytags” will have now the additional Tag.
scope=2,tag=dev
scope=1,tag=internal
scope=3,tag=db
scope=,tag=quarantine
The next Variable for NSX-T will apply later the Tags/Scope to a VM.
$vmdatacontent = $vmdata.Help.updatetags.virtual_machine_tags_update.Create()
We will add the Virtual Machine ID (UUID)
$vmdatacontent.virtual_machine_id = $vmdataid.external_id
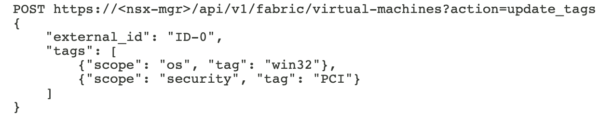
The API Structure for VM Tags is as follows:
Unfortunately the Tags are not placed in a list so each scope/tag combination must be added as a single entry. We will create a loop (foreach) to attach all Tags.
foreach ($item in $vmdataentrytags) {
We will split now each “$vmdataentrytags” in scope and tag. The identifier is “,”.
$item = @($item.split(","))
…and create a List
$vmdatatags1=$item|ConvertFrom-StringData
We will add now for each entry the Tag/Scope to “$vmdatacontent” and close the loop.
$vmdatatags = $vmdata.Help.updatetags.virtual_machine_tags_update.tags.Element.Create()

$vmdatatags.tag=$vmdatatags1.tag

$vmdatatags.scope=$vmdatatags1.scope
$vmdatacontent.tags.Add($vmdatatags) | Out-Null

}
The Last step will add the Tags to the VM.
$vmdata.updatetags("default", $vmdatacontent)

- VCF9 NSX-Edge Setup – What has changed - 11. July 2025
- VCF NSX-Edge setup from a network perspective - 2. June 2025
- VCF Workload Domain Setup from a network perspective - 2. June 2025
Pingback: Working with Groups in NSX created with PowerCLI » vrealize.it - TechBlog VMware SDDC
Hello Daniel:
Thanks for you contribute, May I aska question?
When I using this script to tags for a VM ,but I got a error as below, could you please help me ?
===============================================
VM Name: P-IT-rhel6x64_157
userValue
At line:47 char:1
+ $vmdata.updatetags(“default”, $vmdatacontent)
+ ~~~~~~~~~~~~~~~~~~~~~~~~~~~~~~~~~~~~~~~~~~~~~
+ CategoryInfo : OperationStopped: (:) [], CisException
+ FullyQualifiedErrorId : VMware.VimAutomation.Cis.Core.Types.V1.CisException
Hello Ethan,
Thank you for your comment!
I recognized, that the Script is only working, if the VM has at least one TAG configured. Otherwise the Split will run into a failure.
I have updated the script now and added:
if ($vmdataentry -like ‘*scope*’) {
….
}
If an TAG exist $vmdataentry will have the “scope” in the content. Otherwise neither “scope” nor “tag” will be in the content. And with my if command I make sure that the Script will directly jump to adding a new tag.
Please check this out and give me a feedback if it is working for you.
Regards
Daniel
Hi,
Can you please modify the script as the input should be given from one csv file, like VM name, Tag name.
it should pick corresponding tag w.r.to VMname.
Thanks,
Chaitanya
Dear All,
I have a requirement to add NSXT Tags to over 800 VMs. The tags are different for Different vms.
for example
VM name Tag Scope
VM1 Java application_name
VM2 C applcation_name
VM3 python applcation_name
Please help me to achieve this.
Thanks,
chaitanya
Hi Daniel,
Thanks for your blog about the Policy API. It helped me a lot to make the first scripting steps for managing NSX-T. Question: Did you got a solution for the 1000 VM discovery limitation in the $vmdata.list(“default”).results command?
Kind regards,
Tom
Hi Daniel,
I am running into the issue that only the first 1000 VM’s are discoverd. Is there any news about this.
The PS script I have running for deplying VM’s worked fine until we added more workloads to NSX-T and more VM’s. 🙂
Hello! Your article is valuable.
I would like to set tag and scope on the Virtual Interface (segport tag) of the VM.
How can I access to that information.
You listed out all the VMs from NSX-T but as I checked the details I haven’t found the interface information.
Which would be the proper object that I need to query.
Thank you for your answer.