


Starting with NSX-T 3.2 VMware introduced also the NSX Application Platform.
NSX Application Platform – VMware NSX Application Platform is a new container based solution introduced in NSX-T 3.2.0 that provides a highly available, resilient, scale out architecture to deliver a set of core platform services which enables several new NSX features.
- NSX Intelligence
- NSX Metrics
- NSX Network Detection and Response
- NSX Malware Prevention
To use the new features you need to have a Kubernetes Cluster, a Load Balancer and Kubernetes Volumes.
VMware Tanzu with VMware NSX Advanced Load Balancer will give you an easy way to install and test the NSX Application Platform and you will find some Blogs how to setup NAPP with Tanzu and NSX Adv. Load Balancer.
In case you can’t install VMware Tanzu and the NSX Advanced Load Balancer you can use this Guide to setup Kubernetes with Load Balancer and NFS Storage from Scratch.
You can either use the scripted method or you can copy and paste the commands from the Scripts and execute them manually.
Index
- Prerequisites
- Setup
- Server Preparation
- Download and Modify Script
- Execute Script
- Testing
- Finalize Installation on NSX Manager
- Installation Scripts
Prerequisites
You need four Linux Servers (with standard Setup) and of course the NSX Manager 3.2. You can try to reduce the amount of Memory, CPUs and Storage, but this are the Values I have used for my Setup without any problems.
- NSX Manager with Version 3.2 (Installed and powered on)
- Debian based Linux Server (base installation) with SSH Access. (Tested with Ubuntu Server 20.04.4)
- IP Pool for Load Balancer Adresses
- DNS Names for alle Machines
- DNS Name for the NSX Application Platform. (Pick one IP Address from the Load Balancer IP Pool)
- One Management Server
- One NFS Server
- One Kubernetes Master
- One Kubernetes Node
| HDD1 | HDD2 | CPU | RAM | |
| Management Server | 25G | – | 2 | 4 |
| NFS Server | 25G | 50G | 4 | 8 |
| Kubernetes Master | 50G | – | 16 | 16 |
| Kubernetes Node | 1TB | – | 24 | 64 |
Setup
This is my LAB Setup and the Names/IPs corresponding to my Script and need to be modified to your environment.
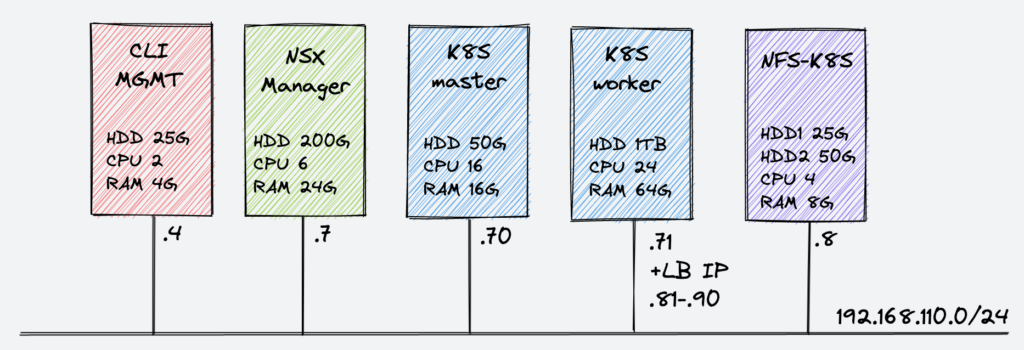
| IP Address | FQDN | |
| CLI (MGMT) | 192.168.110.4 | cli.corp.local |
| NSX Manager | 192.168.110.7 | nsx-mgr.corp.local |
| Kubernetes Master | 192.168.110.70 | k8smaster.corp.local |
| Kubernetes Worker/Node | 192.168.110.71 | k8snode.corp.local |
| NFS Server | 192.168.110.8 | nfs-k8s.corp.local |
| NSX Application Platform | 192.168.110.90 | napp.corp.local |
Server Preparation
To avoid jumping from one Server to another Server I decided to use scripts and let them run from my CLI Server. To do this we need to make some modification on all Servers.
The same Username on all Servers
!!! To run the Script you need to have the same User on all Servers (CLI, Kubernetes, NFS). Otherwise the script will fail !!!
Key instead of password
First we will create a key pair and publish the public key to all the Servers. Do not set a password while generating the key.
ssh-keygen -t rsa -b 4096If you don’t change anything while generating the Key, the Public Key will be stored under “~/.ssh/id_rsa.pub”. Copy the Key to your Servers! I am logged in as User “acme” on my CLI Server and all SSH Commands will be processed as User “acme”.
ssh-copy-id -i ~/.ssh/id_rsa.pub k8smaster.corp.local
ssh-copy-id -i ~/.ssh/id_rsa.pub k8snode.corp.local
ssh-copy-id -i ~/.ssh/id_rsa.pub nfs-k8s.corp.local
sudo without password
We need to run a lot of commands with privileges. So while the Installation we let our User run the commands without password request. !!! BE AWARE YOU SHOULD DELETE THE ENTRY AFTER YOU FINISHED THE INSTALLATION!!!
Run “sudo visudo” on all Servers (including CLI Server) and insert the following line in the end “$username ALL=(ALL) NOPASSWD: ALL” and change $username with your username.
ssh k8smaster
sudo visudo
ssh ...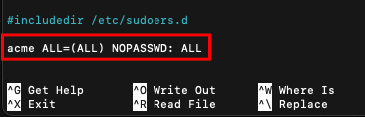
Recommendation: You should SSH again in all Servers and Test if you can do a “sudo” command without password.
sudo apt-get update
Download and modify the Script
All commands will be executed from the CLI Server. First download the Installation Script from GitHub.
wget https://raw.githubusercontent.com/derstich/nsx-napp/main/install-script.shInstallation Script
On Top of the Script change the Values for your environment.
#set Variables

#Place for the Installation Scripts (can be deleted after the installation)
export installfiles=~/nappinstall

#Hostnames (Server FQDN)
export k8sm=k8smaster.corp.local
export k8sn=k8snode.corp.local
export nfs=nfs-k8s.corp.local

#NFS Information
#Disk to use
export sdx=sdb
#Folder for NFS
export nfsfolder=nfs
export nfssubfolder=k8s

#K8S Information
export k8sversion=1.21.9-00
export podnet=172.25.0.0/16
export pathdevmap=/dev/mapper/ubuntu--vg-ubuntu--lv
export kubeadmfolder=~/kubeadm
export k8sconfigfiles=~/k8sconfigfiles

#LB IP Pool
export ippool=192.168.110.81-192.168.110.90

#NSX Manager Information
export nsxmanager=nsx-mgr.corp.local
export nsxuser=admin
export nsxpasswd='YourPassword'
export dockerregistry='projects.registry.vmware.com/nsx_application_platform/clustering'
export helmrepo='https://projects.registry.vmware.com/chartrepo/nsx_application_platform'


#------------------------------------------
Let’s walk trough the Variables.
We create a Folder on all Servers to store the Installation Files. The Folder can be delete after the Installation.
export installfiles=~/nappinstallMap your FQDNs here:
#Hostnames (Server FQDN)
export k8sm=k8smaster.corp.local
export k8sn=k8snode.corp.local
export nfs=nfs-k8s.corp.local
While the Setup from the NFS Server we will also format and mount the second Disk. Normally /dev/sda is used for your primary Disk and is already in use. The second disk should be appear as /dev/sdb you can check this with
ssh $nfs sudo fdisk -l

If you find out that your Disk is not “sdb” you need to change export sdx=”sd*”
No you can define the nfsfolder and the nfssubfolder where NFS should store the content.
#NFS Information
#Disk to use
export sdx=sdb
#Folder for NFS
export nfsfolder=nfs
export nfssubfolder=k8s
Next we will define the Settings for Kubernetes.
First we need to define the Kubernetes Version that is supported with NSX Application Platform.
#K8S Information
export k8sversion=1.21.9-00
Second we need to define the Network for the Kubernetes Pods.
export podnet=172.25.0.0/16For the Kubernetes Node we used a Hard Disk with 1TB (Requirements for NAPP). Ubuntu will create Logical Volume with 10% of the Disk so ~100GB. In the Script we will increase the LV Volume to 100% to use the complete Disk for Kubernetes.
Please check if the pathdevmap is correct
ssh $k8sn df -H
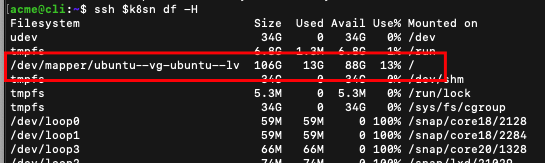
export pathdevmap=/dev/mapper/ubuntu--vg-ubuntu--lvWe also create two folders to store the Kubernetes Files like kubeadm, metalb.yaml, etc.
export kubeadmfolder=~/kubeadm
export k8sconfigfiles=~/k8sconfigfiles
The installation from NAPP requires a Load Balancer and for the Load Balancer we need a IP Pool with at least 5 IP Addresses. One of the IP Address must be mapped to a DNS Name (in my case napp.corp.local<->192.168.110.90) and Kubernetes will to the right mapping later for you.
#LB IP Pool
export ippool=192.168.110.81-192.168.110.90
The NSX Manager Settings are optional and can be done also manual in NSX but it make the Live easier for you if you prepare some Steps upfront.
NSX must interact with the Kubernetes Master and for this you need to upload the .kube/config to the NSX Manager. The Script will upload the config automatically and will also set the registries. If you would like to use your own registry please change it here.
#NSX Manager Information
export nsxmanager=nsx-mgr.corp.local
export nsxuser=admin
export nsxpasswd='YourPassword'
export dockerregistry='projects.registry.vmware.com/nsx_application_platform/clustering'
export helmrepo='https://projects.registry.vmware.com/chartrepo/nsx_application_platform'
Execute the Script
Now you can run the Script and the Servers will be configured automatically. I will explain the Scripts later in Detail.
bash install-script.shUPDATE: I have inserted now a script to download the images (~50G) upfront with “docker pull” to avoid Installation Failures because of poor Internet Connection. The Script needs longer but makes sure that the Installation will run better.
After you started the script you will have enough time to go to lunch;-)
Testing
If the Script has finished you should do some checks.
NFS Status
ssh $nfs service nfs-kernel-server status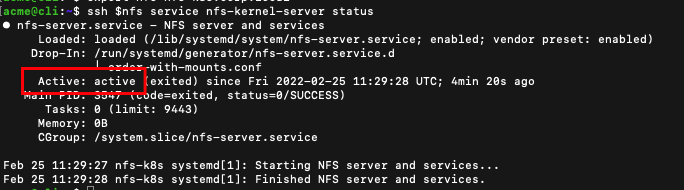
Kubernetes Status
watch kubectl get pods -AWait until all Pods are running
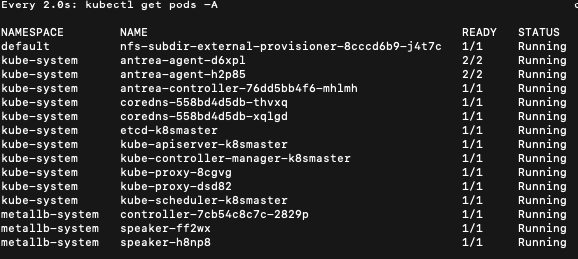
You should see the nfs-subdir-pod in the default Namespace, the Antrea Agent/Controller and the metallb Load balancer.
kubectl get nodesBoth Nodes should be in ready State now

Finalize Installation via NSX Manager UI
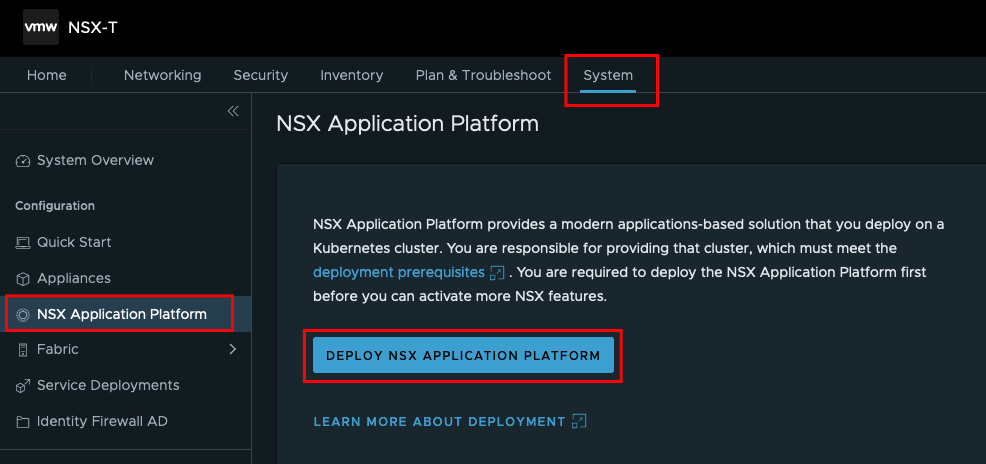
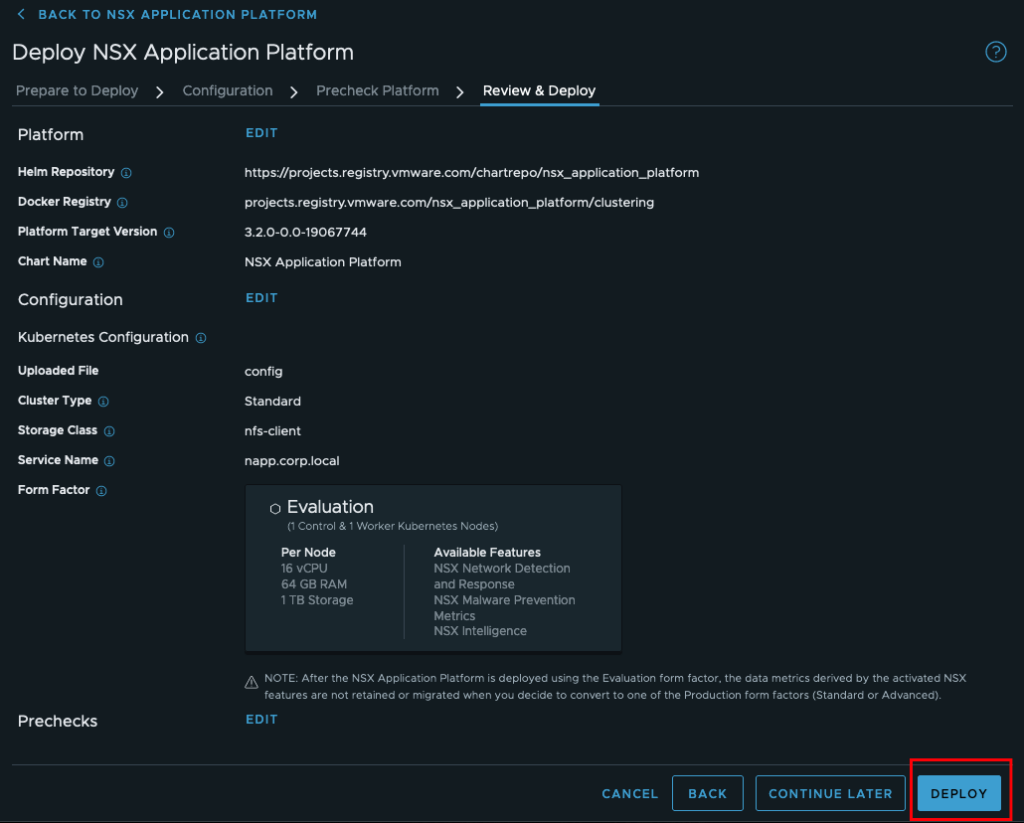
Login to your NSX Manager and go to System -> NSX Application Platform and start the Deployment
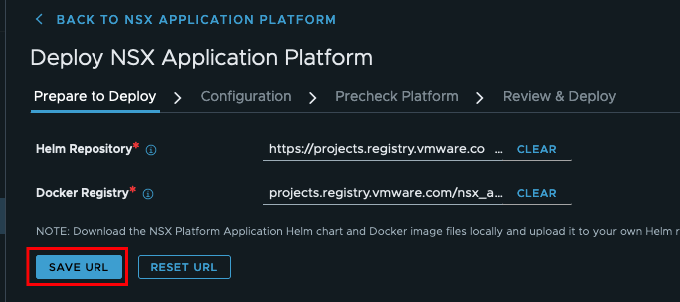
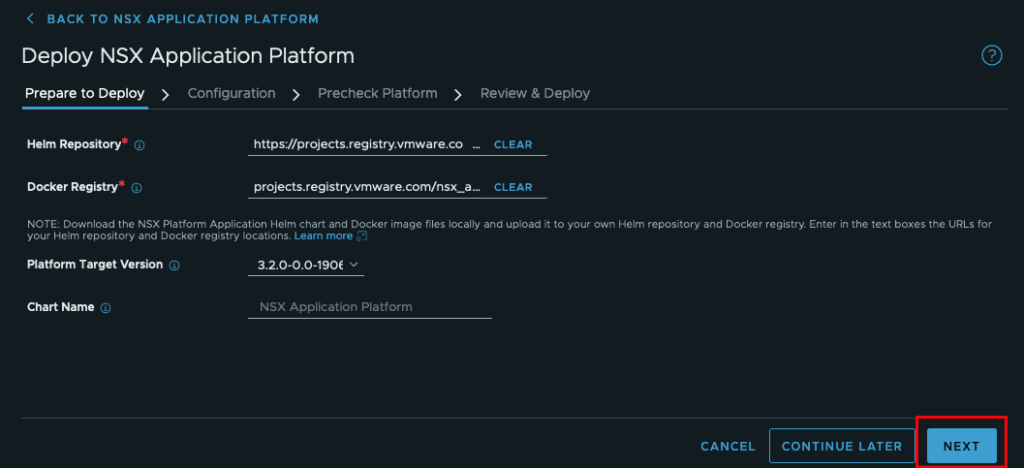
The Repository should be prefilled from our script. Otherwise you can insert the Repo also manual.
Target Platform will be added from NSX.
The Kubernetes config was uploaded by the script. You can also upload the config manually.
May you will be informed that the installet kubectl on NSX Manager does not map the Version from you K8S Cluster. You can download the right Version from the VMware Portal.
Storage Class was defined in Kubernetes and point to the NFS Provisioner.
The Service Name (FQDN) must point to one of the Load Balancer IP Pool Adresses and the DNS entry must exist before you start the installation, because NSX will do the nslookup to find the IP Address for NAPP!
Chose Evaluation and press next.

Now we can run the check

..and start the Deployment
You can follow the deployment also via the Management Server with watch kubectl get pod -A
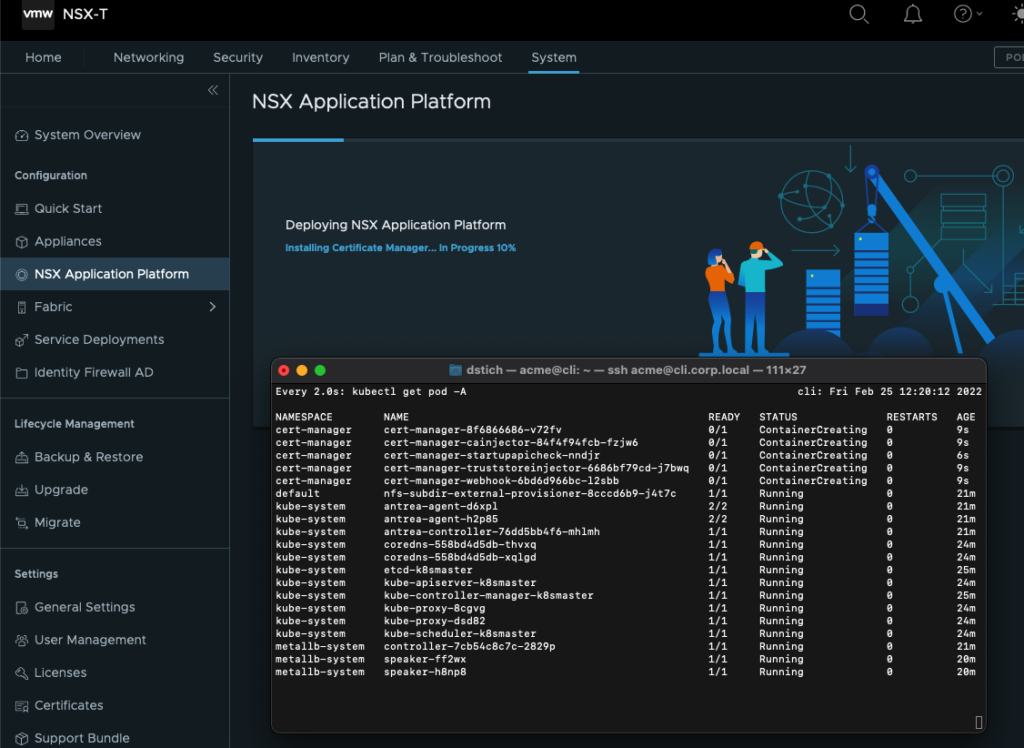
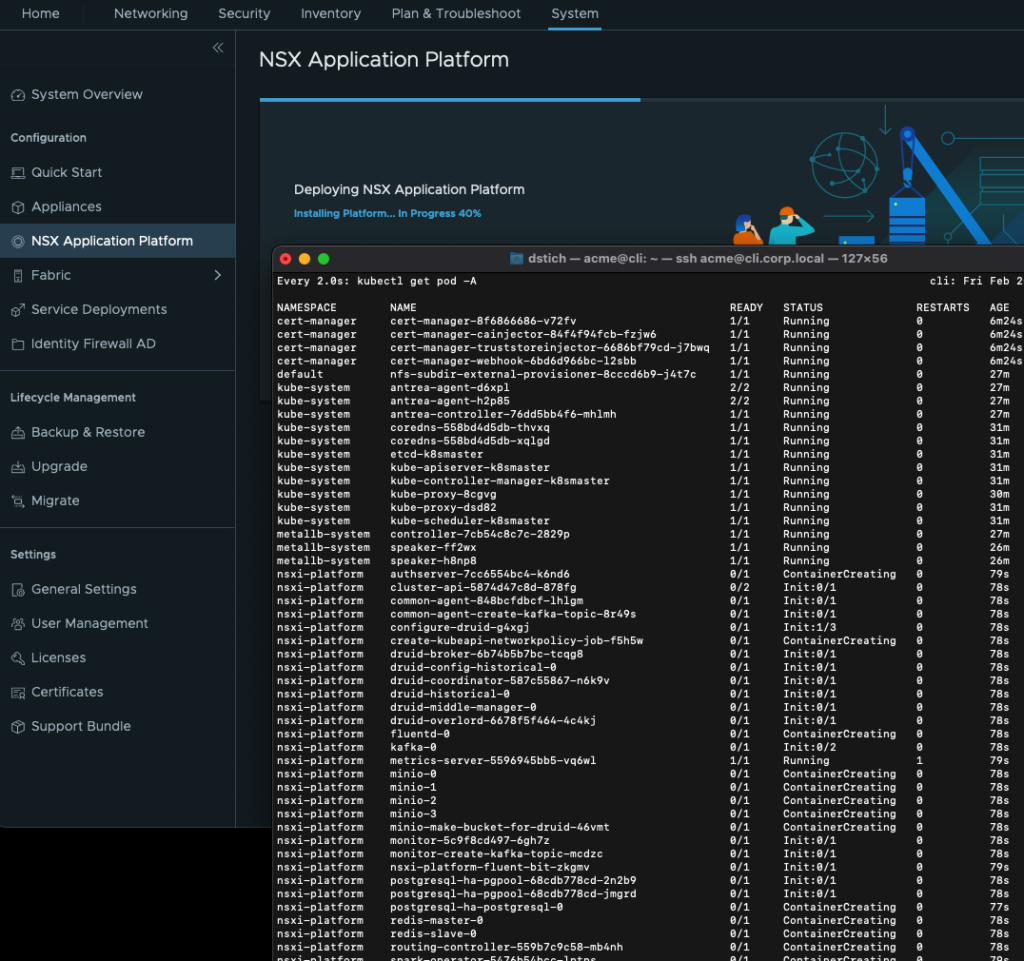
I recognized in my LAB that the Installation fail sometimes at the first time (may it took to long to download all the files, my IOPS are not so good, etc.) If this happen you should retry the installation.
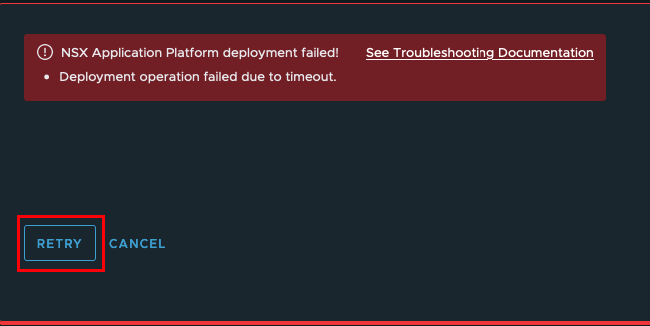
If it does not help you should check which containers are not working and why the are not working.
If the Deployment was successful you can install the different Solutions

Installation Scripts
You will find all Scripts at https://github.com/derstich/nsx-napp
wget https://raw.githubusercontent.com/derstich/nsx-napp/main/install-script.sh
wget https://raw.githubusercontent.com/derstich/nsx-napp/main/nfs-setup.sh
wget https://raw.githubusercontent.com/derstich/nsx-napp/main/k8s-setup.sh
wget https://raw.githubusercontent.com/derstich/nsx-napp/main/k8smaster-setup.sh
wget https://raw.githubusercontent.com/derstich/nsx-napp/main/cli-setup.sh
wget https://raw.githubusercontent.com/derstich/nsx-napp/main/k8sprep.sh
Normally you only need to download the install-script.sh and this script will download the rest.
We discussed the first Part with the Variables and here you can see how the Variables are used and what the Script is doing.
#Create Server Groups
export k8shost="$k8sm $k8sn"
export allhost="$k8sm $k8sn $nfs"

#Create a Directory for the Installation Files on all Servers
mkdir $installfiles
for allhosts in $allhost; do
ssh $allhosts mkdir $installfiles
done

#NFS Configuration
#Download the nfs-setup script
curl -o $installfiles/nfs-setup.sh https://raw.githubusercontent.com/derstich/nsx-napp/main/nfs-setup.sh

#modify the settings
sed -i -e 's\$sdx\'$sdx'\g' $installfiles/nfs-setup.sh
sed -i -e 's\$nfsfolder\'$nfsfolder'\g' $installfiles/nfs-setup.sh
sed -i -e 's\$nfssubfolder\'$nfssubfolder'\g' $installfiles/nfs-setup.sh

#uplod script to NFS Server
scp $installfiles/nfs-setup.sh $nfs:$installfiles/
#execute the Script on NFS Server
ssh $nfs bash $installfiles/nfs-setup.sh

#Setup all Kubernetes Server
#Download the k8s-setup script
curl -o $installfiles/k8s-setup.sh https://raw.githubusercontent.com/derstich/nsx-napp/main/k8s-setup.sh

#modify the settings
sed -i -e 's\$k8sversion\'$k8sversion'\g' $installfiles/k8s-setup.sh
sed -i -e 's\$pathdevmap\'$pathdevmap'\g' $installfiles/k8s-setup.sh

# Upload the script to all Kubernetes Server and execute the Script
for host in $k8shost; do
scp $installfiles/k8s-setup.sh $host:$installfiles/
ssh $host bash $installfiles/k8s-setup.sh
done

#Additional setup on Kubernetes Master
#Download k8smaster-setup script
curl -o $installfiles/k8smaster-setup.sh https://raw.githubusercontent.com/derstich/nsx-napp/main/k8smaster-setup.sh

#modify the settings
sed -i -e 's\$kubeadmfolder\'$kubeadmfolder'\g' $installfiles/k8smaster-setup.sh
export k8sversionshort=${k8sversion::-3}
sed -i -e 's\$k8sversionshort\'$k8sversionshort'\g' $installfiles/k8smaster-setup.sh
sed -i -e 's\$k8smaster\'$k8sm'\g' $installfiles/k8smaster-setup.sh
sed -i -e 's\$podnet\'$podnet'\g' $installfiles/k8smaster-setup.sh

#upload script to K8Smaster
scp $installfiles/k8smaster-setup.sh $k8sm:$installfiles/

#exectue the Scrip on K8Smaster
ssh $k8sm bash $installfiles/k8smaster-setup.sh

#Download the Kubeadm Init from K8S and execute on Worker Nodes
ssh $k8sm tail -n 2 $kubeadmfolder/kubeadm-init.out >> $installfiles/kubeadm-node.sh
cat $installfiles/kubeadm-node.sh | ssh $k8sn sudo -i

# Install Kubectl on Management Host
curl -o $installfiles/cli-setup.sh https://raw.githubusercontent.com/derstich/nsx-napp/main/cli-setup.sh
sed -i -e 's\$k8sversion\'$k8sversion'\g' $installfiles/cli-setup.sh
sed -i -e 's\$k8smaster\'$k8sm'\g' $installfiles/cli-setup.sh
bash $installfiles/cli-setup.sh

#Setup Loadbalancer MetalB
curl -o $installfiles/k8sprep.sh https://raw.githubusercontent.com/derstich/nsx-napp/main/k8sprep.sh
mkdir $k8sconfigfiles
sed -i -e 's\$k8sconfigfiles\'$k8sconfigfiles'\g' $installfiles/k8sprep.sh
sed -i -e 's\$ippool\'$ippool'\g' $installfiles/k8sprep.sh
bash $installfiles/k8sprep.sh

#Optional upload kube/config to nsx manager (needed later for NAPP Installation)
curl -k -u ''$nsxuser':'$nsxpasswd'' -X PUT -H "Content-Type: application/json" -d '{"docker_registry":"'$dockerregistry'","helm_repo":"'$helmrepo'"}' https://$nsxmanager/policy/api/v1/infra/sites/default/napp/deployment/registry
curl -k -u ''$nsxuser':'$nsxpasswd'' -H 'Accept:application/json' -F 'file=@./.kube/config' https://$nsxmanager/policy/api/v1/infra/sites/default/napp/deployment/kubeconfig
NFS Setup Script
The Script nfs-setup.sh will configure the NFS Server
#!/bin/bash
# Install NFS Application
sudo apt install nfs-kernel-server nfs-common -y

#Format the second Disk without userinteraction.
echo -e 'n\np\n1\n\n\nw' | sudo fdisk /dev/$sdx
sudo mkfs.ext4 /dev/$sdx1

#Create a Folder and mount the Folder to the newly formated Disk
sudo mkdir /$nfsfolder
sudo mount /dev/$sdx1 /$nfsfolder
echo '/dev/$sdx1       /$nfsfolder    ext4    defaults     0   0' | sudo tee -a /etc/fstab

#Create a Subfolder for the NFS Share
sudo mkdir /$nfsfolder/$nfssubfolder -p

#Make an entry for the Subfolder in /etc/exports
echo '/$nfsfolder/$nfssubfolder               *(rw,sync,no_root_squash,no_subtree_check)' | sudo tee -a /etc/exports
sudo chown nobody:nogroup /$nfsfolder/$nfssubfolder/

#Restart the NFS Server
sudo systemctl restart nfs-kernel-server
K8S Setup Script
For the Kubernetes Setup we have two Parts. The First Part will configure K8S Master and Worker Node.
#!/bin/bash

#Swap must be disabled for Kubernetes
sudo swapoff -a
sudo sed -i -e 's\/swap.img\#/swap.img\g' /etc/fstab

#Bring the System up to date
sudo apt-get update
sudo apt-get upgrade -y

#Install Docker and change the croupdriver to systemd
sudo apt-get install -y docker.io
sudo systemctl enable docker.service
sudo systemctl start docker
sudo touch /etc/docker/daemon.json
sudo printf \
'{
   "exec-opts": ["native.cgroupdriver=systemd"],
   "log-driver": "json-file",
   "log-opts": { "max-size": "100m" },
   "storage-driver": "overlay2"
}'\
| sudo tee -a /etc/docker/daemon.json
sudo mkdir -p /etc/systemd/system/docker.service.d
sudo systemctl daemon-reload
sudo systemctl restart docker

#Install Kubernetes Packages
curl -s https://packages.cloud.google.com/apt/doc/apt-key.gpg | sudo apt-key add
sudo touch /etc/apt/sources.list.d/kubernetes.list
sudo echo 'deb http://apt.kubernetes.io/  kubernetes-xenial  main' | sudo tee -a /etc/apt/sources.list.d/kubernetes.list
sudo apt-get update
sudo apt-get install -y kubeadm=$k8sversion kubelet=$k8sversion kubectl=$k8sversion
sudo apt-mark hold kubelet kubeadm kubectl

#For the NFS Provisioner we need to install the NfS Client on all Kubernetes Mashines
sudo apt install nfs-client -y

#To use the full Disksize for Kubernete we need to increase the logical Volume
sudo lvextend -l +100%FREE $pathdevmap
sudo resize2fs $pathdevmapK8smaster-setup Script
The Second Part will be executed only on the Master Node
#!/bin/bash

#The Script create a Kubeadm Config, install Kubernetes and store the results in the File kubeadm-init.out

mkdir $kubeadmfolder
touch $kubeadmfolder/kubeadm-config.yaml
printf \
'apiVersion: kubeadm.k8s.io/v1beta2
kind: ClusterConfiguration
kubernetesVersion: $k8sversionshort
controlPlaneEndpoint: "$k8smaster:6443"
networking:
  podSubnet: $podnet' \
| tee -a $kubeadmfolder/kubeadm-config.yaml

sudo kubeadm init --config=$kubeadmfolder/kubeadm-config.yaml --upload-certs | tee $kubeadmfolder/kubeadm-init.out

mkdir -p $HOME/.kube
sudo cp -i /etc/kubernetes/admin.conf $HOME/.kube/config
sudo chown $(id -u):$(id -g) $HOME/.kube/config
source /usr/share/bash-completion/bash_completion
echo 'source <(kubectl completion bash)' >>~/.bashrc
CLI/Management Setup
Now we will install Kubectl also on our Management Server
#!/bin/bash

#The Script will install Kubectl on the Management Server and download the .kube/config from Kubernetes Master

sudo apt-get update
sudo apt-get upgrade -y
curl -s https://packages.cloud.google.com/apt/doc/apt-key.gpg | sudo apt-key add
sudo touch /etc/apt/sources.list.d/kubernetes.list
sudo echo 'deb http://apt.kubernetes.io/  kubernetes-xenial  main' | sudo tee -a /etc/apt/sources.list.d/kubernetes.list
sudo apt-get update
sudo apt-get install -y kubectl=$k8sversion
sudo apt-mark hold kubectl
mkdir -p $HOME/.kube
scp $k8smaster:.kube/config $HOME/.kube/config
sudo chown $(id -u):$(id -g) $HOME/.kube/config
source /usr/share/bash-completion/bash_completion
echo 'source <(kubectl completion bash)' >>~/.bashrc
K8S Preparation
The Last Script will install the CNI, the Load Balancer and the NFS Provisioner
#!/bin/bash

#Install Antrea CNI
curl -o $k8sconfigfiles/antrea.yaml https://raw.githubusercontent.com/antrea-io/antrea/main/build/yamls/antrea.yml
kubectl apply -f $k8sconfigfiles/antrea.yaml

#Install LoadBalancer MetalB
kubectl create ns metallb-system
kubectl apply -f  https://raw.githubusercontent.com/danpaul81/napp_vapp/main/files/nappinstall/metallb.yaml
kubectl create secret generic -n metallb-system memberlist --from-literal=secretkey="$(openssl rand -base64 128)"
touch $k8sconfigfiles/metallb-configmap.yaml
printf \
'apiVersion: v1
kind: ConfigMap
metadata:
  namespace: metallb-system
  name: config
data:
  config: |
    address-pools:
    - name: default
      protocol: layer2
      addresses:
      - $ippool' \
| tee -a $k8sconfigfiles/metallb-configmap.yaml
kubectl apply -f $k8sconfigfiles/metallb-configmap.yaml

#Install NFS Provisioner
sudo snap install helm --classic
helm repo add nfs-subdir-external-provisioner https://kubernetes-sigs.github.io/nfs-subdir-external-provisioner
helm install nfs-subdir-external-provisioner nfs-subdir-external-provisioner/nfs-subdir-external-provisioner --set nfs.server=$nfs --set nfs.path=/$nfsfolder/$nfssubfolder --set storageClass.onDelete=true
- VCF9 NSX-Edge Setup – What has changed - 11. July 2025
- VCF NSX-Edge setup from a network perspective - 2. June 2025
- VCF Workload Domain Setup from a network perspective - 2. June 2025
Hi Daniel,
Thank you for sharing this procedure.
I have 2 questions:
– Why we need the NFS Server?
– Kub Node disk size is 1TB, is this a mandatory? and what if we are running a POC, it can be smaller?
Hello Mahmoud,
Regarding your Questions:
1. You need the NFS Server (can be also installed on the Worker or Master Node) because you need VolumeExpansion and this is not supported with local Storage. So I used the workaround with a simple NFS Server.
2. The Requirement from Kube Node Disk Size 1TB comes from the official NSX Documentation. In my Lab Ican see the usage is less than 100G so may you can try it also with a smaller disk, but I didn’t test it yet.
Regards
Daniel
Hi Daniel, im Rony, im from Brazil.
First of all I would like to congratulate you for the great post about NSX.
I have a question. When I run the k8smaster-setup.sh script, it throws me an error in podSubnet: when converting YAML to JSON.
Would you know the reason?
Hi Daniel, im Rony, im from Brazil.
First of all I would like to congratulate you for the great post about NSX.
I have a question. When I run the k8smaster-setup.sh script, it throws me an error in podSubnet: when converting YAML to JSON.
Would you know the reason?
We followed your instructions But we get “Server version v1.21.9 and client version v1.18.20 are incompatible. Please upload Kubernetes Tools to resolve”
I believe this might be due to 3.2.01. need to upload kubernets-tools-1.20 in VMware download, NSXT Intelligence
We followed your instructions But we get “Server version v1.21.9 and client version v1.18.20 are incompatible. Please upload Kubernetes Tools to resolve”
I believe this might be due to 3.2.01. need to upload kubernets-tools-1.20 in VMware download, NSXT Intelligence
Great stuff here and appreciate your dedication to this..
I tried everything above and ran into problems.
The error from NSX Manager states that the Server version 1.21.9 (this is the K8S cluster) and client ( the NSX-T Mgr) 1.18.20 are not compatible and you need to upload the newer Kubernetes tools from VMware.
So. The MGR needs to be updated to the 1.20 version, but if you are setting up a home lab here you won’ have access to the files on the VMware site. Even if you are a VMG user with the NSX-t license. I have reached out to VMUG, but not optimistic with the reply I received.. I have tried modifying your install script to install K*S 1.19.16 but that did not seem to work – complained about the K8S config as invalid..
Did you have to update your NSX-T Mgr with the 1.20 Kubernetes tools?? I have tried both the 3.20 and 3.20.1 Mgr appliances and same issue..
Thoughts???
Thanks again for your work.
Hi Daniel,
is it possible to use same upstream K8 Cluster (or TKG) for multiple NSX-T Clusters to deploy Application Platform? I mean, if you have multiple Workload Domains in VCF, each Domain running own NSX-T Management Cluster…
Is it enough to create namespace for each WLD, or not?
And why do we can`t use embeded Harbor (in case Tanzu on vSphere)? Because of Helm Carts or?
Thanks and best regards