


Before we start: Thanks to David Fidler for his in-depth SaltStack knowledge and Thomas Kopton for the heavy lifting of the MS SQL installation!
Aria Automation (aka vRealize Automation) is a comprehensive automation solution that can deliver full application stacks with a desired state templating model. It has various integrations e.g. with vCenter, NSX and external tools and consists of 2 major components.
- Aria Automation – core component for blueprinting, self-service and integrations
- Aria Automation Config (aka SaltStack and here referred as SaltStack) – configuration management module for OS-based config management and application provisioning
Combining all components provides the capability to define a comprehensive application stack. Customers with an Aria Automation license can automatically benefit from Aria Automation Config (SaltStack) for application and configuration management.
In this blog I will explain how such a comprehensive stack based on a specific example can be built. The goal is that the blueprint (cloud template) is defined and created as pre-work which allows for fully automated provisioning by clicking just 1 button. Once the solution has been deployed, Aria Automation further allows for day-2 management to implement user-defined adaptions as part of managing the environment.
I will not cover the setup of the individual solutions. Please refer to official documentation how installation and configuration of Aria Automation, NSX and the Config (SaltStack) components is performed.
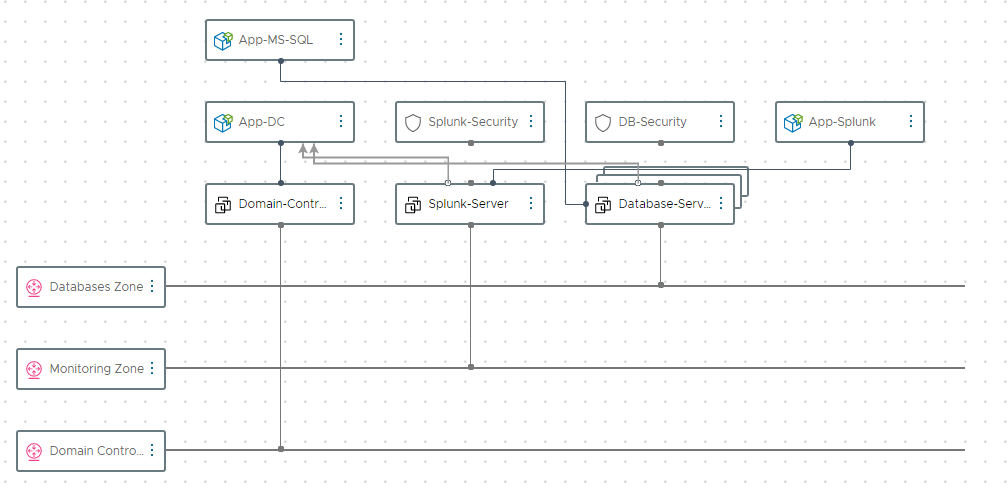
Description of the 3-tier application stack
For this example, we will use an application stack that consists of following components:
- Active Directory Server – based on Windows 2019 VM
- Database Server – based on Windows 2019 VM with MS SQL Express 2019
- Monitoring Server – based on Windows 2019 VM with Splunk Enterprise
All 3 service will be deployed in separate dynamic networks created automatically on provisioning. In addition, there is security groups added to the Database servers as well as the monitoring server to demonstrate controlled and secured access to these services. The base OS provisioning is done by Aria Automation using a vSphere template. Application installation and configuration is delivered by SaltStack using the integration into Aria Automation.
Used components and their tasks:
| Aria Automation | Blueprinting (Cloud Templates) Base OS provisioning by vSphere Templates Scaling resources |
| Aria Automation Config (SaltStack) | Configuration of Active Directory Controller Installation of MS SQL Express 2019 Installation of Splunk Enterprise |
| NSX | Provisioning of on-demand networks Provisioning and management of security groups |
Please note that this is an example configuration that can be tailored in all directions. For example, we will be using a security group that prevents RDP communication for ease of demonstration. Any other desired security principle can be easily implemented by adjusting the relevant parameters.
Pre-requisites
I will not go into the details how to set up the infrastructure. Please refer to the official Aria Automation documentation how to do this.
In a nutshell following configurations need to present:
- Make sure your management servers and deployed VMs have access to internet. In case you have an air-gapped environment or a proxy-based internet connection there are multiple ways to support that. As I am not covering details about that in this blog it’s highly recommended to provide a non-proxied internet connection.
- Aria Automation installed (min version needed is 8.10 while in this demo 8.11.1 has been used)
- Aria Automation Config (SaltStack) installed (version should align to Aria Automation)
- NSX-T installed (refer to product interop matrix, in this case version 3.1.3 is used)
- Creation of T0 router on NSX and configuring of routing for on-demand networks
- Integration of NSX with Aria Automation and creation of an on-demand network profile
- Integration of SaltStack with Aria Automation
- Windows Template on vSphere (Windows 2019) that allows for static IP provisioning
- Make sure you can deploy a Windows VM inkl. SaltStack canvas object from Aria Automation. The salt minion needs to be automatically provisioned as part of this process.
NSX Configuration
In this example I am using on-demand routed networks for NSX separating each tier into a different network zone. For transparent communication it’s required that your network setup is propagating the routes appropriately. If you don’t mind about this way of network separation you can also leverage existing networks or use a NAT configuration (on-demand outgoing). You’ll need to modify the cloud template in this case.
In addition, security groups are leveraged to limit access to the provisioned services. Those are dynamically created based on the cloud template definition. For demo purposes you might want to make sure that the provisioned services are reachable from your demo network. Therefore, it’s important to decide on the right network type depending on what you want to achieve. Find some demo use cases in the bottom of this blog post.
See an example here for the security rules configuration of the DB server. It allows access for the MS SQL port 1433 and WinRM (for remote configuration), but denies all other incoming traffic incl. RDP (which is a separate rule that can be modified on demand).
  DB-Security:
    type: Cloud.SecurityGroup
    properties:
      securityGroupType: new
      rules:
        - name: Allow-Splunk-Traffic
          source: 0.0.0.0/0
          ports: 1433
          protocol: TCP
          direction: inbound
          access: Allow
        - name: Block-RDP-Traffic
          source: 0.0.0.0/0
          ports: 3389
          protocol: TCP
          direction: inbound
          access: Deny
        - name: Allow-WinRM-Traffic
          source: 0.0.0.0/0
          ports: 445
          protocol: TCP
          direction: inbound
          access: Allow
        - name: Block-all-incoming
          source: 0.0.0.0/0
          ports: all
          direction: inbound
          access: Deny
SaltStack configuration for Domain Controller setup
There are multiple ways to install and configure Active Directory using automated processes and silent installations. In this blog I used the classic dcpromo approach for the sake of the demo. If there’s desire to use another way, the process might look similar and just needs to be adjusted.
For dcpromo an answer file is needed. This file will automatically be generated using SaltStack. For installing Active Directory, 3 parameters are required as a minimum:
- Name of new domain
- NetBIOS name of new domain
- Admin password for safe mode
SaltStack supports two ways of storing dynamic data:
- pillar – is stored on the master and not specific to minions
- grain – is stored on the minion and specific to minion configuration
I decided to let the consumer define the first 2 parameters for the actual deployment which are stored in a pillar. The safemode admin password will be stored as a fixed value in a SaltStack pillar as it needs to be encrypted.
Input parameters in Cloud Template
inputs:
  ad-domain:
    type: string
    title: New AD Domain
  ad-netbiosdomain:
    type: string
    title: New AD NetBIOS Domain
Encryption of default-password and store as pillar data
Pillar data by default is not encrypted. When using input parameters in Aria Automation for pillar values to be handed over to SaltStack, encrypted values cannot be passed over. As a password represents sensitive data we need to encrypt the value on SaltStack itself. The process how to do that using a salt renderer is described more comprehensively here. Assuming you are using the SaltStack appliance (rather than a binary installation) following steps are required to suffice our use case:
Create gpg keys
gpg --gen-key --homedir /etc/salt/gpgkeys
Confirm by typing “O”.
In the following screen you will be asked for a passphrase. Make sure you keep it empty and confirm that “Yes, protection is not needed”. The system will ask you twice.

Export your gpg keys and import the public key into the public keyring
gpg --homedir /etc/salt/gpgkeys --export-secret-keys --armor > exported_private.key
gpg --homedir /etc/salt/gpgkeys --armor --export > /etc/salt/gpgkeys/exported_pubkey.gpg
gpg --import /etc/salt/gpgkeys/exported_pubkey.gpg
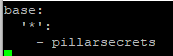
Create an encrypted string for your secret where “supersecret” is your string to encrypt and “vrassc-pillarkey” is the real name of the key entered before.
echo -n "supersecret" | gpg --armor --batch --trust-model always --encrypt -r "vrassc-pillarkey"Copy the encrypted string (inkl. BEGIN and END lines) and store it as pillar. For this you must create 2 files. The top.sls file will be executed primarily and defines which pillar definitions do apply for which minions. In this case we will be applying the pillar config to all minions.
/srv/pillar/top.sls
/srv/pillar/pillarsecrets.sls
Make sure that you are using indentations for the encrypted value (add 2 spaces in front of each line).
To refresh the pillars for the related minion you can run this command:
salt '<minion>' saltutil.refresh_pillarTo test your configuration, you can request pillar items which should show the decrypted value:
salt '<minion>' pillar.itemsState/config files for domain controller
Setup of a domain controller using dcpromo requires 2 steps:
- Creation of an answer file
- Execution of dcpromo command
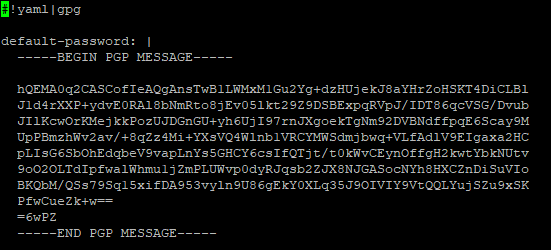
SaltStack will handle both. For the answer file a template file must be created and stored on the SaltStack file server. Find here the content of the file honoring dynamic parameters coming from pillars:
{% set addomain = salt['pillar.get']('addomain') -%}
{% set adnetbiosdomain = salt['pillar.get']('adnetbiosdomain') -%}
{% set adsafepassword = salt['pillar.get']('default-password') -%}

[DCINSTALL]

InstallDNS=yes
NewDomain=forest
NewDomainDNSName={{addomain}}
DomainNetBiosName={{adnetbiosdomain}}
SiteName=Default-First-Site-Name
ReplicaOrNewDomain=domain
ForestLevel=3
DomainLevel=3
DatabasePath="%systemroot%\NTDS"
LogPath="%systemroot%\NTDS"
RebootOnCompletion=no
SYSVOLPath="%systemroot%\SYSVOL"
SafeModeAdminPassword={{adsafepassword}}
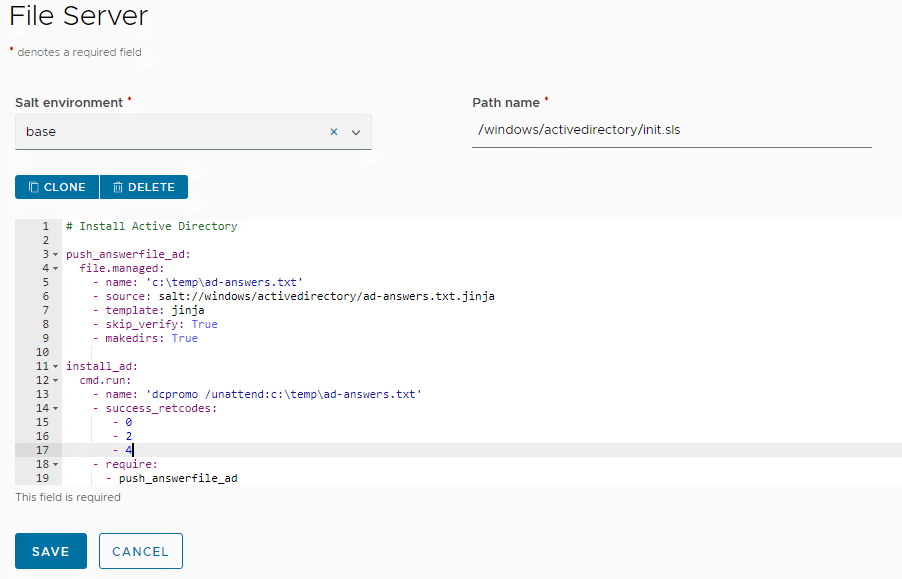
Make sure you store it in the appropriate path as shown in this screenshot. This path is referenced from the Aria Automation cloud template.
The actual dcpromo command is invoked by a separate state file.
push_answerfile_ad:
  file.managed:
    - name: 'c:\temp\ad-answers.txt'
    - source: salt://windows/activedirectory/ad-answers.txt.jinja
    - template: jinja
    - skip_verify: True
    - makedirs: True

install_ad:
  cmd.run:
    - name: 'dcpromo /unattend:c:\temp\ad-answers.txt'
    - success_retcodes:
       - 0
       - 2
       - 4
    - require:
      - push_answerfile_ad
Make sure you store it on the file server as per screenshot:
SaltStack configuration for Splunk Enterprise setup
Input parameters in cloud template
inputs:
  splunk-version:
    type: string
    title: Splunk Version
    default: 9.0.4.0
    enum:
      - 9.0.4.0
      - 8.2.9.0
  splunk-username:
    type: string
    title: Splunk Admin User
    default: splunkadmin
Windows Package Manager installation
Splunk Enterprise is a classic Windows application installed by an msi installer. While SaltStack could just run the required command, there’s some more intelligence in the product to implement a desired state model. This provides the advantage that not just a command is executed for installation, furthermore it will allow uninstall and upgrade install. You define the different splunk installer versions in a metadata file and SaltStack handles them like how package managers as yum are handled in linux systems.
The way to build this capability is by using the SaltStack Windows Package Manager winrepo functionality.
Enabling winrepo on SaltStack
To enable winrepo only a single command must be executed on the SaltStack appliance:
salt-run winrepo.update_git_reposAfter execution you will see that a file structure /srv/salt/win/repo-ng/salt-winrepo-ng has been created.
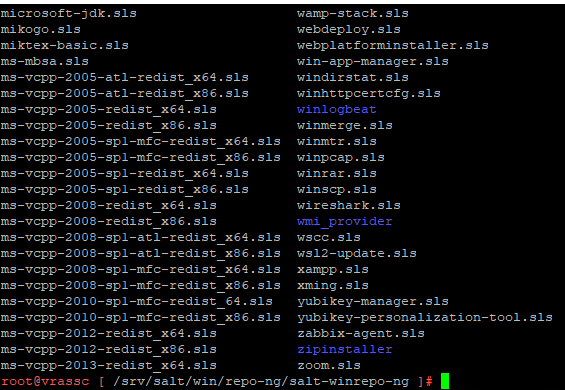
Feel free to walk through some of the existing configuration files e.g. for firefox or mongodb to better understand how these metadata files are structured. In our case we will create a custom file that is tailored for our Splunk installation. For this we will create a separate directory structure in the repo-ng tree. As the SaltStack server can be used as file server to support the installation procedure, we will store the Splunk Enterprise installation binaries in appropriate sub directories.
For this create the sub directories as per below screenshot, download the Splunk Enterprise msi files from the splunk web page (you must register for a trial) and put them in the related directories.

The init.sls file contains the metadata required for the splunk installation.
splunk:
  '9.0.4.0':
    full_name: 'Splunk Enterprise'
    installer: 'salt://win/repo-ng/custom-repo/splunk/splunk_x64_9.0.4.0/splunk-9.0.4-de405f4a7979-x64-release.msi'
    install_flags: AGREETOLICENSE=Yes
    uninstaller: 'salt://win/repo-ng/custom-repo/splunk/splunk_x64_9.0.4.0/splunk-9.0.4-de405f4a7979-x64-release.msi'
    uninstall_flags: '/qn /norestart'
    msiexec: True
    locale: en_US
    reboot: False
  '8.2.9.0':
    full_name: 'Splunk Enterprise'
    installer: 'salt://win/repo-ng/custom-repo/splunk/splunk_x64_8.2.9.0/splunk-8.2.9-4a20fb65aa78-x64-release.msi'
    install_flags: AGREETOLICENSE=Yes
    uninstaller: 'salt://win/repo-ng/custom-repo/splunk/splunk_x64_8.2.9.0/splunk-8.2.9-4a20fb65aa78-x64-release.msi'
    uninstall_flags: '/qn /norestart'
    msiexec: True
    locale: en_US
    reboot: False
Make sure that the folders and file names presented in this file match your actual installation.
After any change to the repo configuration the winrepo db must be updated on the minions if there are existing minions:
salt '*' pkg.refresh_dbIf everything has been configured successfully you can try listing the available versions through one windows minion server:
salt '<server>' pkg.list_available splunkYou should receive an output like this:

State file for Splunk Enterprise
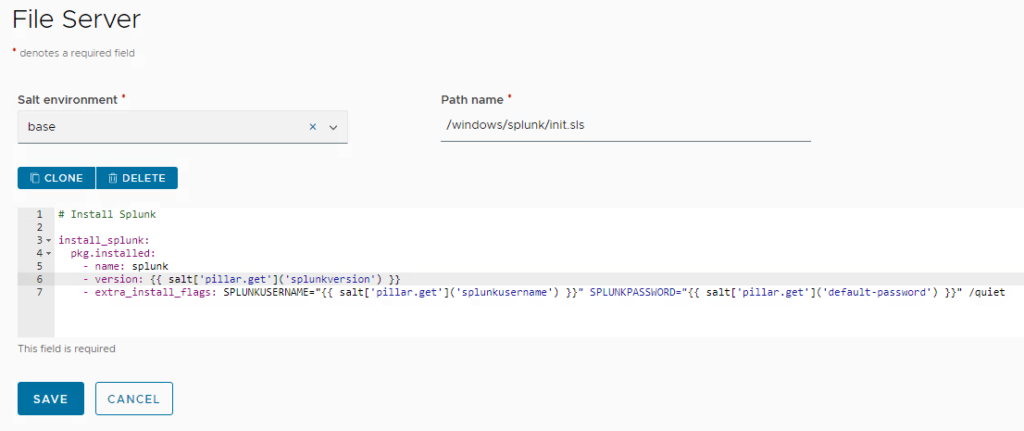
After the custom repo incl. metadata file and installation sources has been configured, the acutal state file for the Splunk Enterprise installation must be created on the SaltStack file server:
# Install Splunk

install_splunk:
  pkg.installed:
    - name: splunk
    - version: {{ salt['pillar.get']('splunkversion') }}
    - extra_install_flags: SPLUNKUSERNAME="{{ salt['pillar.get']('splunkusername') }}" SPLUNKPASSWORD="{{ salt['pillar.get']('default-password') }}" /quiet
Make sure it’s installed in the appropriate directory and environment:
SaltStack configuration for MS SQL setup
For MS SQL setup I have been using imperative commands to also demonstrate this capability. It will not use Windows Package Manager in this example. However, this will be possible as well.
As preparation, the MS SQL 2019 x64 express binaries must be downloaded and stored on the salt-master for consumption by the state files.
Please put the exe file in the directory /srv/salt/installation-files (need to be created). You see its reference in the state file below. Make sure you exactly match the path and file name or modify the state file to your needs.
In addition, the installer requires a configuration file (ConfigurationFile.ini) which must be put into the same folder.
Make sure you put the state file on the file server as per screenshot:
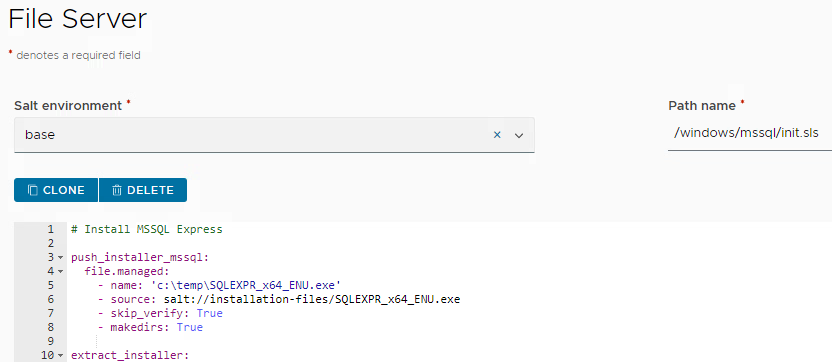
init.sls for MS SQL Express 2019
# Install MSSQL Express

push_installer_mssql:
  file.managed:
    - name: 'c:\temp\SQLEXPR_x64_ENU.exe'
    - source: salt://installation-files/SQLEXPR_x64_ENU.exe
    - skip_verify: True
    - makedirs: True

extract_installer:
  cmd.run:
    - name: 'c:\temp\SQLEXPR_x64_ENU.exe /q /x:C:\temp\SQLEXPR_2019'
    - require:
      - push_installer_mssql

push_config_file:
  file.managed:
    - name: 'C:\temp\SQLEXPR_2019\ConfigurationFile.ini'
    - source: salt://installation-files/ConfigurationFile.ini
    - skip_verify: True
    - require:
      - extract_installer

install_mssql:
  cmd.run:
    - name: 'c:\temp\SQLEXPR_2019\SETUP.EXE /ConfigurationFile=c:\temp\SQLEXPR_2019\ConfigurationFile.ini'
    - require:
      - push_config_file

MSSQLSQLEXPRESS_running:
  service.running:
    - name: 'MSSQL$SQLEXPRESS'
    - enable: True
    - require:
      - install_mssql

unset_ports_1:
  reg.absent:
    - name: 'HKLM\SOFTWARE\microsoft\microsoft sql server\MSSQL15.SQLEXPRESS\mssqlserver\supersocketnetlib\tcp\ipall'
    - vname: 'tcpdynamicports'
    - require:
      - MSSQLSQLEXPRESS_running

unset_ports_2:
  reg.absent:
    - name: 'HKLM\SOFTWARE\microsoft\microsoft sql server\MSSQL15.SQLEXPRESS\mssqlserver\supersocketnetlib\tcp\ipall'
    - vname: 'tcpport'
    - require:
      - unset_ports_1

set_ports_1:
  reg.present:
    - name: 'HKLM\SOFTWARE\microsoft\microsoft sql server\MSSQL15.SQLEXPRESS\mssqlserver\supersocketnetlib\tcp\ipall'
    - vname: 'tcpdynamicports'
    - vdata: ''
    - require:
      - unset_ports_1
      - unset_ports_2

set_ports_2:
  reg.present:
    - name: 'HKLM\SOFTWARE\microsoft\microsoft sql server\MSSQL15.SQLEXPRESS\mssqlserver\supersocketnetlib\tcp\ipall'
    - vname: 'tcpport'
    - vdata: '1433'
    - require:
      - unset_ports_1
      - unset_ports_2

open_sql_port_tcp:
  win_firewall.add_rule:
    - name: MSSQL (1433)
    - localport: 1433
    - protocol: tcp
    - action: allow
    - require:
      - set_ports_1
      - set_ports_2

open_sql_port_udp:
  win_firewall.add_rule:
    - name: MSSQL Browser (1434)
    - localport: 1434
    - protocol: udp
    - action: allow
    - require:
      - set_ports_1
      - set_ports_2

MSSQLSQLEXPRESS_stop:
  service.dead:
    - name: 'MSSQL$SQLEXPRESS'

MSSQLSQLEXPRESS_start:
  service.running:
    - name: 'MSSQL$SQLEXPRESS'
    - enable: True
    - reload: True
    - require:
      - MSSQLSQLEXPRESS_stop
      - open_sql_port_tcp
      - open_sql_port_udp
Bringing it all together in Aria Automation
Create secret for Windows Administrator password
First create a secret for the Windows Administrator password of your template. As this is a security-critical parameter we’d like to store it as secret and reference it from the Cloud Template. Use the name “win-vm-administrator” for the secret as this is used in my Cloud Template.

Aria Automation cloud template
If all previous steps have been performed as described, you only need the full Aria Automation cloud template . Just import it into Aria Automation, create a version and release it for Service Broker consumption. Be aware that the canvas designer checks some parameters. If any of the steps before has been missed, you will likely see errors.
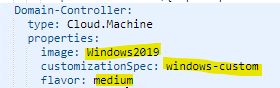
In any case you need to tailor the cloud template to your image mapping configuration as I have been using an image mapping called “Windows 2019”. Also, I decided to use a defined customization spec which needs to be created before in vCenter. I have been facing some issues without that. The customization spec does not require a specific configuration related to the use case. You can use my file and tailor it to your purpose.
All 3 VM-Services (Domain-Controller, Splunk-Server, Database-Server) need to be adapted to your environment.
Once the template test is successful you must create a version of it and create a content source in Service Broker. If the content source is already available, open it up and import the content again so that the new cloud template and/or version shows up in the catalog.
Service Broker custom form
The form coming from the cloud template input variables will work without having any custom form configuration. However, from a usability perspective it just makes sense to improve user experience by adding a custom form. You can download my custom form yaml, import it and modify it to your purpose. When having imported the custom form, you should see a service looking like this:

It has multiple tabs – one for each tier app to demonstrate different use cases.
- Domain Controller
- Specify domain name and NetBIOS domain name
- Database Servers
- Specify number of database servers and allow for scaling as day-2
- Splunk Server
- Specify Splunk Enterprise version to install and admin username for first logon

Depending on your performance of the environment a deployment will take 30 to 45 minutes. Be aware that the cloud template has dependencies defined where the Database and Splunk servers will only start provisioning after the Domain-Controller has been deployed successfully.
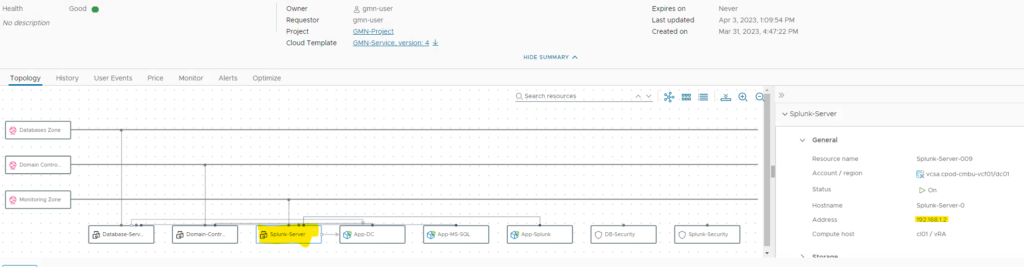
After successful deployment you can retrieve the IP address of the Splunk server from the deployment details and connect to it through http://<ip-address>:8000. You can log in with the username defined during provisioning (by default splunkuser) and the default-password that has been encrypted as pillar in a previous step.
Day-2 actions and lifecycle management
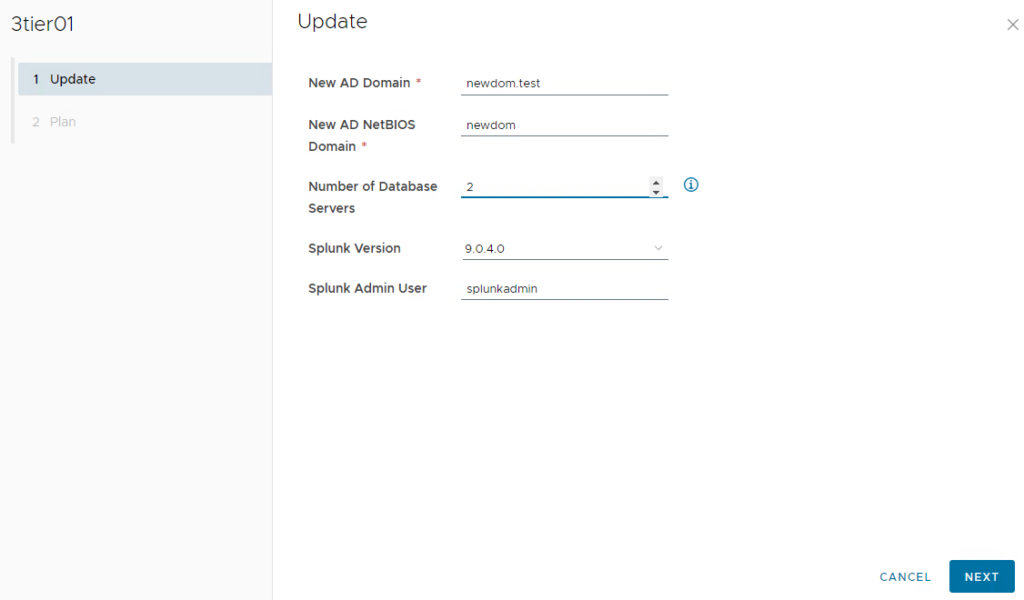
Scaling MS SQL servers
When requesting the whole service, for SQL database servers users can specify the number of instances that are provisioned. It might however be that users do not know initially how many servers they need and must scale in a later step. Aria Automation provides the capability to scale services as day-2 operation. This can be demonstrated by this cloud template as well. When user executes the “update” day-2 action on the deployment, he can tailor the original input parameters. In case he only changes database servers from 1 to 2, the system will automatically understand that this is a scale operation and subsequently it will deploy a second database server with same parameters.

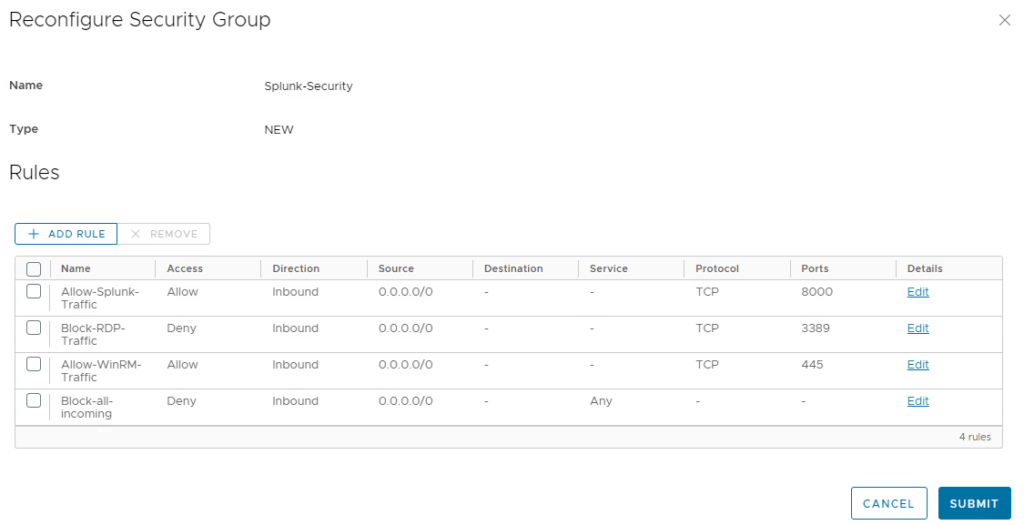
Managing Security Groups
As you might have noticed there is default security groups configured in the cloud template:
- Database server: port 1433 allowed, RDP and other communication disabled
- Splunk server: Port 8000 allowed, RDP and other communication disabled
This is controlled by NSX security groups which are automatically configured during deployment. As it’s done on a NSX level, it’s completely independent to the guest OS and users can’t override this by OS settings.
As part of the self-service, users might want to change the firewall rules after the deployment. This could be to allow temporary administrative access through RDP or to limit access to the service to only few ip addresses. Aria Automation offers an action “Reconfigure” on the security group object which can be used for that.

When executing the action, the user is presented with the configured security rules and can modify/add/delete them. Once this is done, Aria Automation reconfigures the security group to meet the new requirements. For demo purposes you can enable RDP access and subsequently show that RDP is now working which has not been the case before.
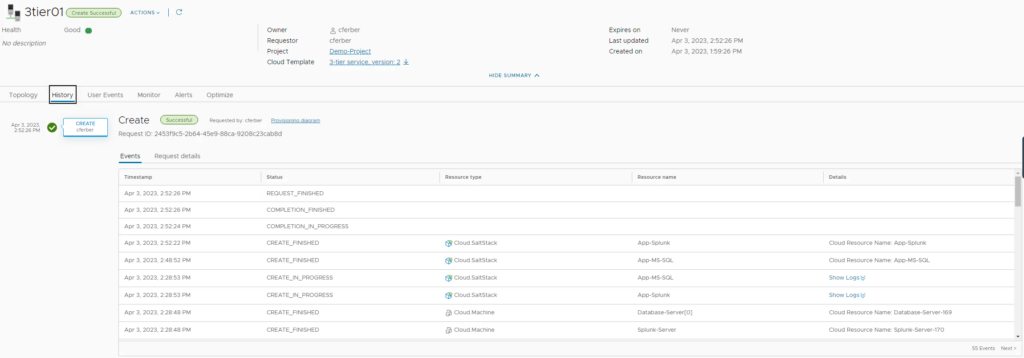
Monitoring activities in Aria Automation / SaltStack
Aria Automation shows a process history for the whole deployment. You can determine which tasks have been executed in sequence and you will see the status during deployment.
From an application perspective, SaltStack will show all details of the application installation and configuration steps. This allows customers to split responsibilities for infrastructure and applications. It also provides a lot of options to do day-2 configuration management for guest operating systems.

Have fun!

- 1-node Kubernetes Template for CentOS Stream 9 in VCF Automation - 30. September 2024
- Aria Automation custom resources with dynamic types - 9. August 2024
- Database-as-a-Service with Data Services Manager and Aria Automation - 4. July 2024