


VMware Aria Guardrails is a central policy management system with desired state principle and primary focus on public clouds. It consists of several templates that easily can be used by the admin to apply his desired policy on public clouds. One of the templates is for AWS IAM management to define the password policy (like password age, expiry, complexity required). While Guardrails provides an intuitive UI to use and apply a policy, it does not include of a self-service catalog as of today. Customers might want to offer such service in their existing portal based on Aria Automation. Consumers could enable the policy for permanent enforcement or they might want to just apply it once and re-run that infrequently.
Guardrails provides rich API capabilities using the modern GraphQl API language. By leveraging that capability it’s possible to expose a service like IAM password policy in Aria Automation.
This blog will cover how this can be done.
Preparation on Guardrails
Elevated Permissions
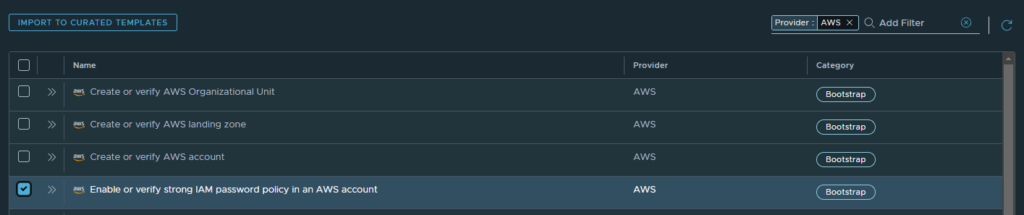
This use case relates to IAM password policy management. Looking at the library and available templates you should find a template named “Enable or verify strong IAM password policy in an AWS account”. You must import this into your curated template store to be able to apply it to the respective accounts.
Get Guardrails template ID
For further processing in the workflows, the ID of the template is required. The easiest way to get it is to open the template in Guardrails and retrieve it from the URL.

Note it down – we’ll need it in a later step.
Get Guardrails API key
The process we are using will make use of the GraphQL API of Guardrails to execute respective commands. We therefore need API access through an appropriate access key.
Navigate to your account settings in the cloud service portal (right top when clicking on your name). Go to “identity & access management” and navigate to the “API Tokens” tab. Give it a name and configure “Guardrails Admin” permissions.
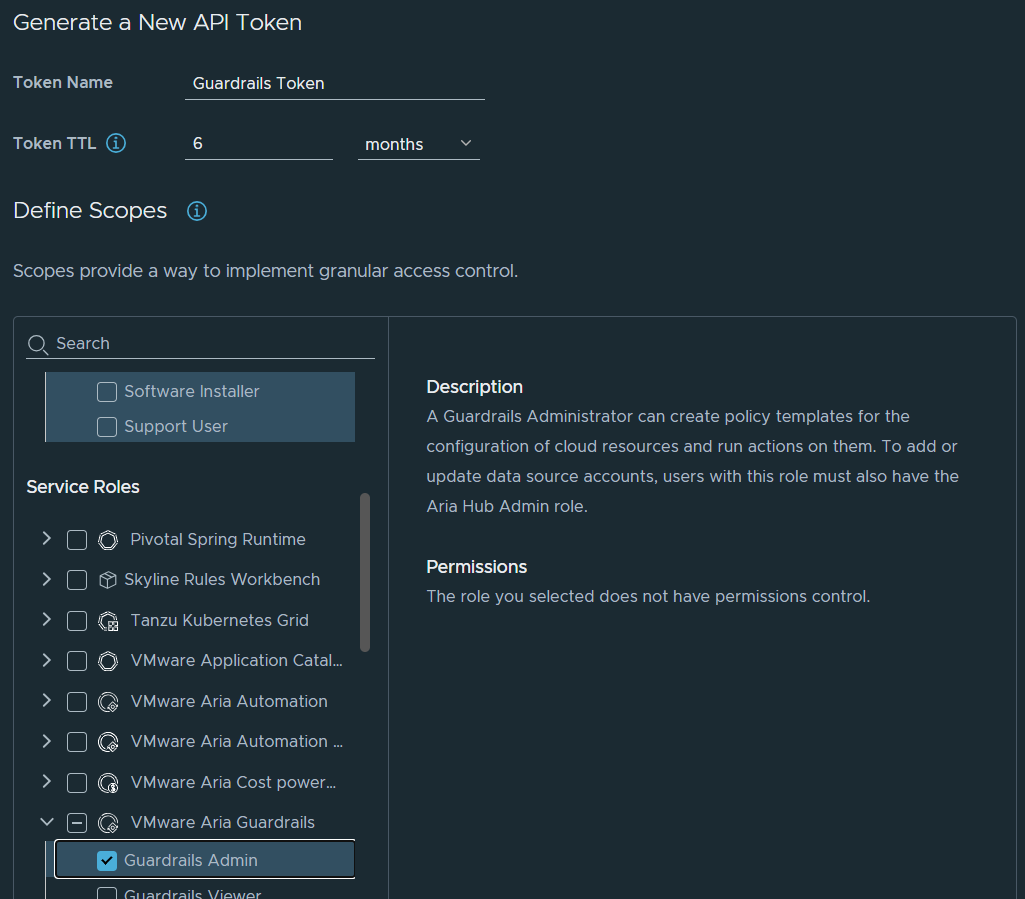
Once the token is generated, store it somewhere as we need it later. Please note that the token is only visible once for copying it. Afterwards there’s no way to retrieve it again.
Configuration of Aria Automation Orchestrator
Import Orchestrator package
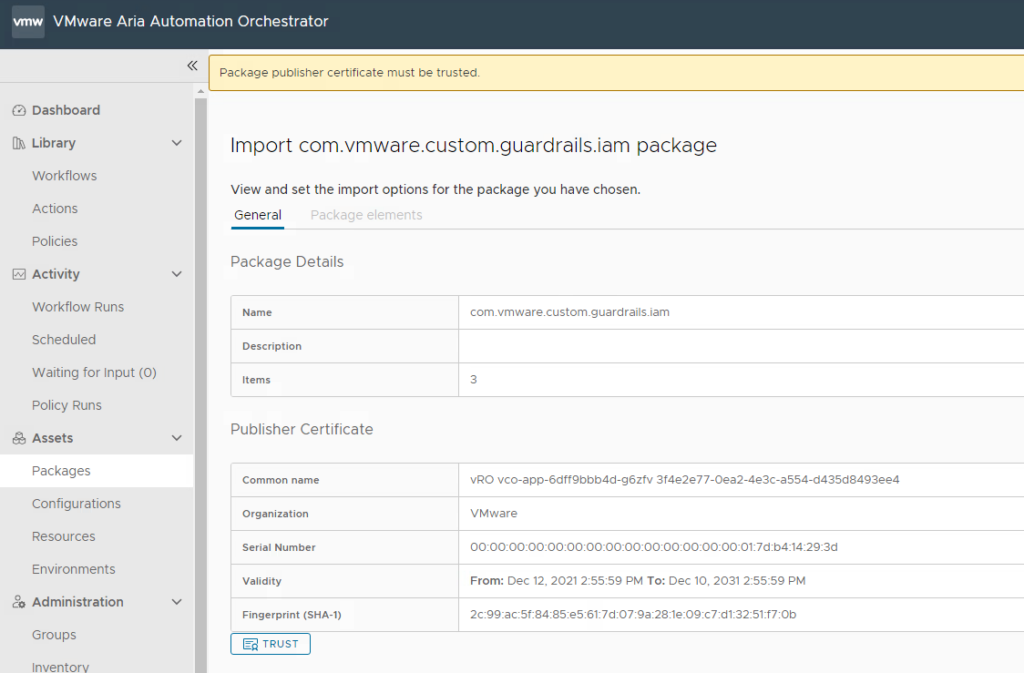
As next step you must download the Orchestrator package and import it into Aria Automation Orchestrator. For this you must trust the certificate presented. The package contains a workflow “AWS IAM Password Policy” as well as an Environment “python 310” to provide the python dependencies. Verify that both components exist after the import. There’s another workflow “Create AWS account” in this package which is only provided for reference and not actively used in this use case. All workflows use python as scripting language that executes tasks against the GraphQL API of Aria Guardrails/Hub.
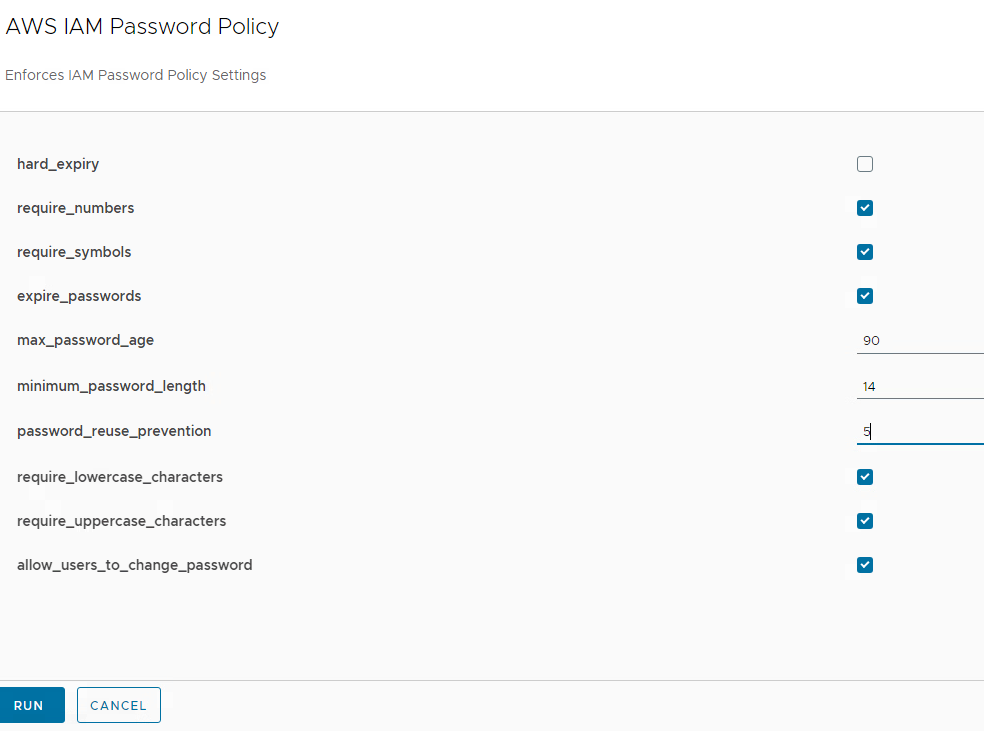
Provide your environment data
The “AWS IAM Password Policy” workflow has several variables which are used in the related scripts.
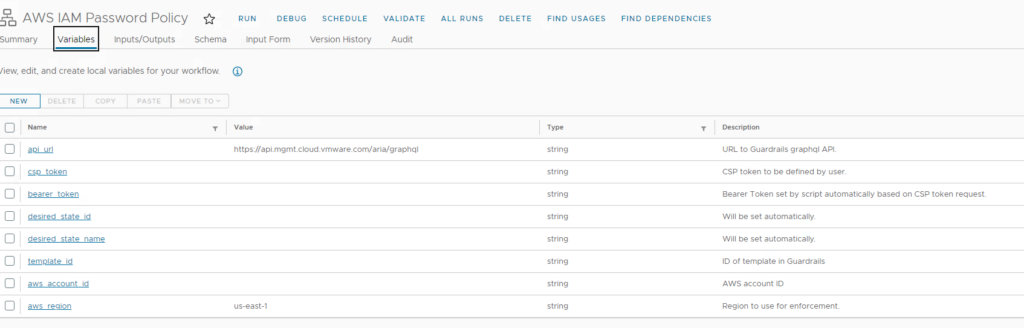
There are at least 3 variables that need to be populated based on your environment. We captured them already in the previous steps:
- csp_token: The api token string created before for your account
- template_id: The Aria Guardrails template ID of the “Enable or verify strong IAM password policy in an AWS account” template
- aws_account_id: The ID of your AWS account.
The region information should not be relevant as it’s a global setting which will be changed. It’s there in case region-specific changes are done.
Testing the workflow
Once all parameters have been provided, the workflow should execute properly. To test this, we open the AWS console and navigate to IAM à account settings screen. You will see what has been configured on AWS so far.
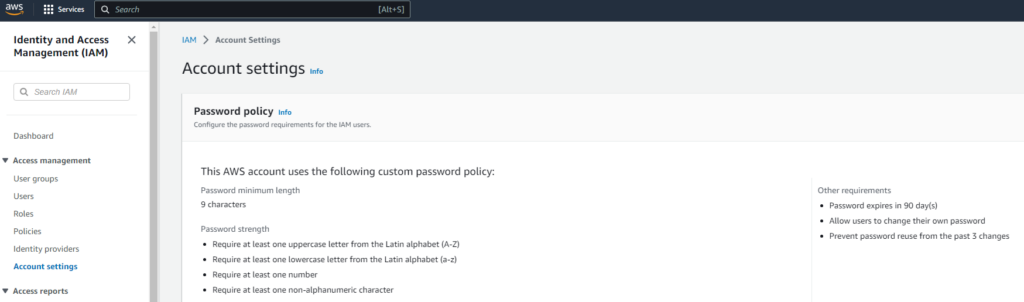
In this case e.g. the “prevent password reuse from the past 3 changes” is configured to “3”. We will modify this value on workflow execution. To do this you must run the workflow from Aria Automation Orchestrator and provide the right parameters to change.
After execution you will see that the AWS value has been changed to “5”.
In addition, you can check Aria Guardrails if the enforcement policy has been created properly. You find it when you open the template mentioned above and navigate to the “desired state” tab.

On each execution of the workflow a desired state will be created which is named by the template + “by Aria Automation” postfix. You will also notice that the desired state has been set to “inactive” by the workflow. The reason for this is that the desired state will by default be active permanently. So, if you change the AWS setting back to another value manually, it will automatically be reverted latest overnight. While this might be desired for some use cases, it’s hard to control in a demo environment. Due to that we execute the desired state once and set it to “inactive” afterwards. You always can run the desired state manually. In case you use the workflow, a new desired state is generated and the old ones can be removed or kept for reference.
Integration with Aria Automation
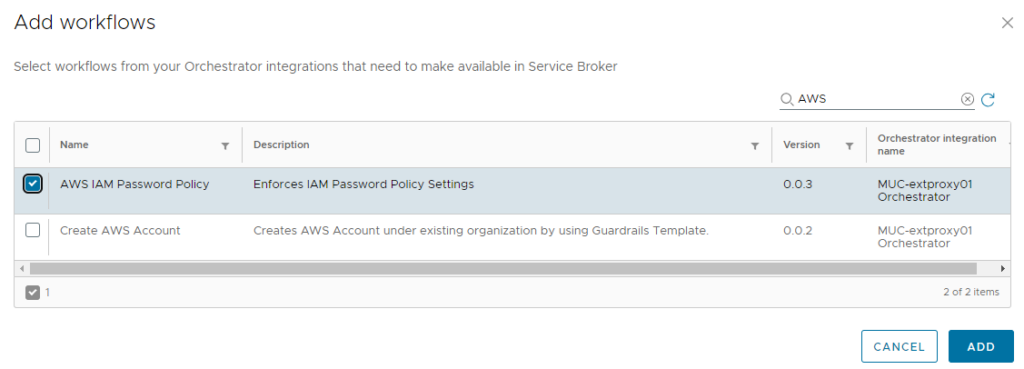
Aria Automation has the capability to integrate an Aria Automation Orchestrator workflow in its Service Broker. Find here a description how to configure the integration.
Once the integration is configured and a content source of type “Orchestrator” is being added, you must select the mentioned workflow in the Content Source Details screen of Service Broker.
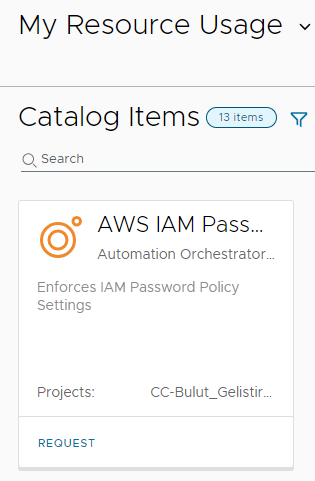
If the content source is shared through a sharing policy, the item appears on the catalogue screen.
With this it’s already functional, however the single request fields might not be as descriptive as needed. To optimize user experience, you can add a custom form and a custom item icon. There is a pre-configured custom form available which you can easily download and import into the catalog item (content & policies à content à select “customize form” on catalog item à actions à import form à select the downloaded yaml).
It should look like this once the import has finished:
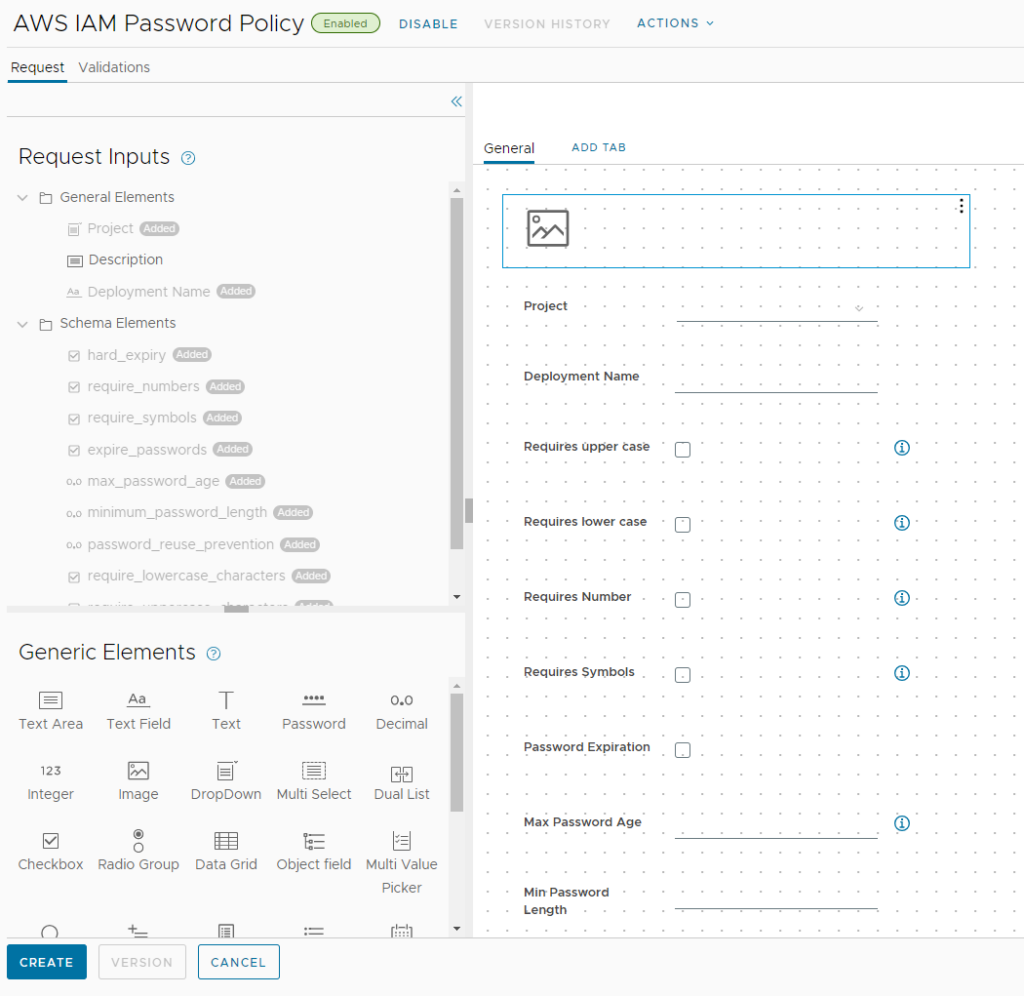
There is an image field on top which is empty after the import. Feel free to add an URL to your desired image to display in the catalogue form.
Don’t forget to enable the custom form and save it.
The final request form could look like this:
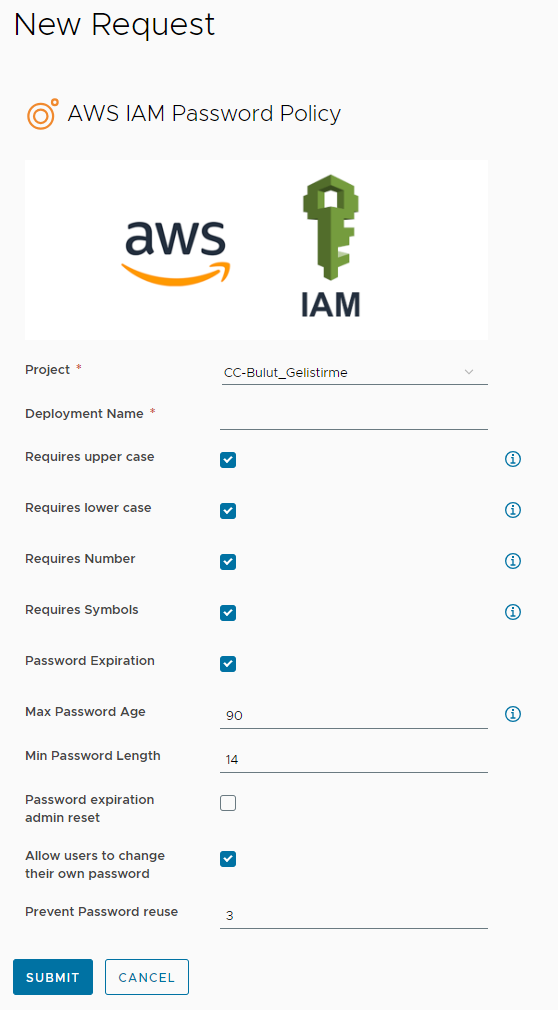
As you can see in the request form, the custom form adds field names which are self-explanatory. Also, it contains help icons for more in-dept explanations.
You can now test the catalogue item. The result will be the same as running as Orchestrator workflow directly. You just must specify a deployment name which has no impact on the actual task that is executed. Once the deployment has finished, it will appear under the “deployments” view. A removal of the deployment will not have any impact. Certainly, one could add more logic to e.g. remove the Guardrails policy when the deployment is deleted from Aria Automation.
Have fun!

- 1-node Kubernetes Template for CentOS Stream 9 in VCF Automation - 30. September 2024
- Aria Automation custom resources with dynamic types - 9. August 2024
- Database-as-a-Service with Data Services Manager and Aria Automation - 4. July 2024