


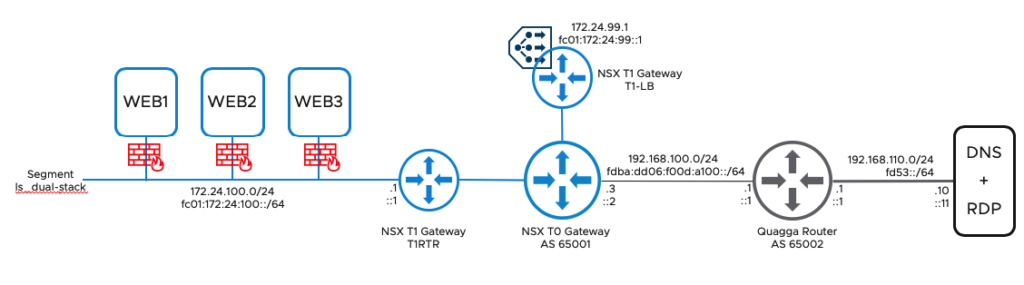
In this Blog I will explain how to configure Dual Stack with IPv4 and IPv6 in NSX-T 3.0 (Policy API). Additional I will enable DHCP for IPv4, SLAAC (Stateless Address Autoconfiguration) for IPv6 and NSX Loadbalancing for IPv4 and IPv6.
Prerequisite
Before you can start, the following prerequisites must be meet:
- NSX 3.0 is installed
- T0 Router and T1 Router with IPv4 is configured and connected to an external Router via BGP. (There are a lot of blogs available, how to configure NSX for IPv4)
- T1 Router for Load Balancing is configured and connected to the NSX-Edge. (You can find a Step by Step guide for Load Balancing in my previous Blog: Creating a L7 Web Loadbalancer in NSX for HTTP and HTTPS)
- You have at least one Linux VM available (I am using Ubuntu 20.04 Server with Apache)
Configuration Steps
- Enable IPv6
- Create a ND Profile for SLAAC
- Enable IPv6 between T0 Gateway and External Router
- Modify T1 Router
- Create a DHCP Profile for IPv4
- Create a new Segment
- Enable DHCPv4
- Testing IPv4 and IPv6
- Create an IPv4/IPv6 Load Balancer
Enable IPv6
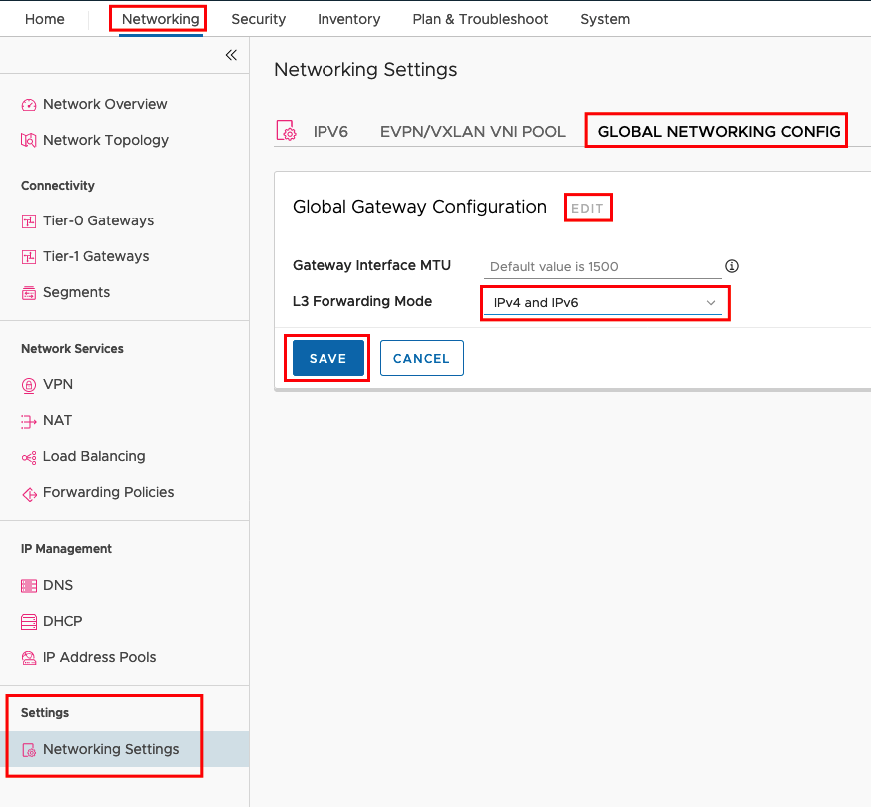
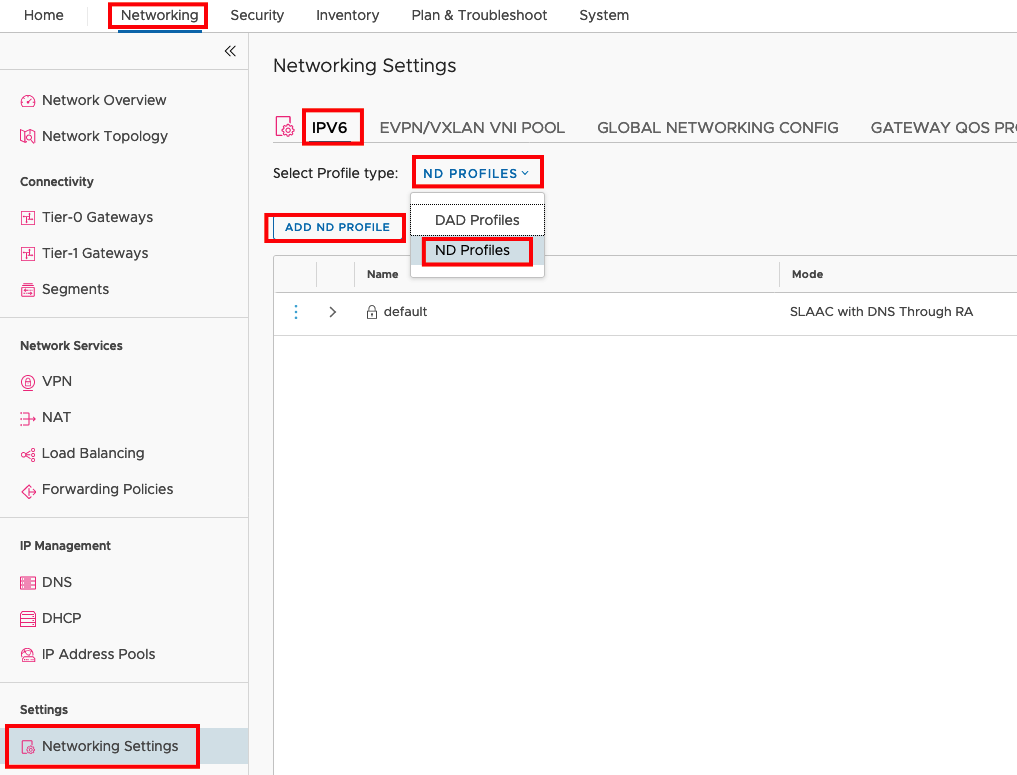
In the default configuration from NSX IPv6 is disabled and must be enabled first. You can enable IPv4 and IPv6 under Networking -> Settings -> Networking Settings -> GLOBAL NETWORKING CONFIG -> EDIT
Enable IPv6 between T0 Gateway and External Router
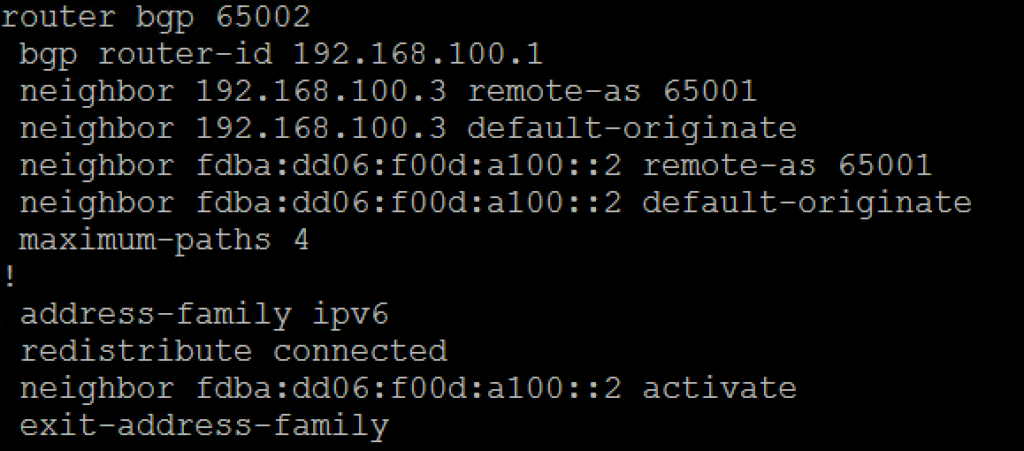
The external Router is configured with IPv4/IPv6 and BGP is enabled.
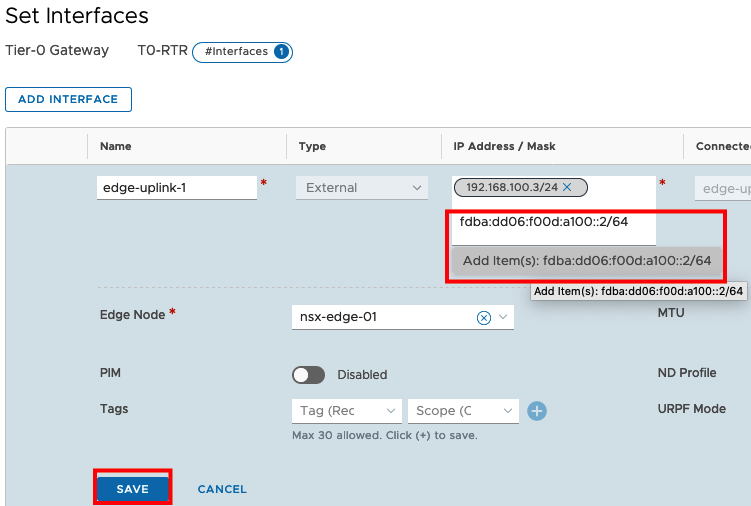
IPv4 and BGP is also configured on the T0 Gateway in NSX and the connections is established. Now we can configure an IPv6 Interface on the T0 gateway and connect it to the external Router. Go to the Tier-0 Gateways and edit the Interfaces.
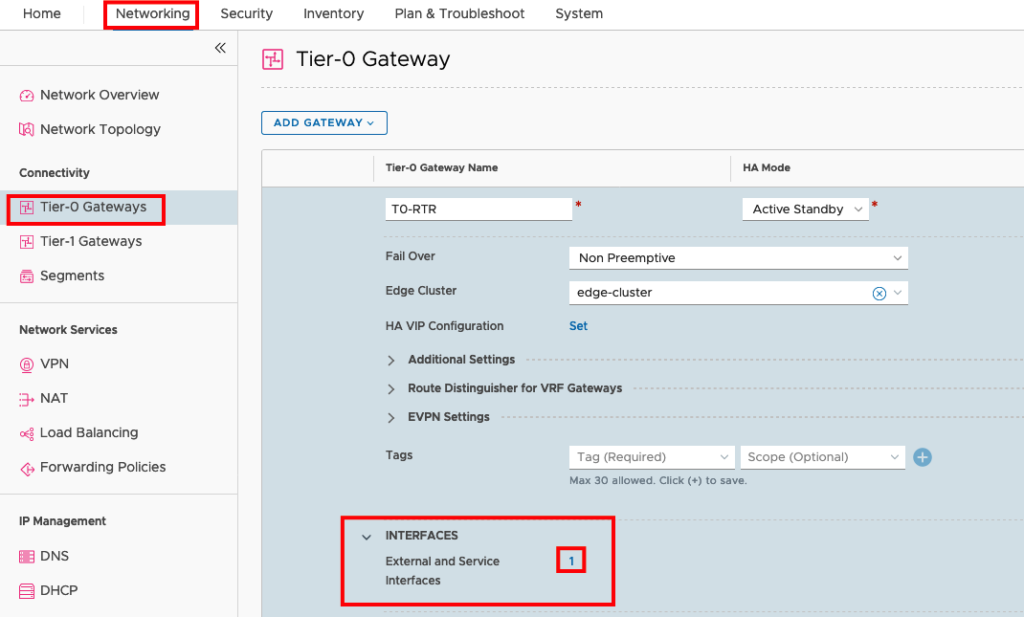
Edit the existing IPv4 Uplink

Add the IPv6 Address in the IP Address Field without deleting the IPv4 Address. and save the configuration. And close the Setting Window.
Now you should be able to ping this Address from your external Router.

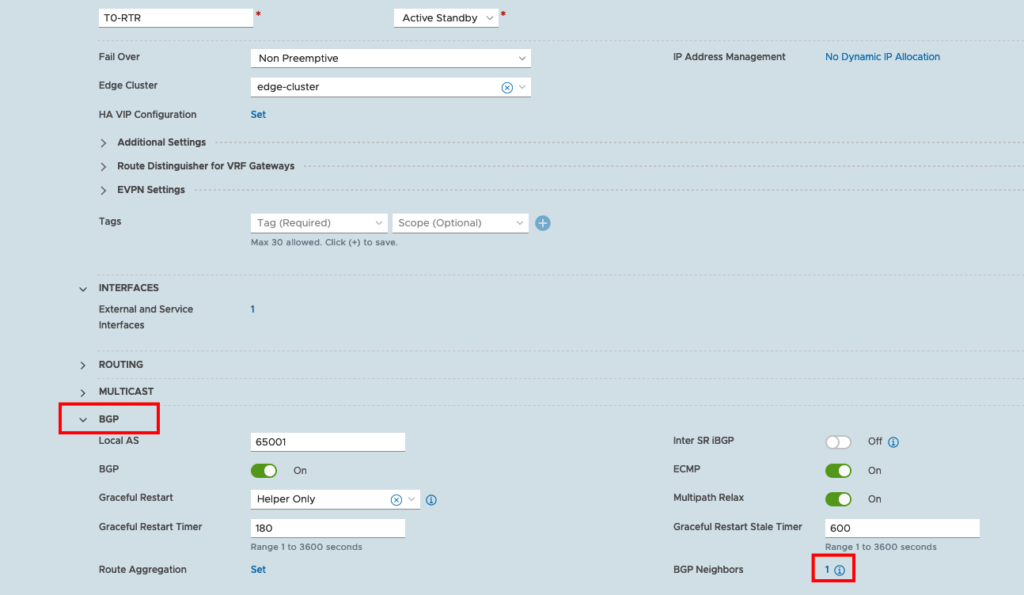
If the ping is successful, we can start to configure BGP. Go to the BGP Section and configure the BGP Neighbors.
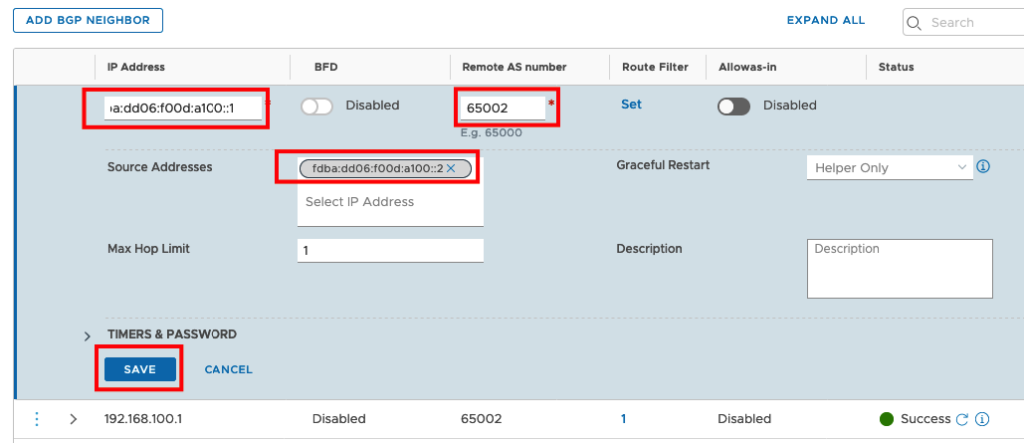
You need to add a new Neighbor. The IP Address will be the external IPv6 IP. The Remote AS number is the same I am using for IPv4 and the Source Address will be the IPv6 Address. I made a simple BGP Configuration so all other Fields will be default.
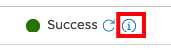
Press the refresh Icon under status to see the Config was successful pushed.
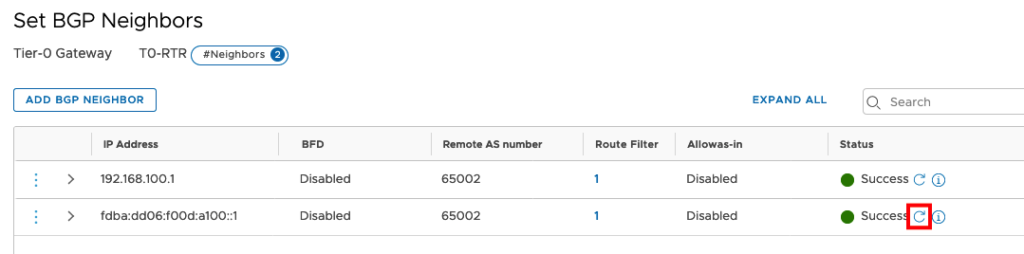
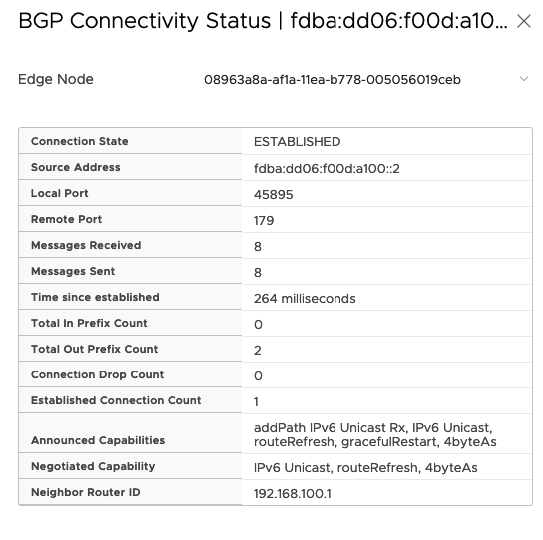
If the Status shows Success you can check the BGP Status under the Information Icon.
Connection Stat must be ESTABLISHED and you should see, that Messages Received and Sent.
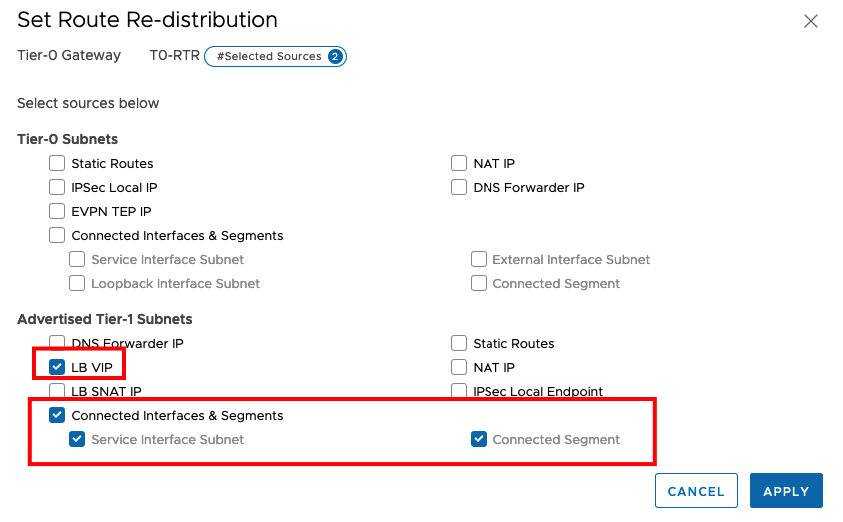
For the next steps, please check if you redistribute LB VIP and Connected Interfaces & Segments from the T1 Subnets
Create a ND Profile for SLAAC
SLAAC allows a host to connect to a network and configure an address and start communicating with other Hosts. In addition you can also provide the DNS and SNTP Information to the Host.
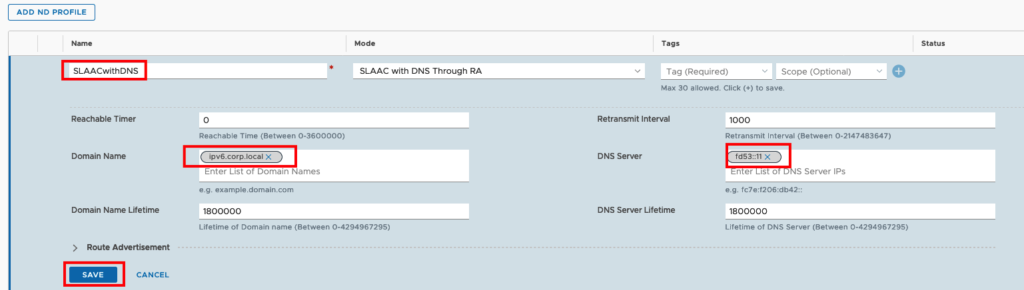
The default Profile is SLAAC with DNS Trough RA, but unfortunately you can’t add the DNS Server or the Domain. So we will create a new ND Profile under Networking -> Networking Settings -> IPV6 -> ND PROFILES
We need to create a Name for the Profile, set the Domain Name (in my case ipv6.corp.local) and the DNS Server (in my case fd53::11)
Modify T1 Router
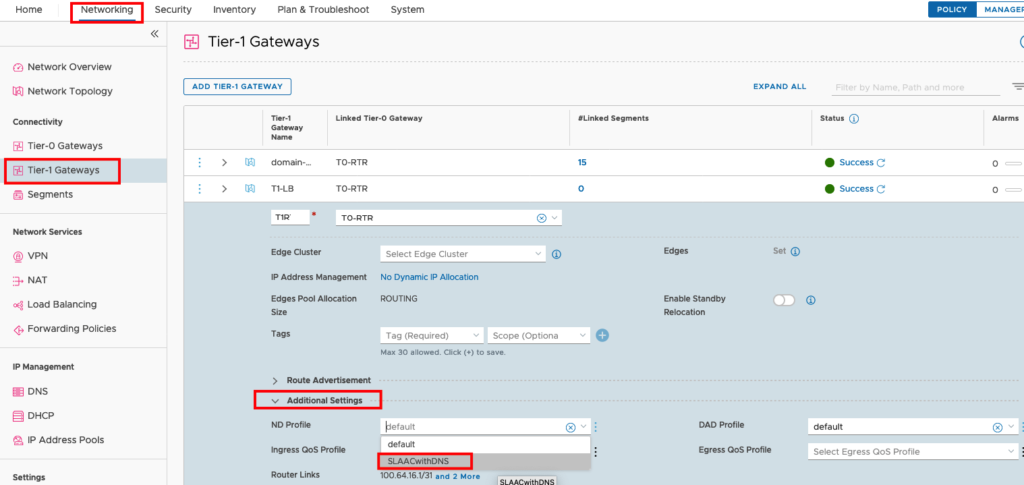
Now we will bind the new Profile to our T1 Router. Edit your T1 Router, go to Additional Settings and change the ND Profile to SLAACwithDNS.
Create a DHCP Profile for IPv4
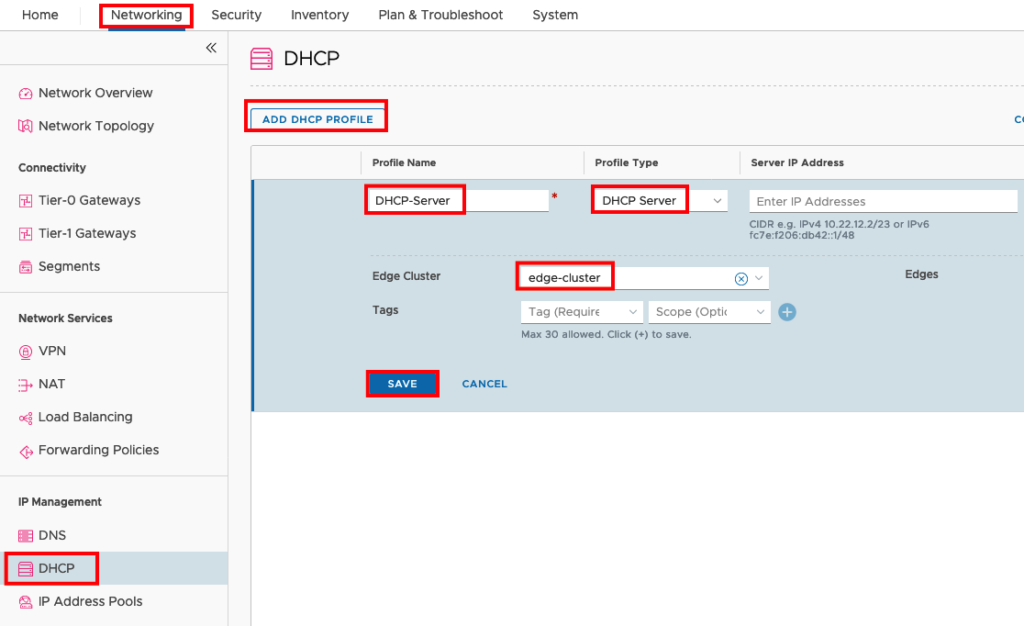
For IPv4 we will use the normal DHCP Server included in NSX-T. Go to Networking -> DHCP -> ADD DHCP PROFILE and insert a Name for your DHCP Server. Profile Type will be DHCP Server and you need to add the DHCP Server to your Edge Cluster. The Field Server IP Address is optional and nod needed in our case, because we make the Settings in the individual DHCP Setting for the Logical Segment. You will see that NSX choose automatically a Server IP Address from the network 100.96.0.0/30 (NSX Internal Addresses).
Create a new Segment
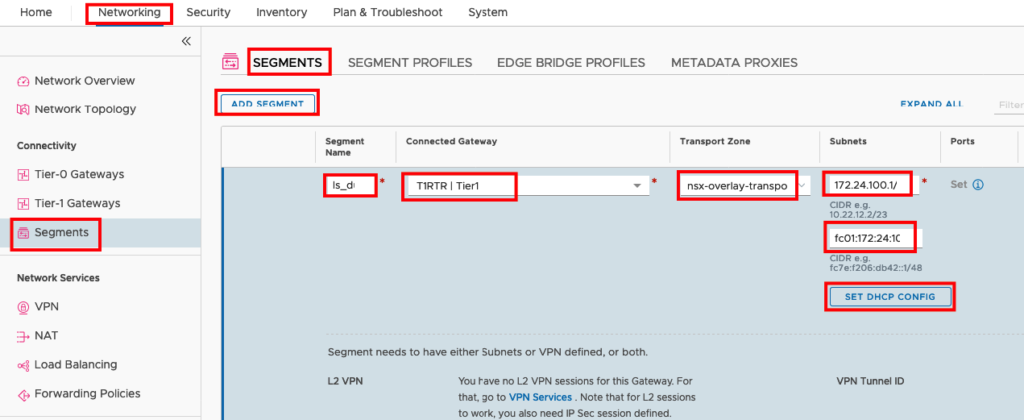
You can either modify an existing Segment or you create a new Segment for the VMs with Dual Stack. In my case I create a new Segment with the name “ls_dual-stack”. Go to Networking -> Segments -> ADD SEGMENT and insert a Segment Name, connect to the T1 Router and your overlay Transport Zone. Under Subnets you have two fields. One for IPv4 and one for IPv6. Insert your IP Default Gateways in this fields. In my Case IPv4: 172.24.100.1/24 and IPv6 fc01:172:24:100::1/64. You will see that the Field SET DHCP CONFIG will change the colour from grey to blue and you can add your DCHP Server.
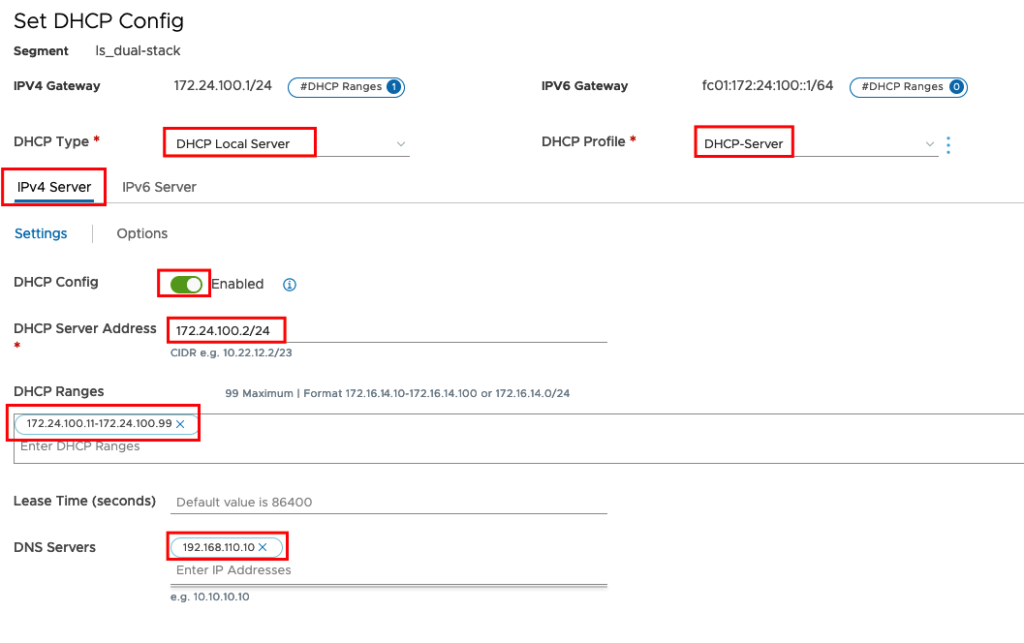
Enable DHCPv4
The DHCP Type will be DHCP Local Server and the DHCP Profile will be your new created DHCP Server. First you need to enable DHCP Config and choose an unused IP Address from your IPv4 Address Space as DHCP Server Address. Now you can define the DHCP Range for your VMs and insert the DNS Server Information.
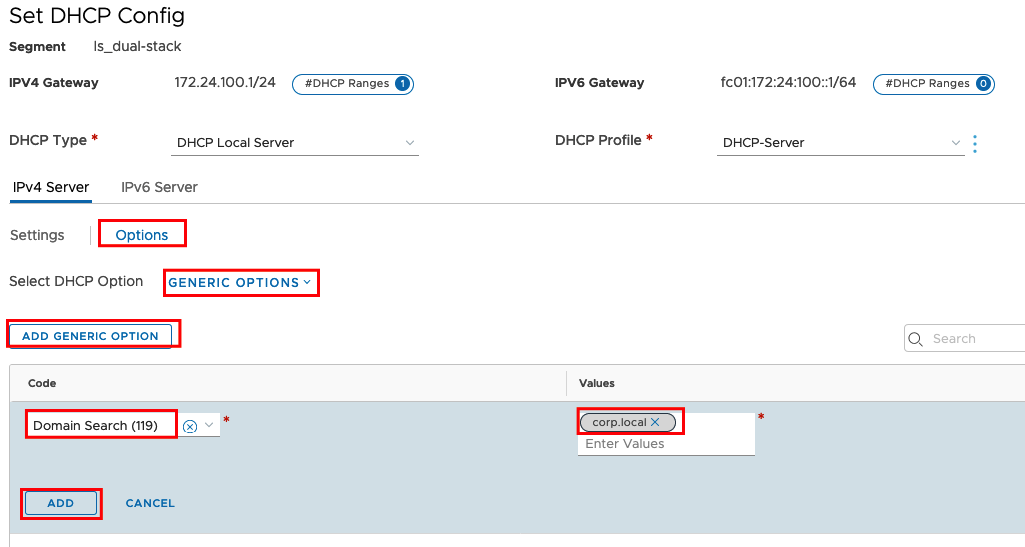
Under Options you can set different Parameters for DHCP. In my case I am adding the GENERIC OPTION: Domain Search
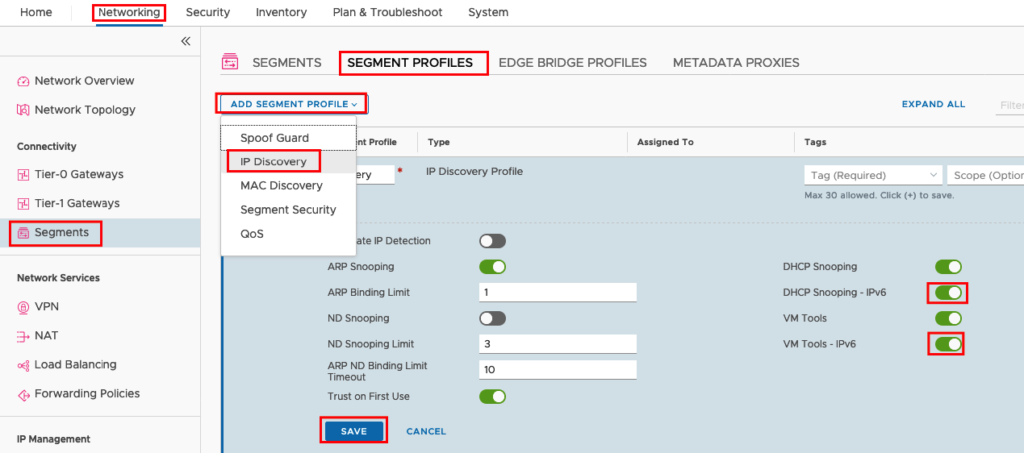
Additional we need to create a new Segment Profiles for IP Discovery and attach this profile to the Segment, because IPv6 discovery is not enabled in the default profile. Go to Networking -> Segments -> SEGMENT PROFILES -> ADD SEGMENT PROFILE -> IP DISCOVERY, give a name and enable DHCP Snooping – IPv6 and VM Tools -IPv6.
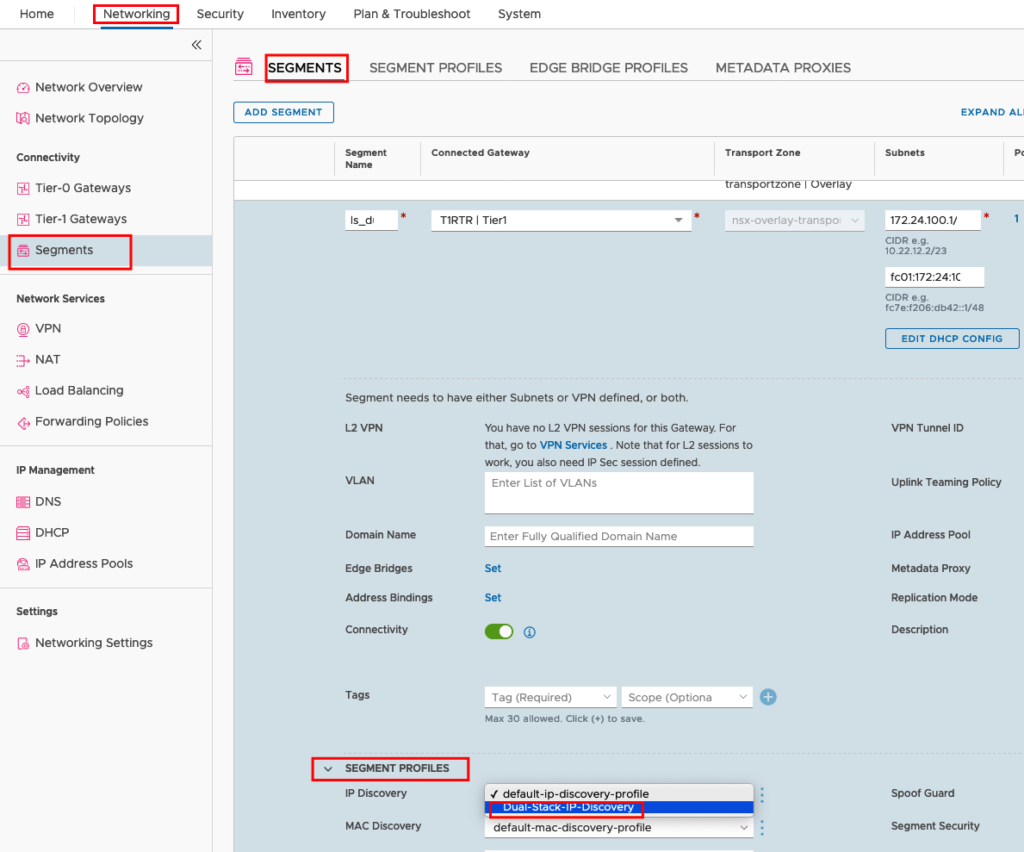
And attach the Profile to your Segment
Testing IPv4 and IPv6
Everything is now prepared and if you server listen on IPv4 and IPv6 the Server should get an IPv4 Address and some IPv6 Addresses. Attach your Server to the logical Segment and check if the Network Settings working with DHCP.

Restart your Networking on the VM and check your IP information. You should have one IPv4 and One IPv6 Address from your Network.

You should be able to ping Devices outside from NSX. In my case I will try to reach my DNS Server over IPv4 (192.168.110.10) and over IPv6 (fd53::11)
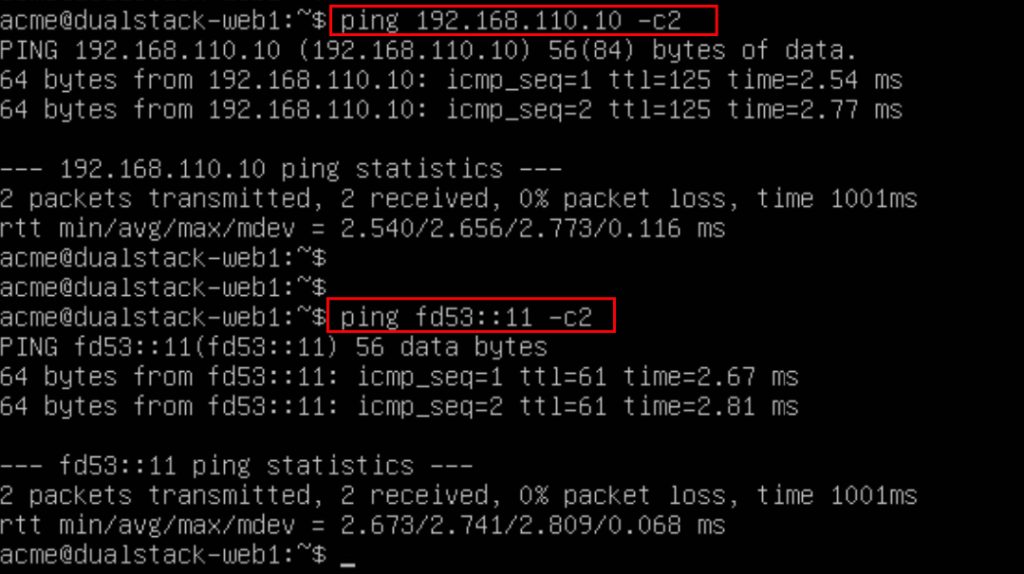
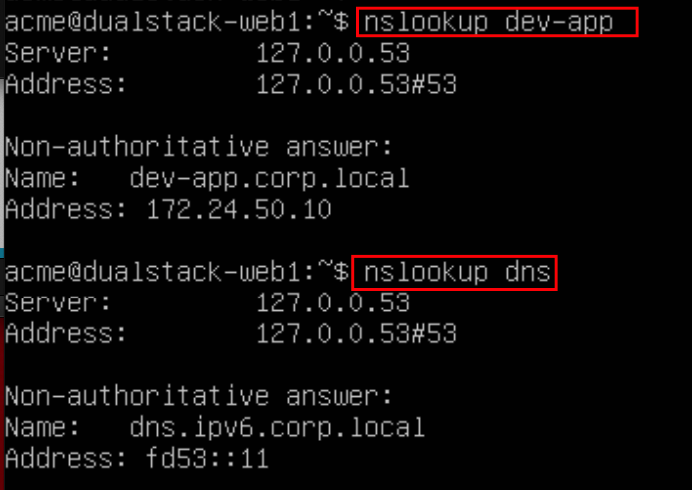
Now lets check if DNS is working. In my case I am providing the DNS Search via DHCP. So I do not need to ask with the complete FQDN.
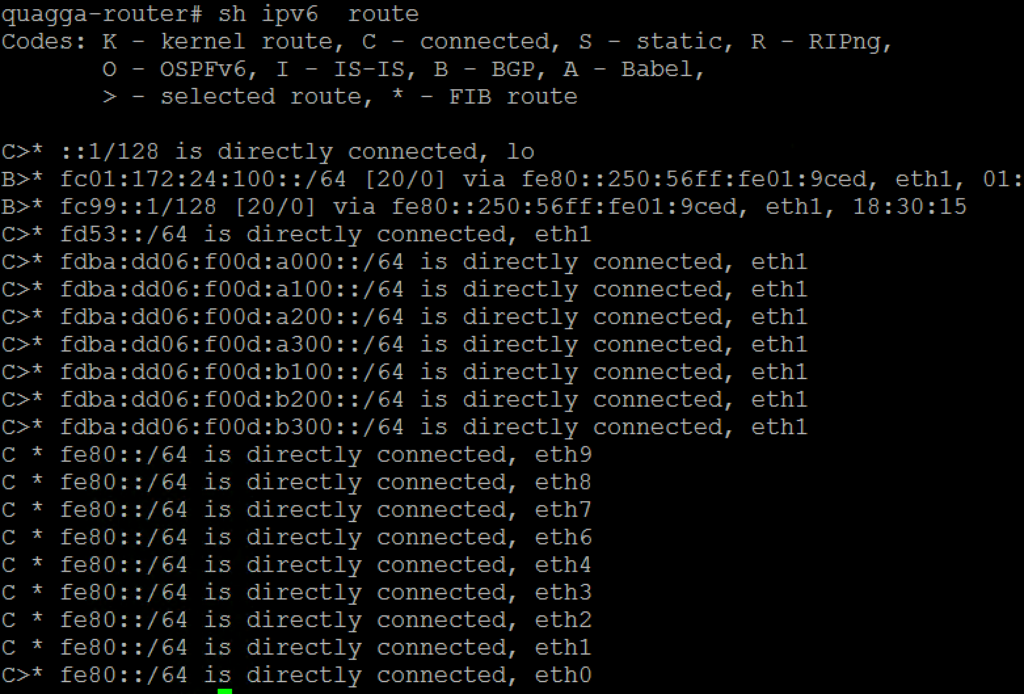
If your Tests was successful you can jump to the next Section (Create an IPv4/IPv6 Load Balancer) otherwise you can try to ping the T1 Router and check also the Routing Tables on your NSX Edge and your external Router.
Create an IPv4/IPv6 Load Balancer
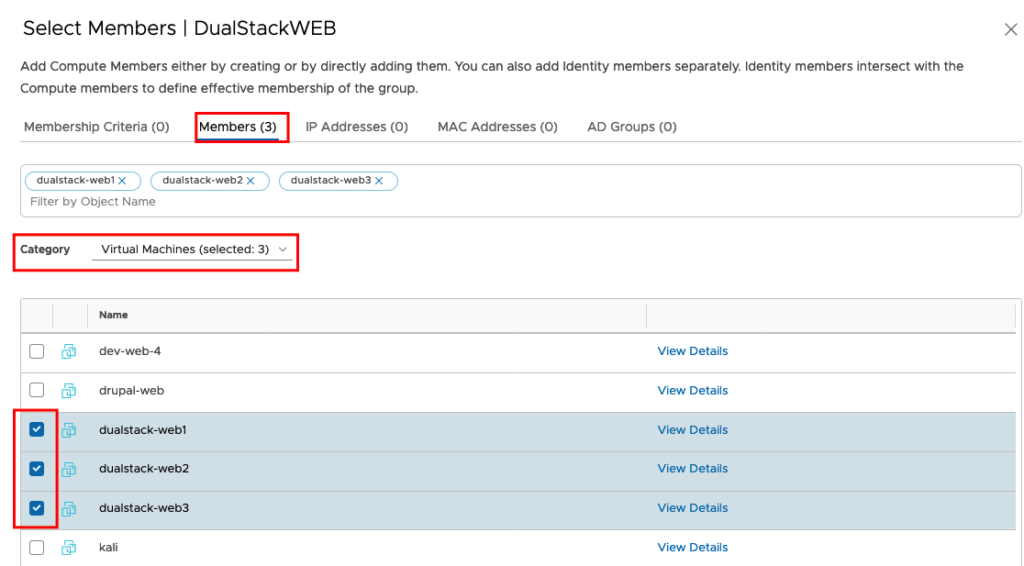
Let’s create a IPv6 L7 HTTP Load Balancer! But before we can start you should create a new Group in NSX to learn automatically the IP Addresses from the Web Servers. Go to Inventory -> Groups -> ADD GROUP, define a Name and add your Members.
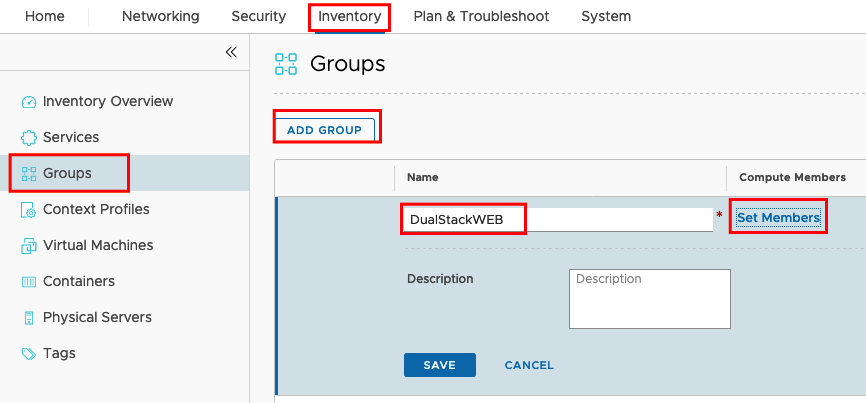
For my Test Enviroment I decided to add the members statically. Choose Members and Category Virtual Machines and select the VMs you created before.
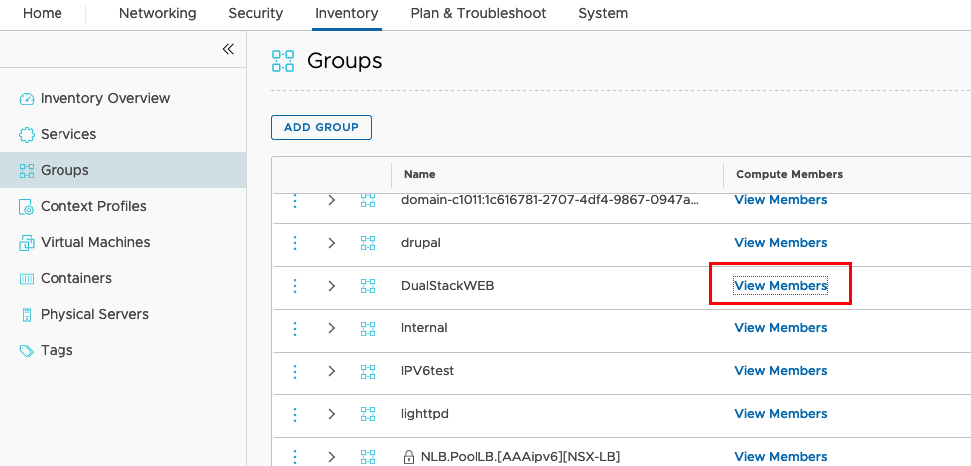
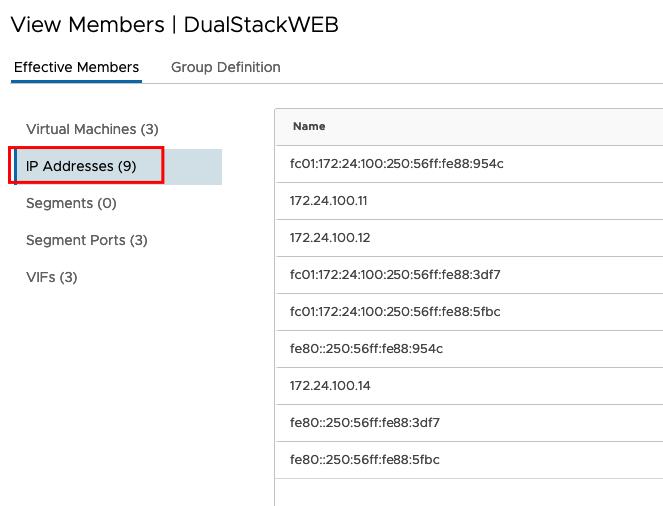
You can check now if all IP Addresses are learned in this Group
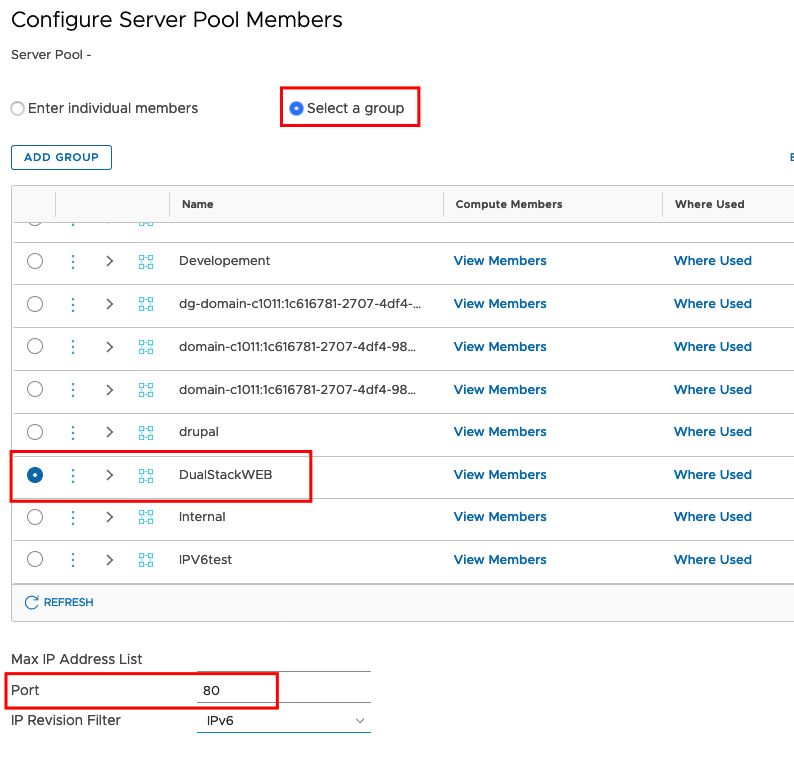
Now we can create create the Server Pool and the Virtual Server. Go to -> Load Balancing -> SERVER POOLS -> ADD SERVER POOL set the Name and select your Members.
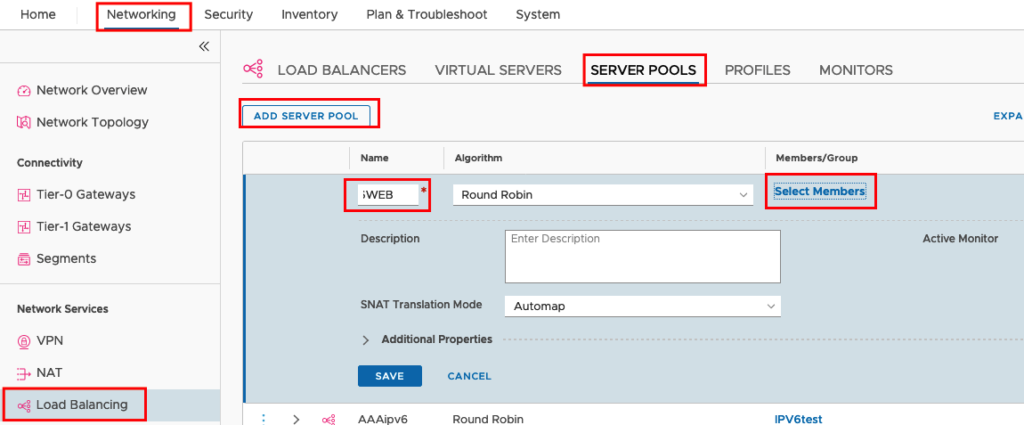
Select your Group set the Port Number (In my case HTTP Port 80) and change the IP Revison Filter to IPv6.
In the next Step we will create the VIRTUAL SERVER (L7 HTTP). Go to -> Load Balancing -> VIRTUAL SERVERS -> ADD VIRTUAL SERVER -> L7 HTTP create a Name, enter the IPv6 Address, the Port Number and select a Load Balancer and your new created Server Pool.
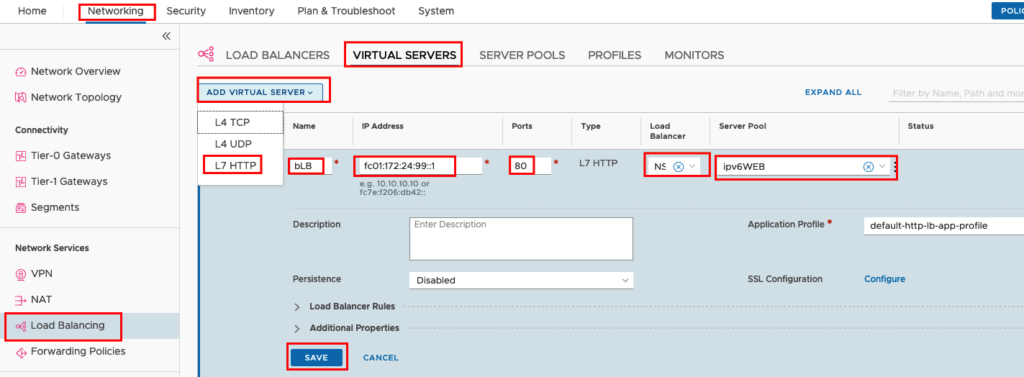
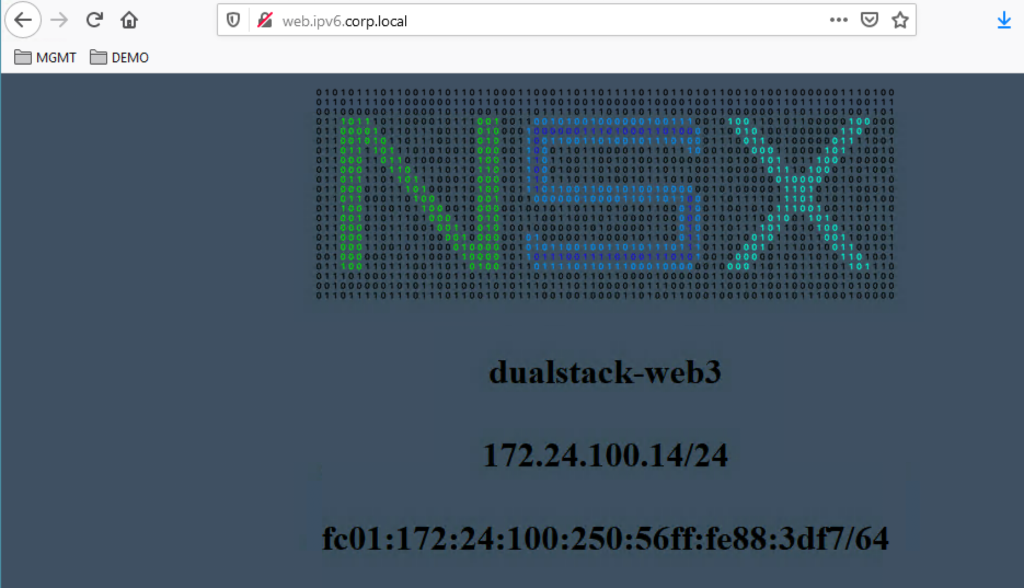
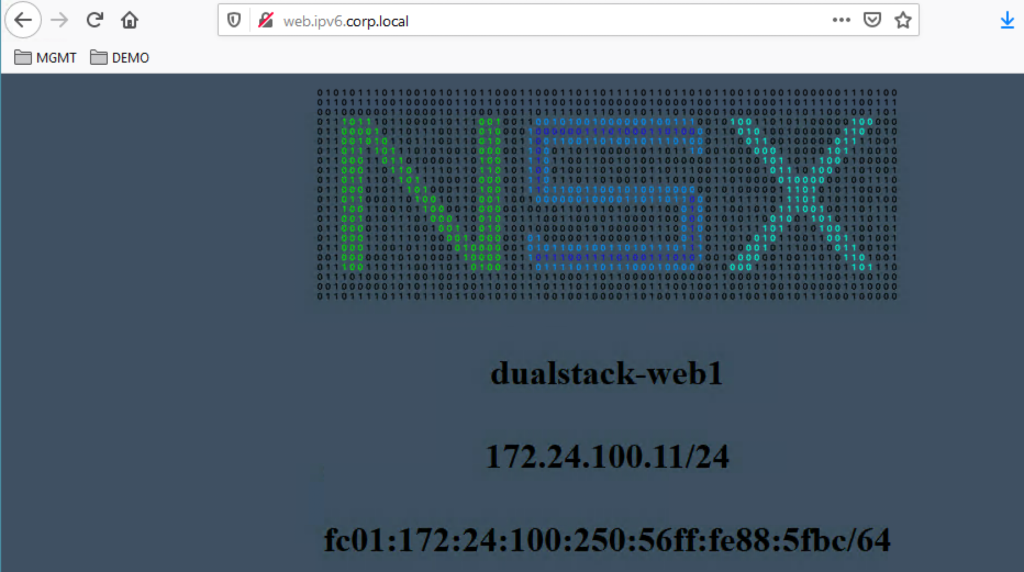
I have created an IPv6 DNS Entry (web.ipv6.corp.local) for the IPv6 Address fc01:172:24:99::1. So after 1 minute or so the Virtual Server should be up and you can test from an external IPv6 enabled device if you can access the Web Sites.
Hope this will help you to start with IPv6 in NSX 3.0.

- VCF9 NSX-Edge Setup – What has changed - 11. July 2025
- VCF NSX-Edge setup from a network perspective - 2. June 2025
- VCF Workload Domain Setup from a network perspective - 2. June 2025
Pingback: Integrate NSX Adv. Load Balancer (aka AVI) in NSX-T » vrealize.it - TechBlog VMware SDDC