


In this Blog I will explain how you can easily integrate NSX-T in the NSX Advanced Load Balancer (Formerly Avi Networks) and profit from the integrated solution.
Prerequisite
Before you can start, the following prerequisites must be meet:
- NSX 3.0 is installed
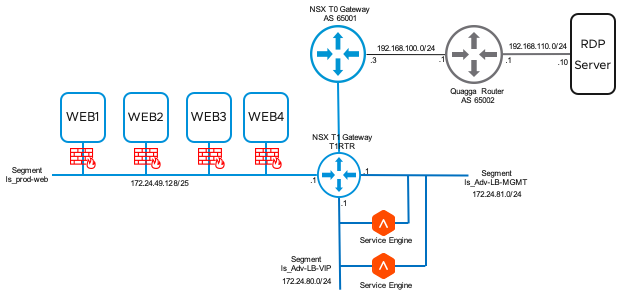
- T0 Router and T1 Router with IPv4 is configured and connected to an external Router via BGP or Static. (There are a lot of blogs available, how to configure NSX for IPv4)
- NSX Adv. Load Balancer (aka AVI) is installed and connected with your vCenter
- NSX Adv. LB is updated to minimum Version 20.1.1
- Some Web Servers are available for Testing and connected to a Logical Segment in NSX
Configuration Steps
- Create a Content Library in vCenter
- Check T1 Gateway Configuration in NSX-T
- Configure Logical Segments in NSX-T
- Create a Group for WEB Servers in NSX-T
- Create NSX-T Cloud Provider
- Create a new Application
- Troubleshooting
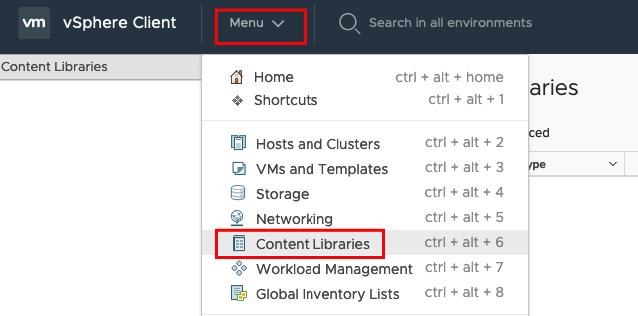
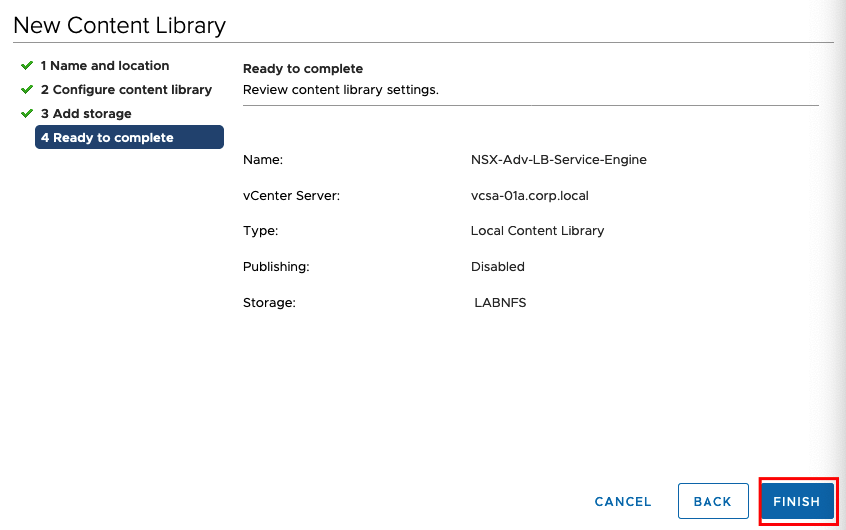
Create a Content Library in vCenter
The NSX Adv. LB Controller will automatically deploy the Service Engines for Load Balancing if they need. For this we need a Content Library in vCenter. Open your vCenter and go to -> Menu -> Content Libraries
Click on “+” to create a new Content Library, specify a Name and klick NEXT.

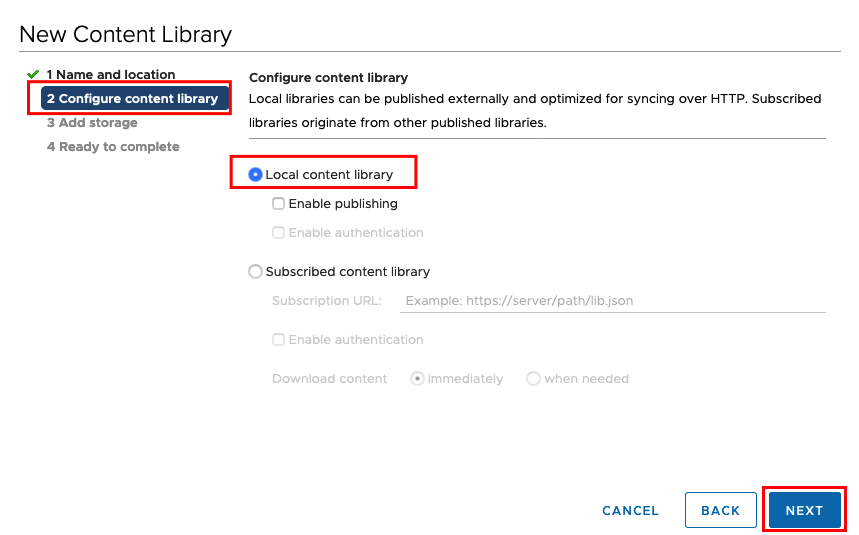
Use the Defaults in Step 2 and klick NEXT
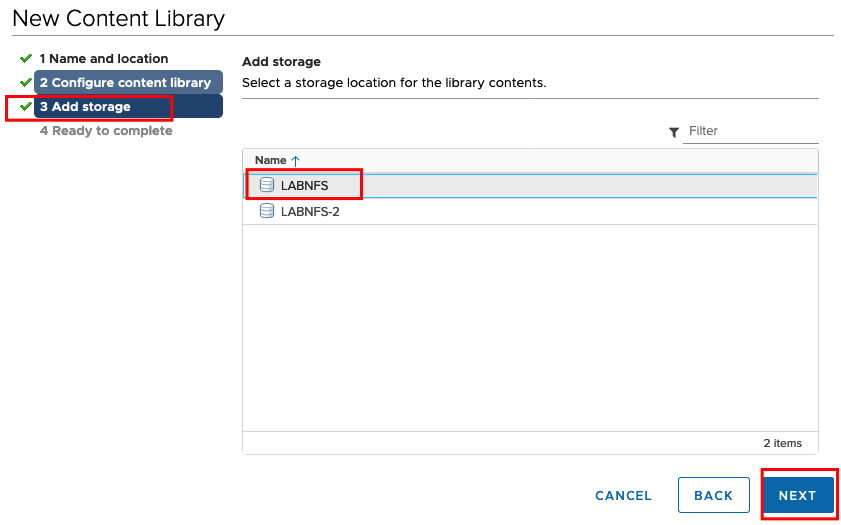
Chose your specific Storage with some free space and klick NEXT
and if everything is correct FINISH!
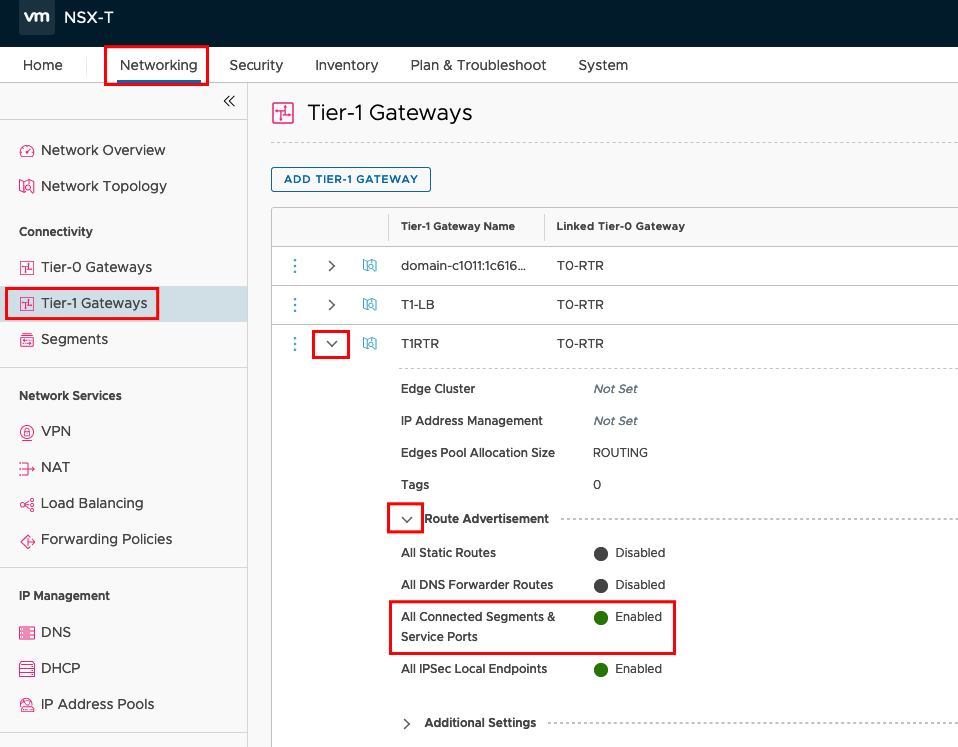
Check T1 Gateway Configuration in NSX-T
Now we can jump to our NSX Manager and check first the T1 Gateway Configuration. Go to your T1 Gateway -> Networking -> Tier-1 Gateways -> YOUR-T1-ROUTER -> Route Advertisements and check if “All Connected Segments & Services Ports” is enabled. If your connected Segments should not be propagated, you can advertise only “All Static Routes” (Pointing to the VIP).
Configure Logical Segments in NSX-T
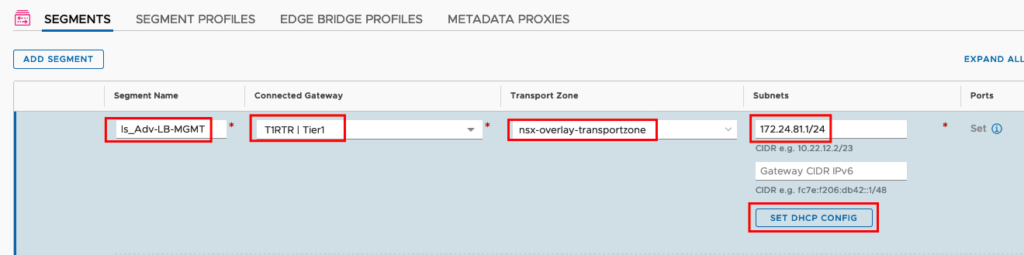
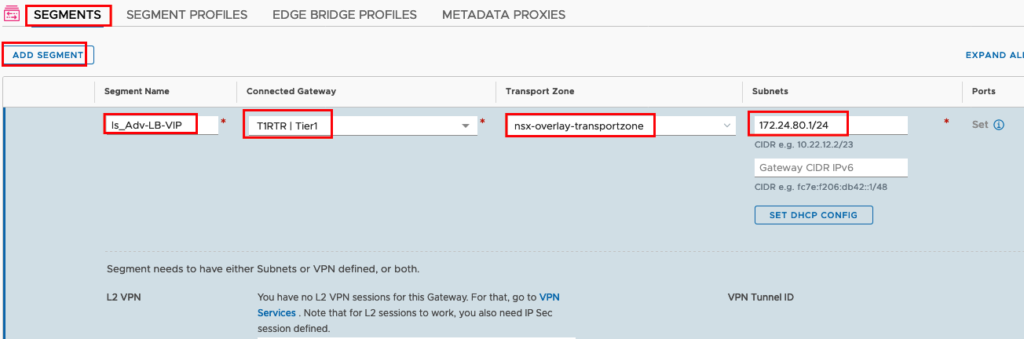
If your T1 Gateway is configured properly you can create a logical Segment for the Management of your Service Engines. Go to Segments and ADD Segment

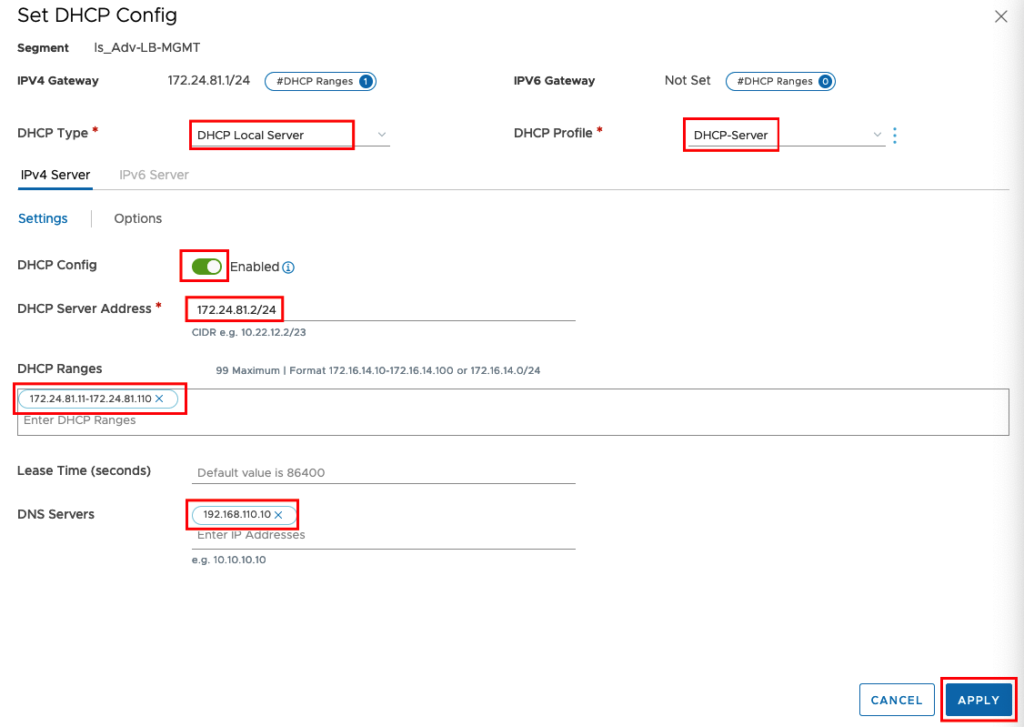
Insert a Name for your Segment, connect to your T1 Gateway, choose the right Transport Zone and Set the IP Default Gateway Address. Now we can activate DHCP for the Service Engines. (In my previous Blog I described in Detail how to configure DHCP here is the Direct Link)
Choose “DHCP Local Server” as DHCP Type and use the DHCP Profile you defined before under the Networking Section DHCP. Enable DHCP, set a DHCP Server Address (one free Address from your Network),a DHCP Range and your DNS Server(s).
If you finished this configuration we will configure a Second Logical Segment for the Load Balancer VIPs. We will not configure DHCP in this Segment
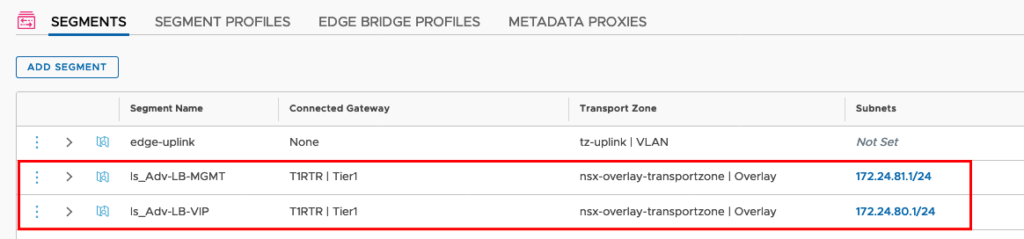
Now you should have two new Segments
Create a Group for WEB Servers in NSX-T
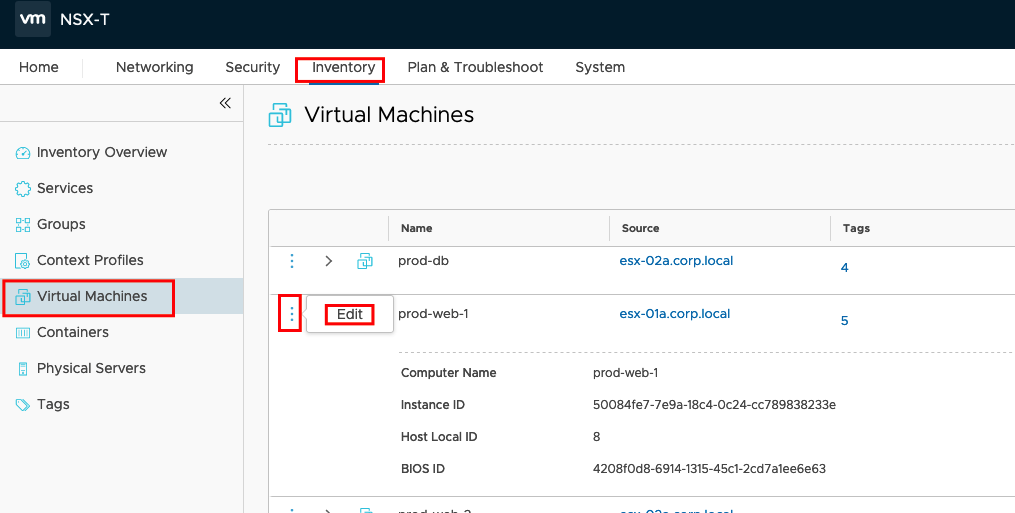
The NSX Adv. LB can learn the Web Servers IP Addresses directly from NSX, if using the Groups and Tagging. If you didn’t tagged your VMs before you need to go to Inventory -> Virtual Machines, choose your VM and edit your VM
Insert a Name in the Tag-Field and don’t forget to press the “+” next to the Tag;-). You should do this will all VMs belonging to the Web Server Pool. (In my previous Blogs I explain how you can use Automation to set Tags and Groups;-)

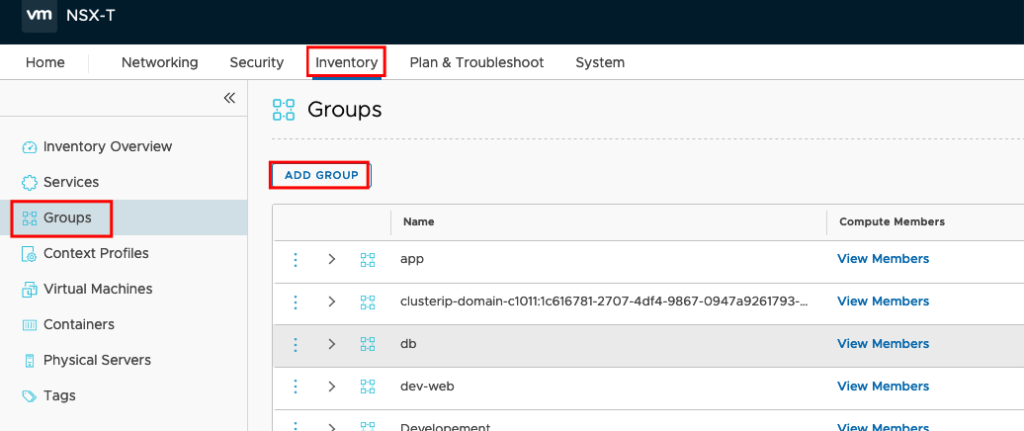
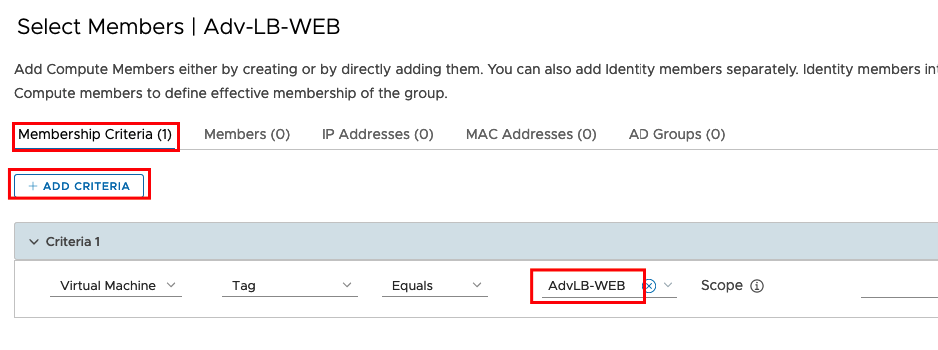
Now we will create a new Group and add the Web Servers. Go to Inventory -> Groups ADD GROUP.
Create a Name and Set the Members

We will now use as Memership Criteria the Tag we created before
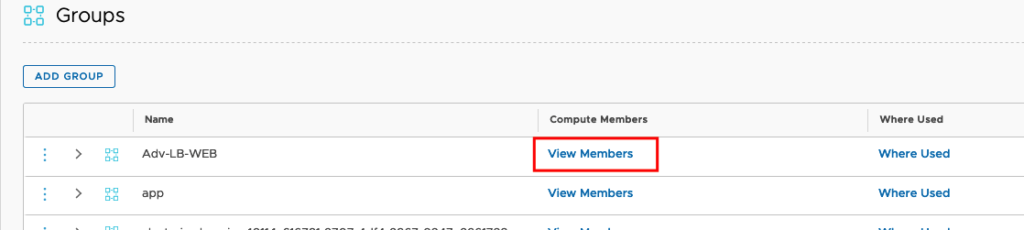
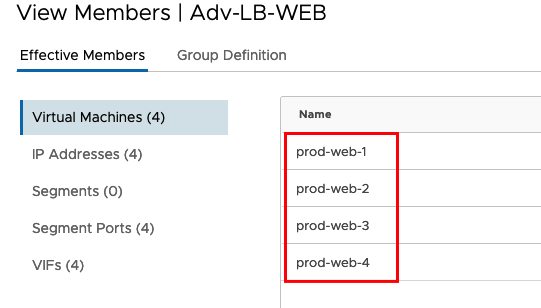
if you save the configuration you should be able to see the Members in the Group.
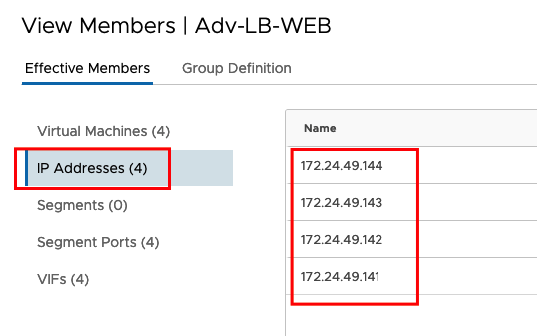
And the belonging IP Addresses
Now we can start to configure the NSX Advanced Load Balancer
Create NSX-T Cloud Provider
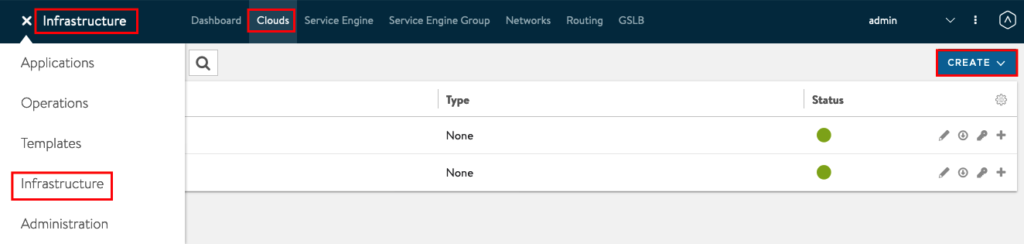
Connect to the Management from your NSX Adv. Load Balancer and jump to -> Infrastructure -> Clouds -> CREATE
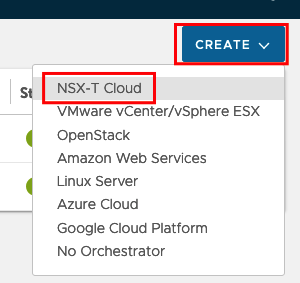
Choose from the Drop Down Menu “NSX-T Cloud”
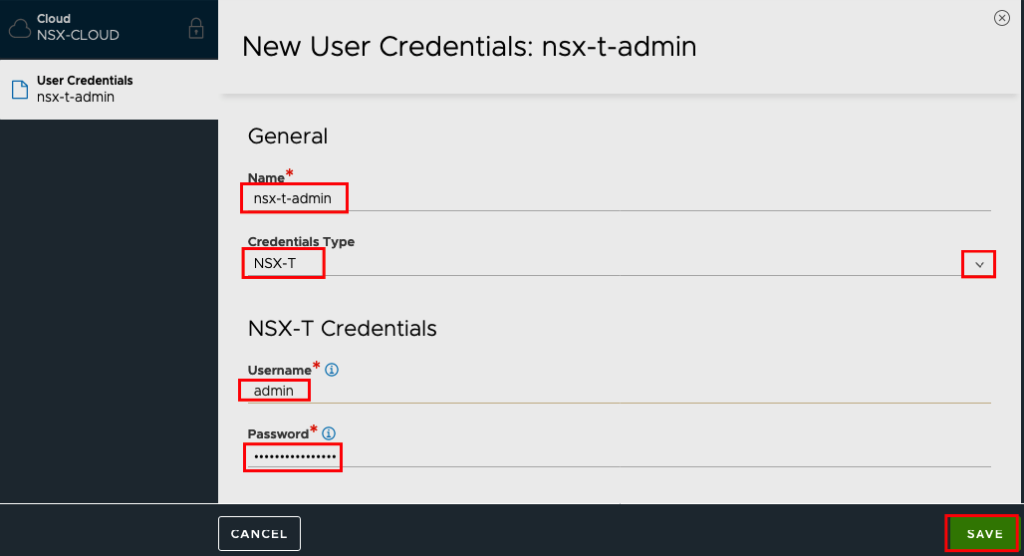
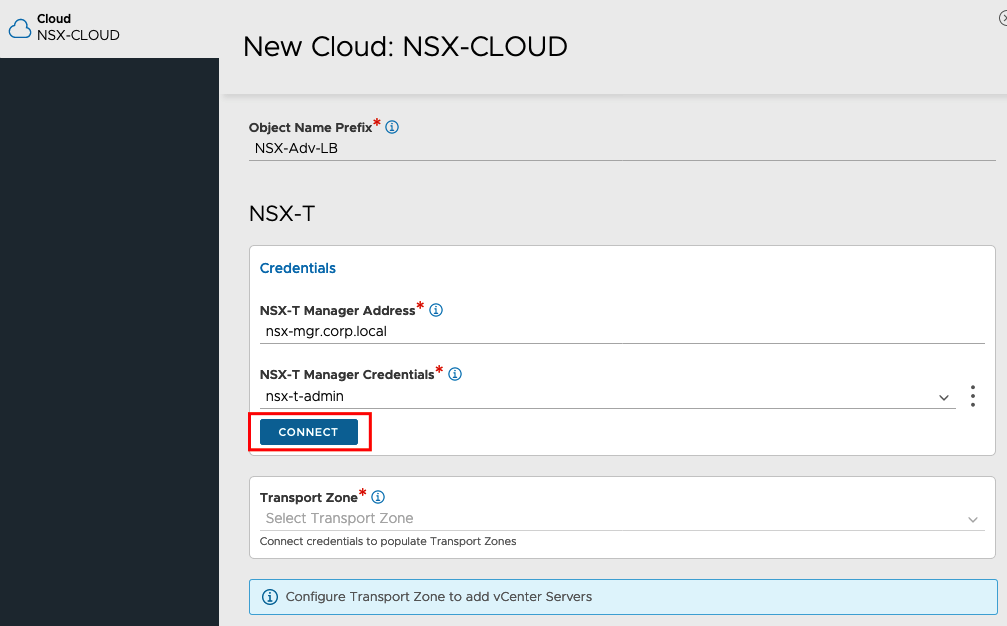
We need to define a Name, choose DHCP, create a Object Name Prefix and than we will insert the Connection Information for NSX-T. We didn’t create the NSX Credentials before and need to create new credentials.
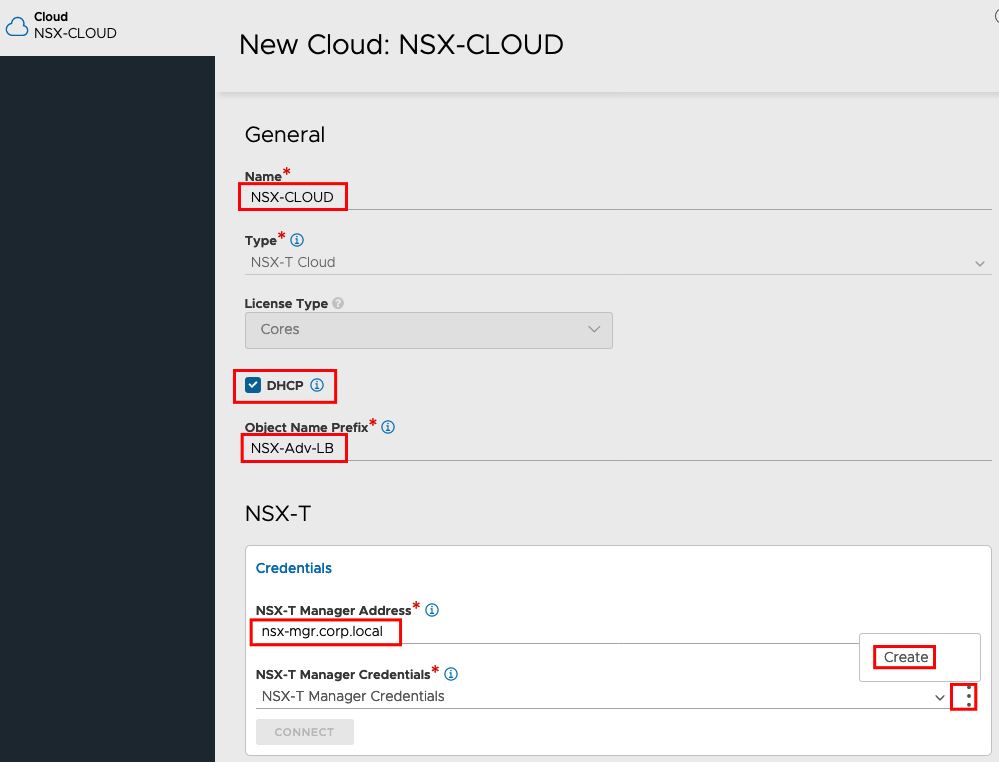
Credential Type must be set to NSX-T and than you need to specify Username and Password
Now we can connect NSX Adv. LB to the NSX-T Manager
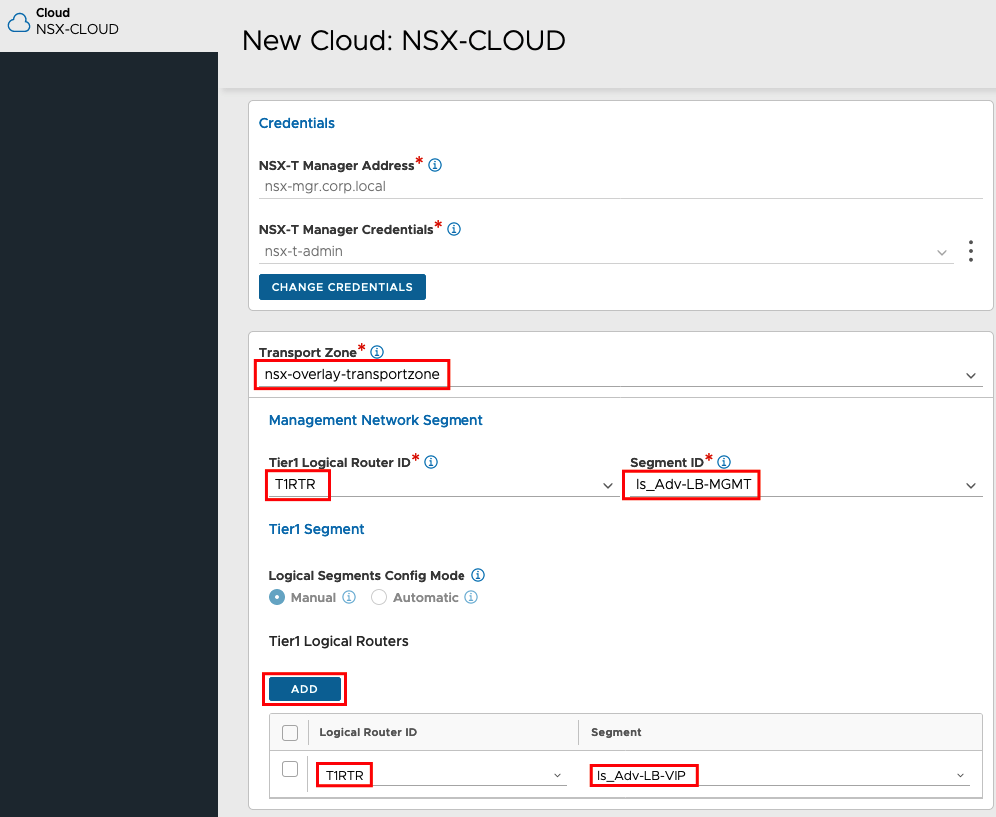
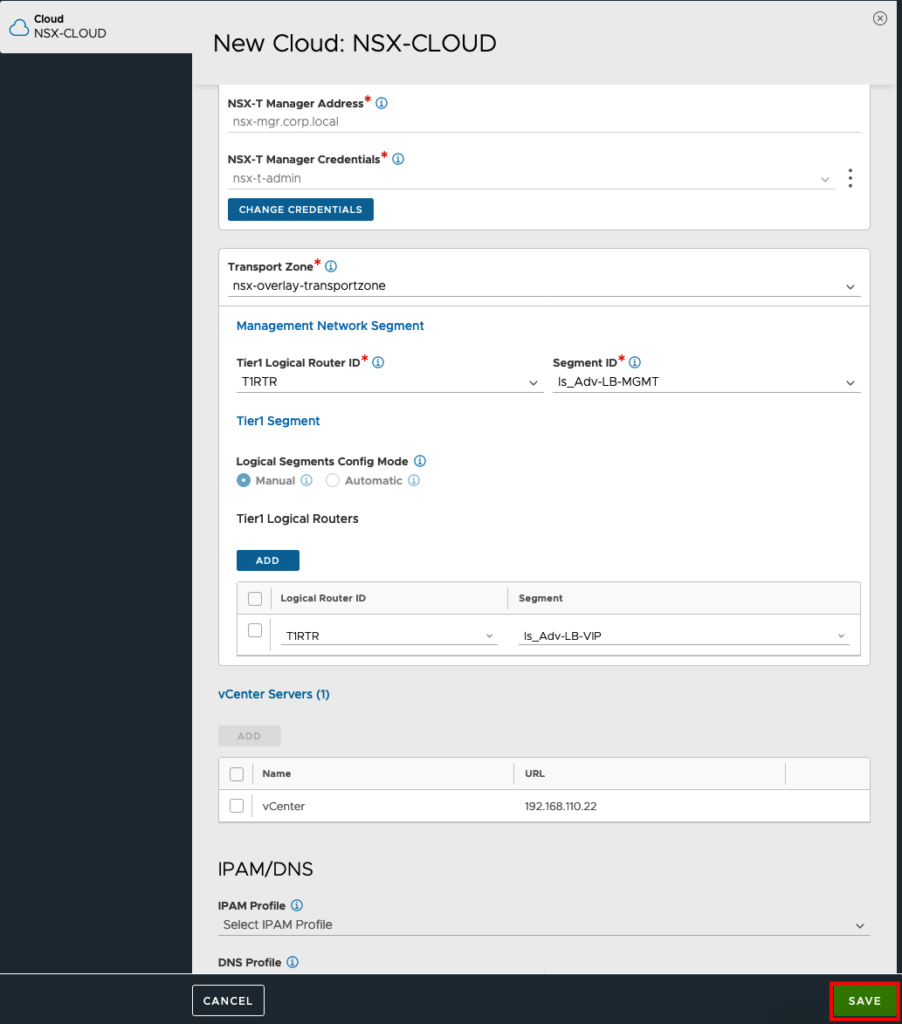
If the connection was successful, you can choose your Transport Zone, Your T1 Router and the Segment for your Management Interface you created before.
Under Tier1 Logical Routers we will add the Segment for the VIPs.
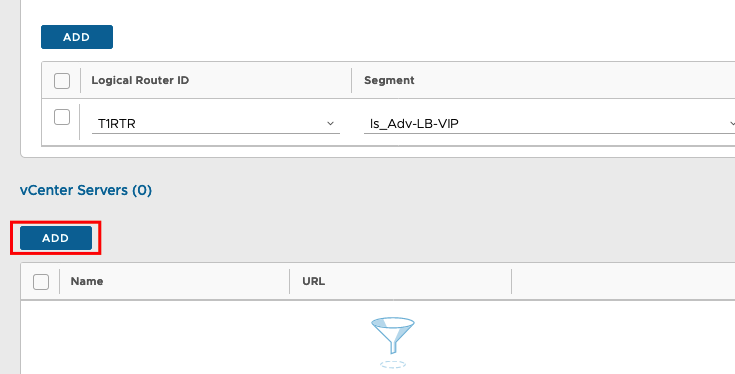
The Service Engines will be created automatically in vCenter on Demand. So we need also the connection to our vCenter. So we will add the vCenter….
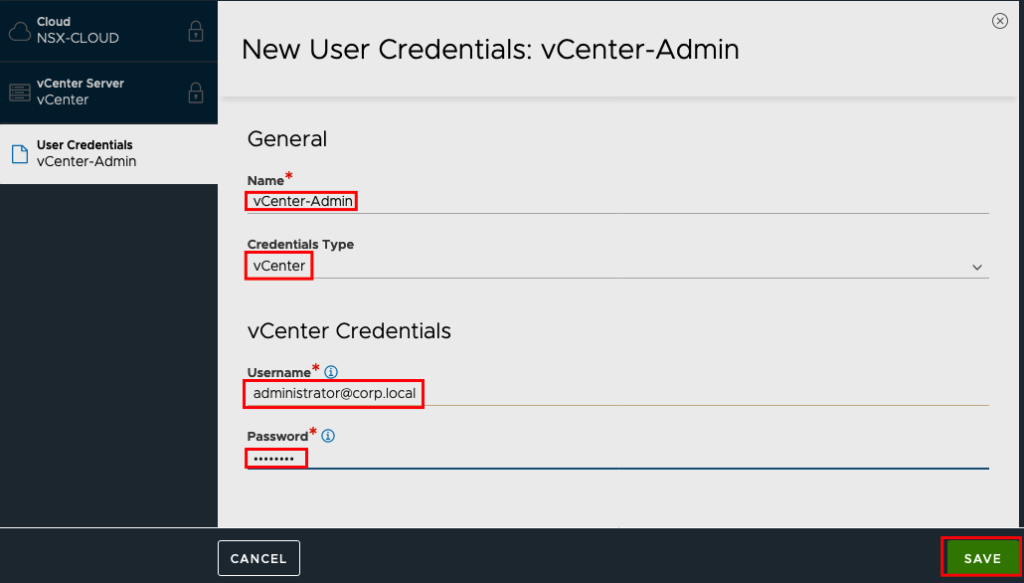
Sett the Connection Details and create new Credentials for vCenter
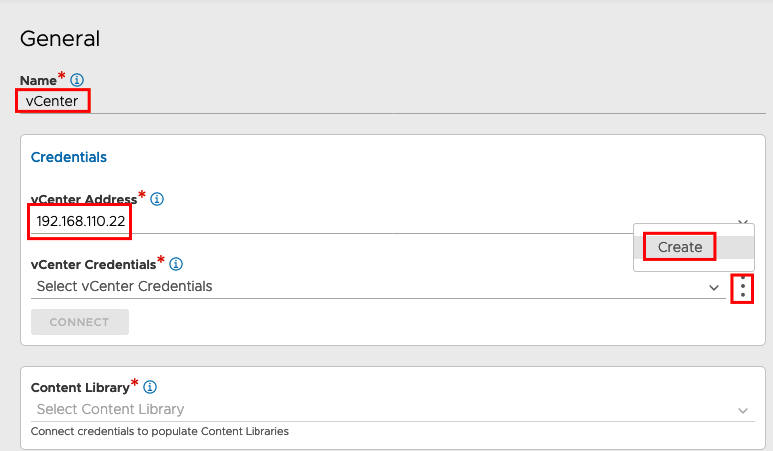
Choose as Credential Type vCenter and insert the Credentials.
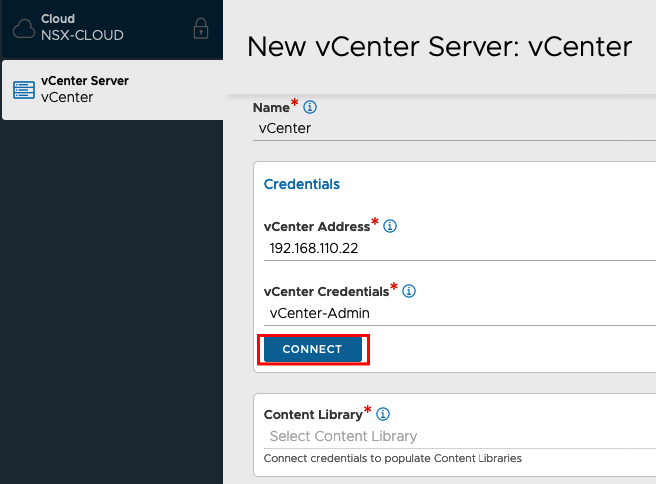
Now we can connect to our vCenter…
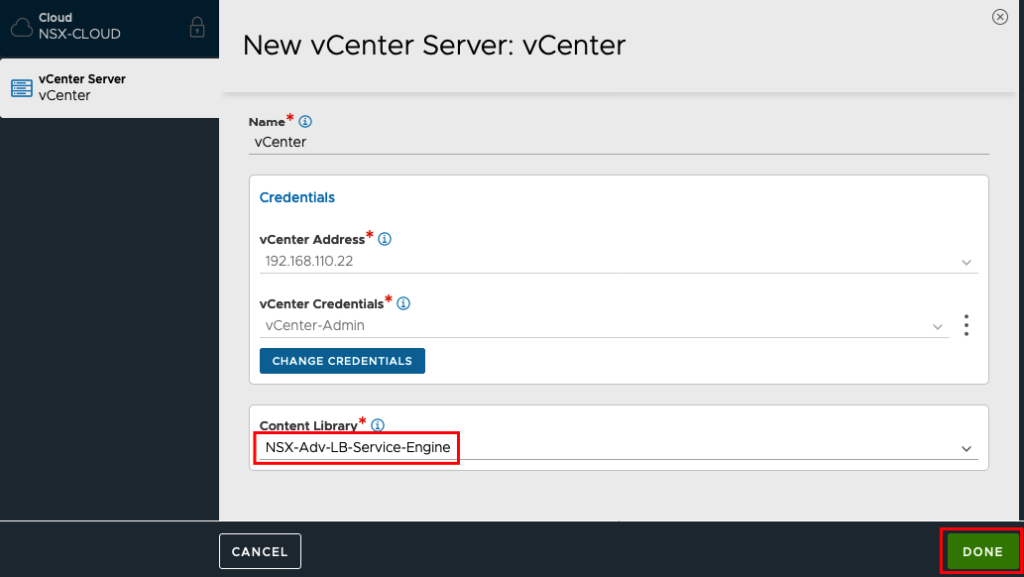
….and choose the Content Library we have created in vCenter before.
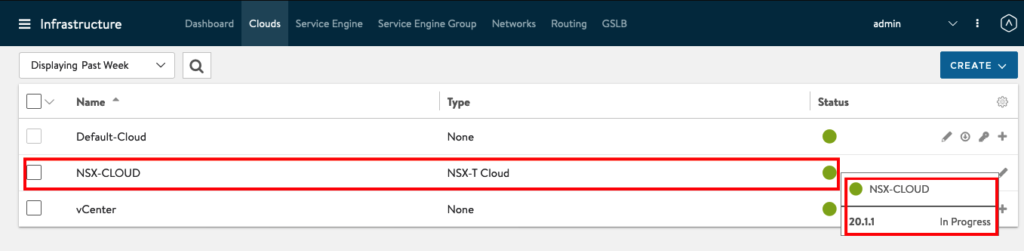
We will create the IPAM Profile later. So we can save now the Configuration to add the new Cloud.
It can take some Minutes until the Status will change from “In Progress” to “Complete”
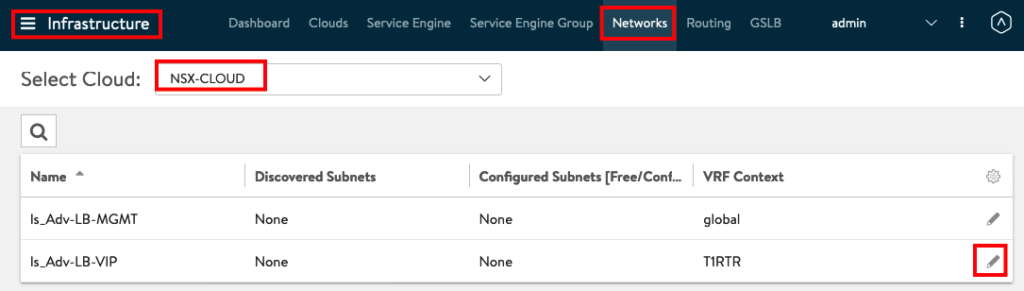
In the Meanwhile we can configure the Networks for IPAM. Go to Infrastructure -> Networks, choose NSX-CLOUD and edit the VIP Network.
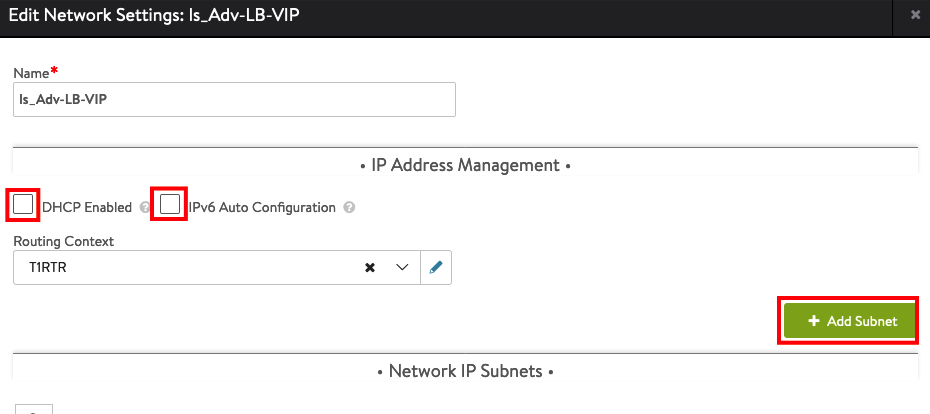
Uncheck “DHCP Enabled” and IPv6 Auto Configuration” and add the Subnet we will use for the VIP.
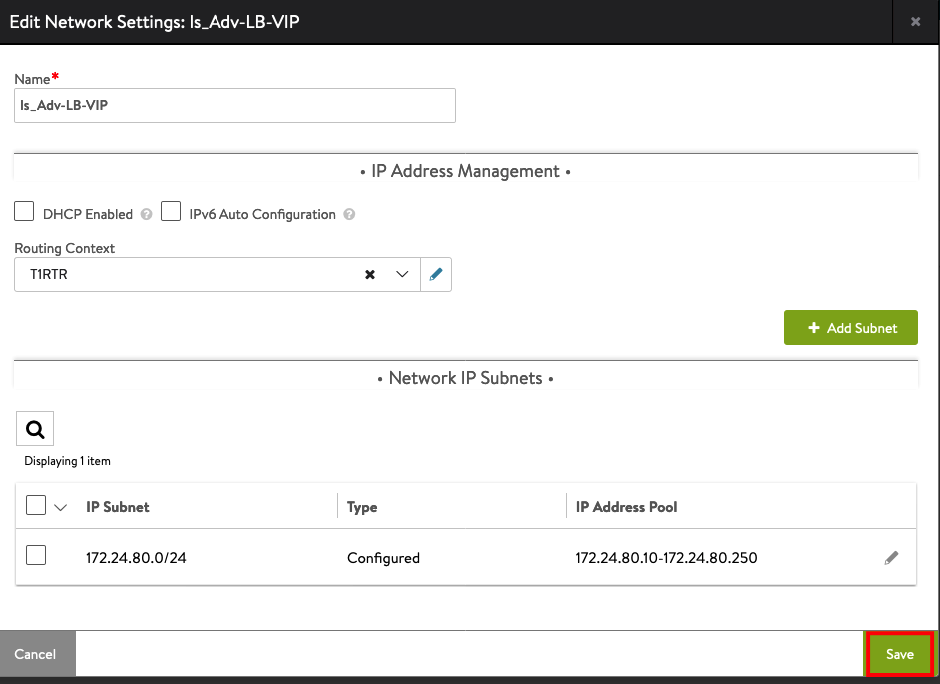
Define your Subnet, add a Static IP Pool with an IP Address Range and press Save.

And Save again.
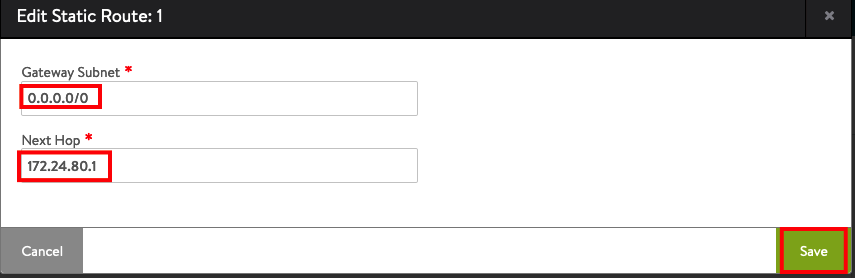
Now we can add the Default Route for the Service Engine VIP. Go to Infrastructure -> Routing, Select NSX-CLOUD and create under your VRF Context from your T1 Router.
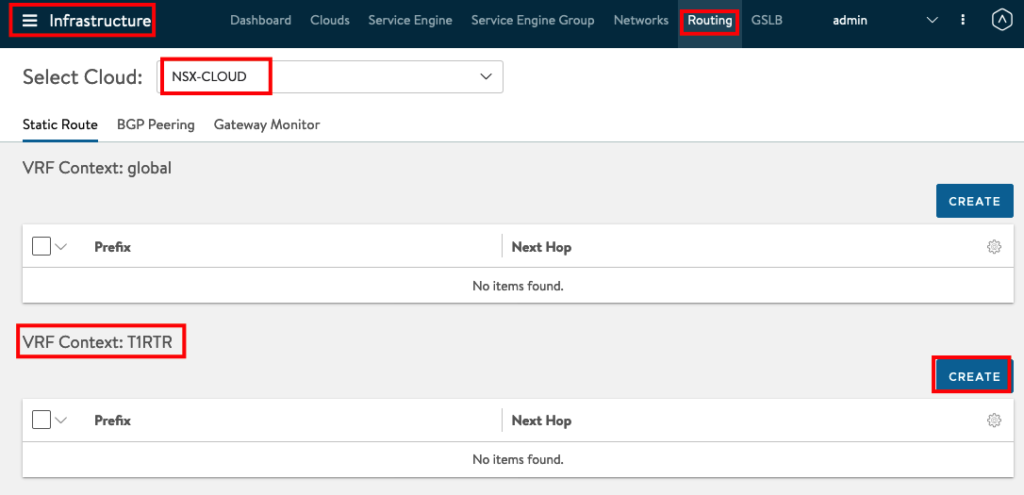
The Next Hop will be the IP Address you configured before in your NSX Manager under the Segment.
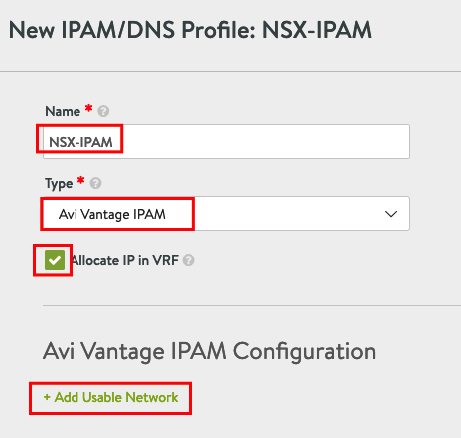
Next we will create a IPAM Profile under Templates -> Profiles -> IPAM/DNS Profiles -> CREATE -> IPAM Profile

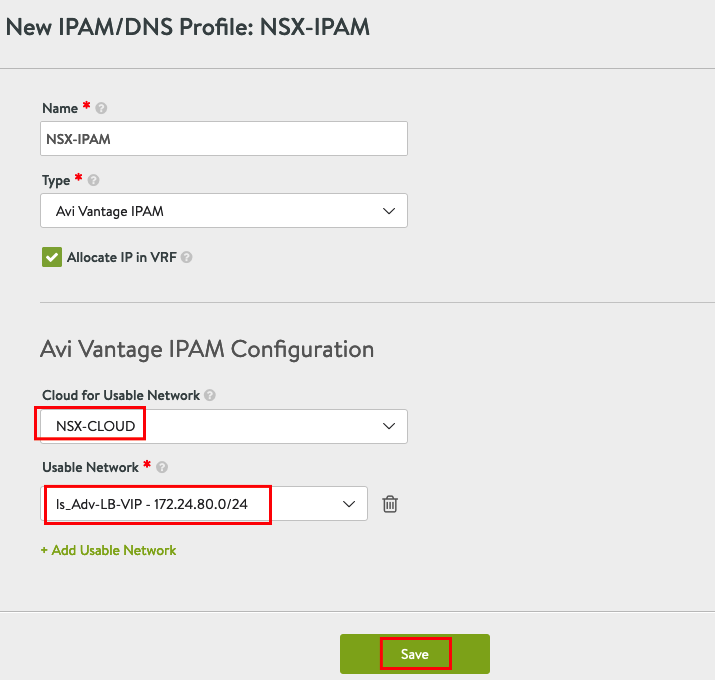
Insert a Name and choose Type “Avi Vantage IPAM”, Allocate IP in VRF and Add Usable Network
Choose NSX-CLOUD and the VIP Network and press Save
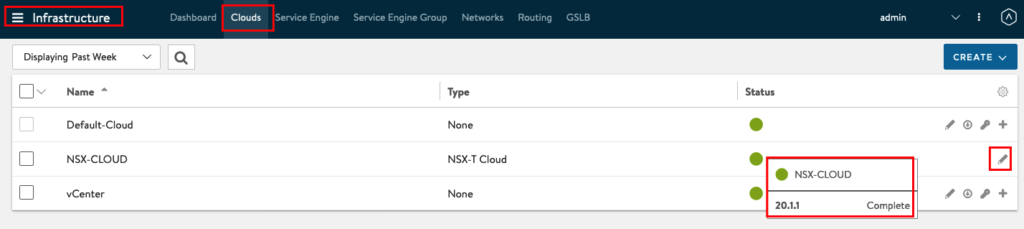
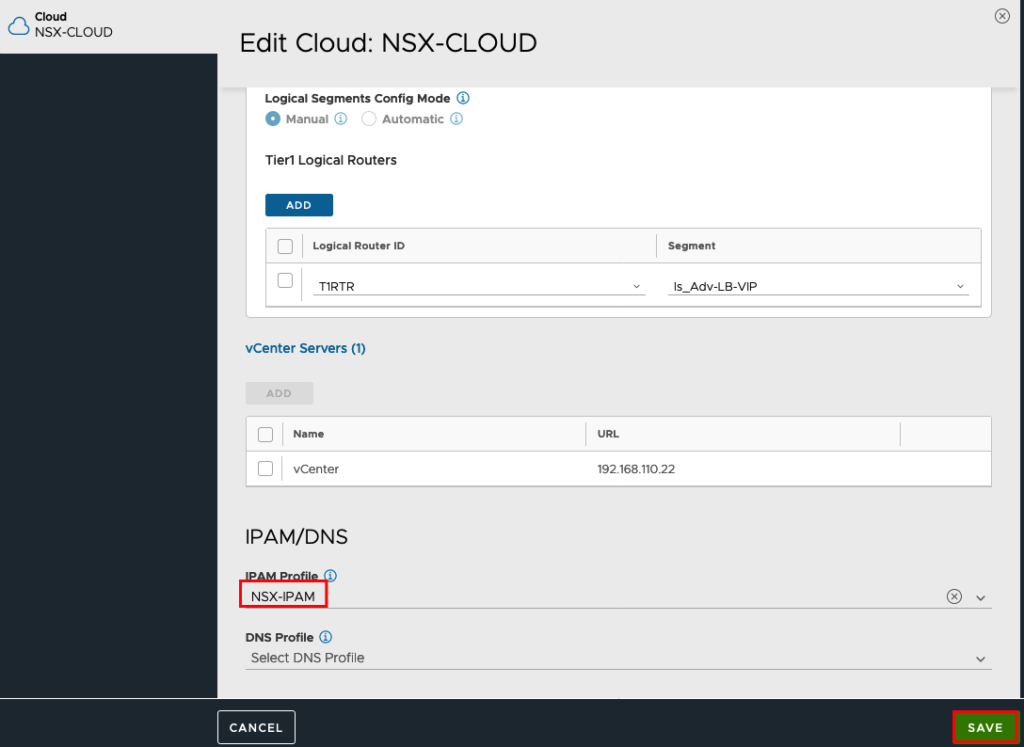
We will now jump back to our Cloud and insert the IPAM Profile. Go to Infrastructure -> Clouds and edit NSX-CLOUD ( You can check also, if your Cloud Status changed from “In Progress” to “Complete”
Insert your IPAM Profile and press Save.
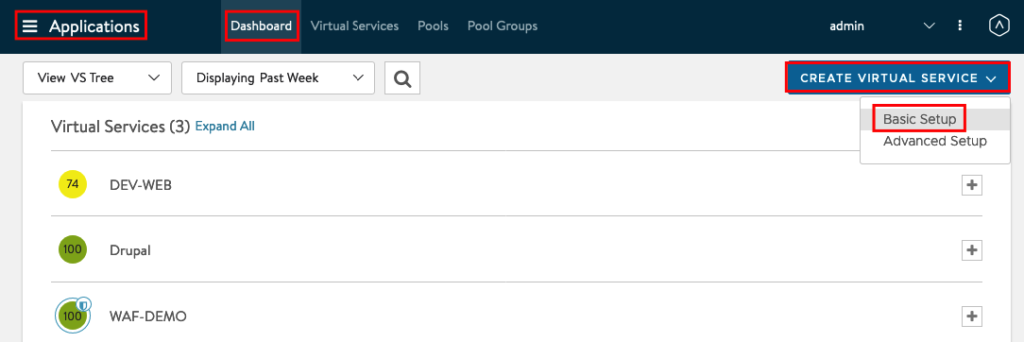
Create a new Application
The Pre-Work is done now and we can use now the Load Balancer for our Applications. Go to Applications -> Dashboard -> CREATE VIRTUAL SERVICE and choose Basic Setup.
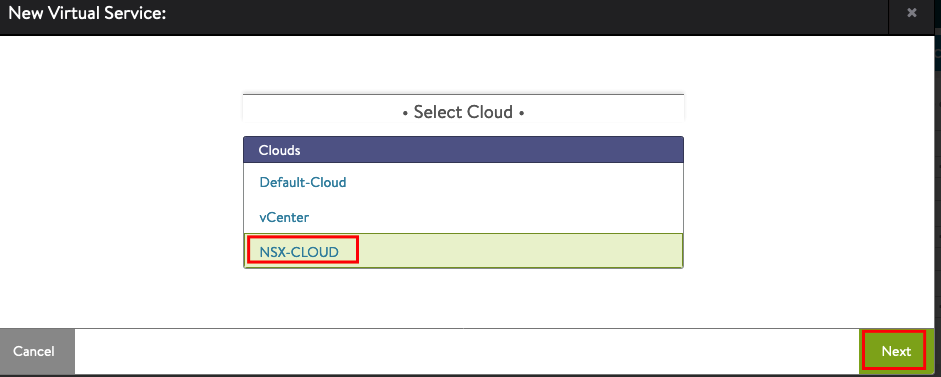
Choose your NSX-CLOUD and press Next
We will create a simple Load Balancing Service with HTTP and a Server Pool. Of course you can use also configure all other Parameters but for Testing it is better to start with a simple Deployment and modify the deployment after everything is working as expected.
We will create a Name for the Service, choose Auto Allocate and use the Information from IPAM.
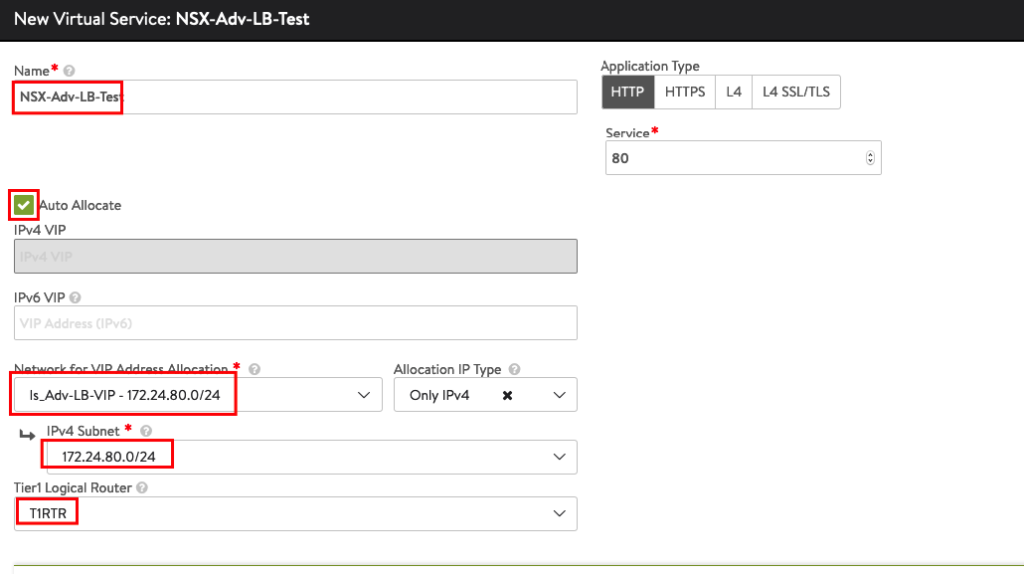
We will use the previous defined Group in NSX to auto allocate the WEB Servers IP Addresses, based on the Security Tags and Groups. Press Save to create the Application.
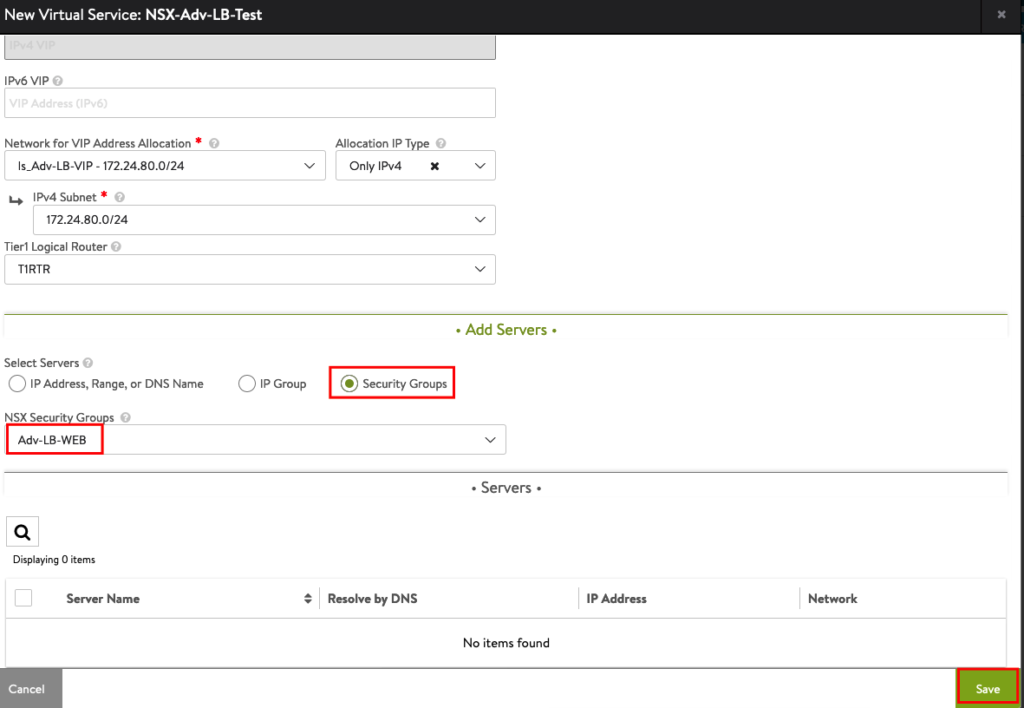
The Service is not be available right now, because the Service Engine VMs need to be created in vCenter. But you should see the IP Addresses learned from NSX.
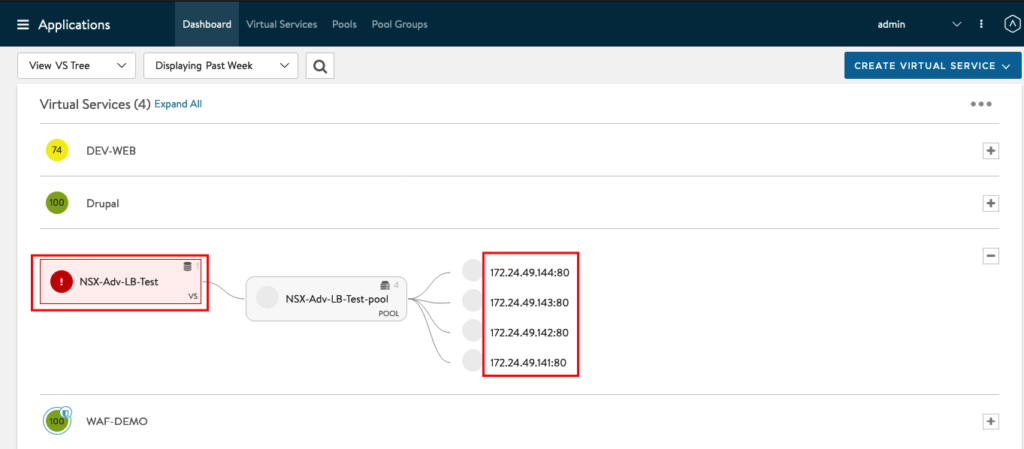
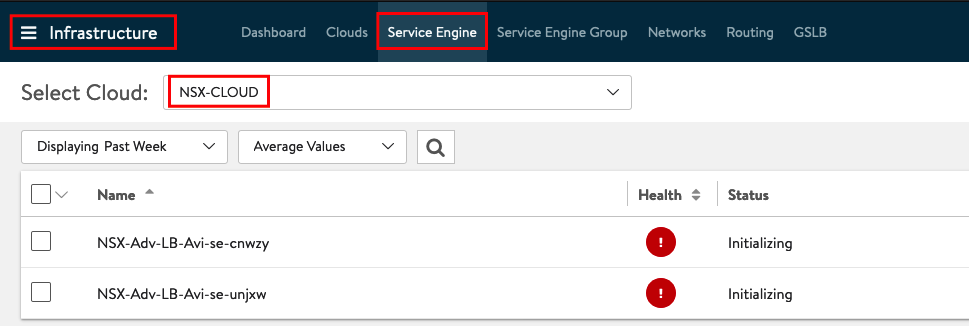
Wait until the Service Engines are up and Running and recognized from the Controller. You can check the Status under Infrastructure -> Service Engine -> NSX-CLOUD
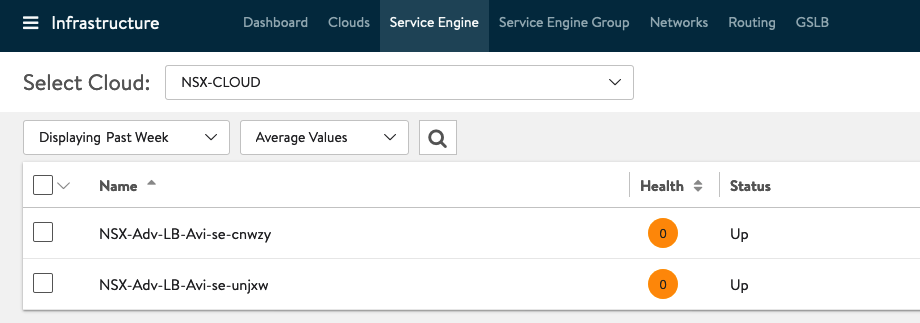
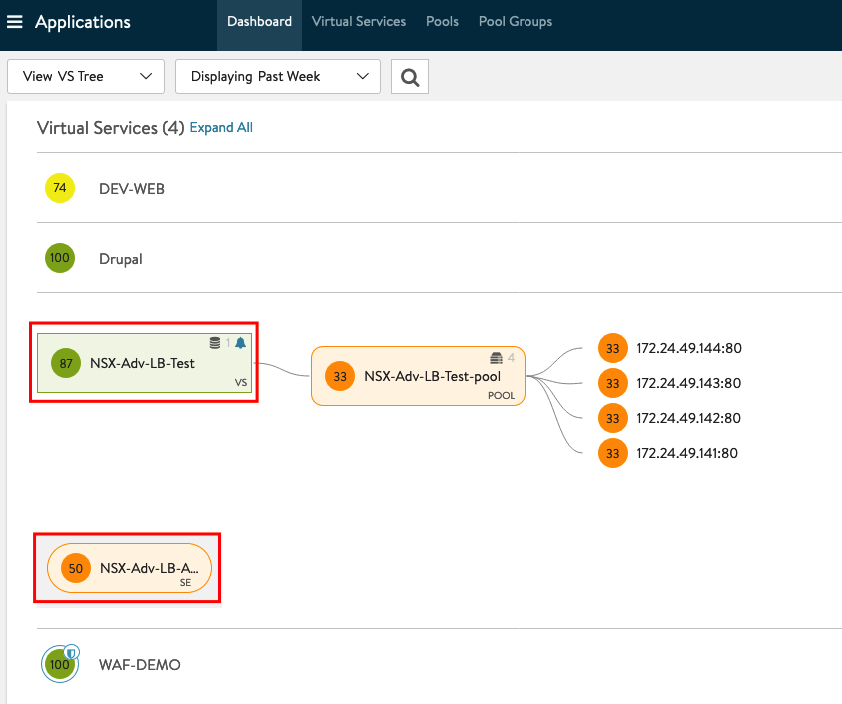
If the Status from the Service Engines is UP you can jump back to Applications to check the Status from the Service. And also if the Service Engine is applied to the Application.
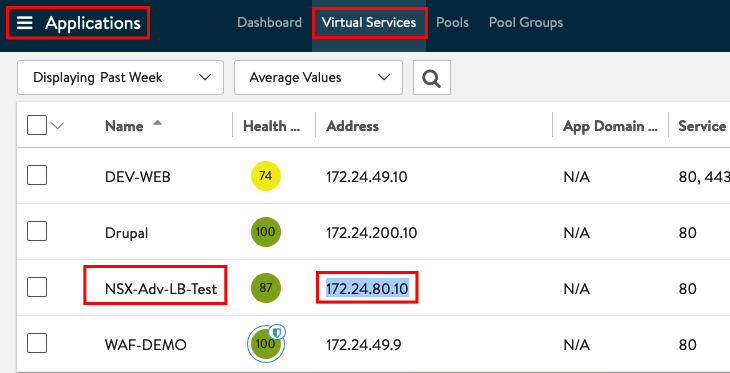
Open a new Window in your Browser and type in the Address. If no Firewall Rule is blocking the Connection and also if the Web Servers are configured properly you should be able to connect to your Service.

Troubleshooting
If something went wrong you should check the following Information
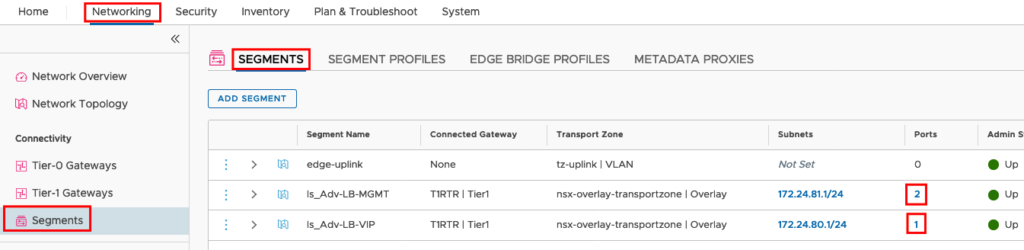
Go to your NSX Manager and check if the Service Engines are connected to the Segments.
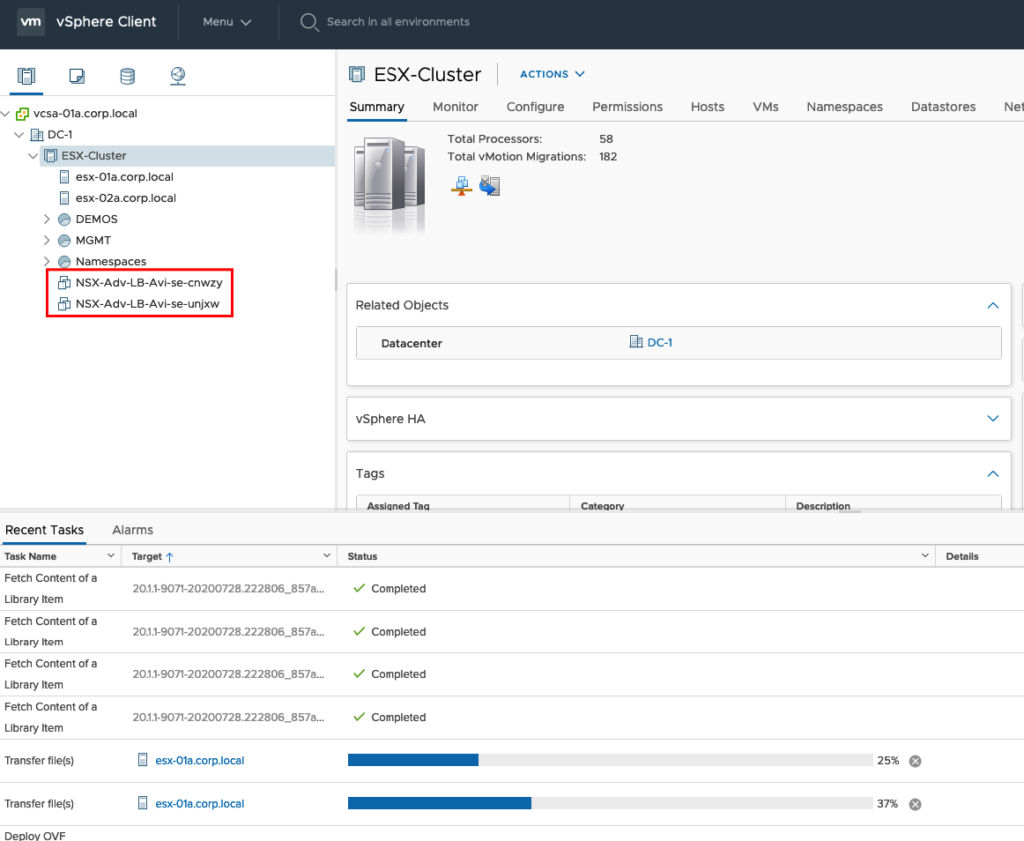
You will recognize that you have one Port connected to VIP Segment and 2 Ports connected to Management Segment. The NSX Adv. Load Balancer will install two Service Engines for Redundancy, but will connect only one Service Engine to the Application in the Default Setting.
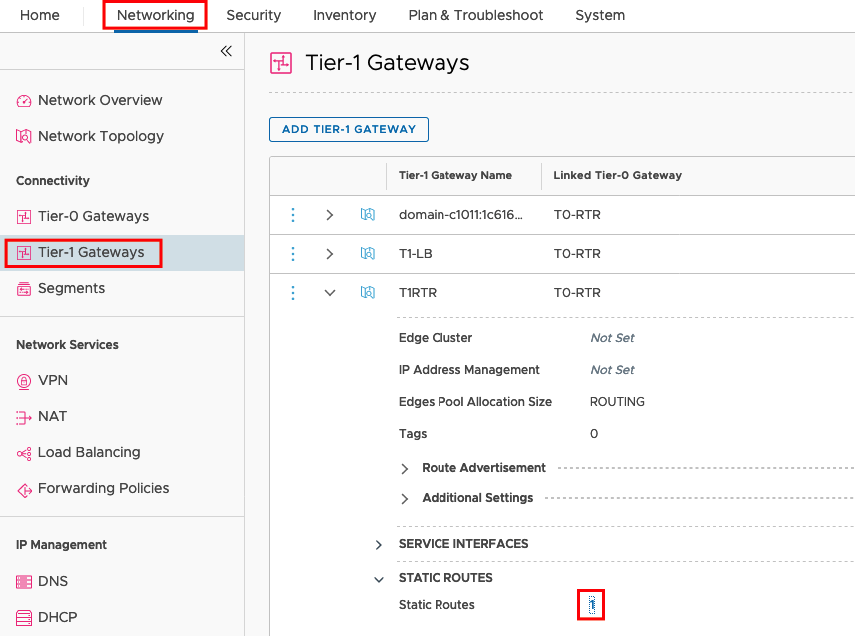
You should also check the Routing in NSX. The NSX Adv. Load Balancer will create a static Route on the Tier-1-Gateway to the VIP. Go to Networking -> Tier-1-Gateways -> YOUR T1 ROUTER -> STATIC Routes and click on the Hyperlink to show the Details.
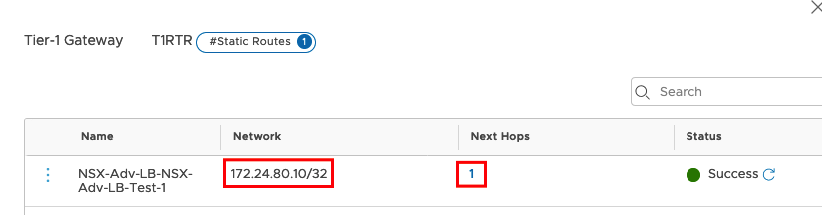
You should see the VIP Address and if you klick on the Next Hops Hyperlink you will find more Details.
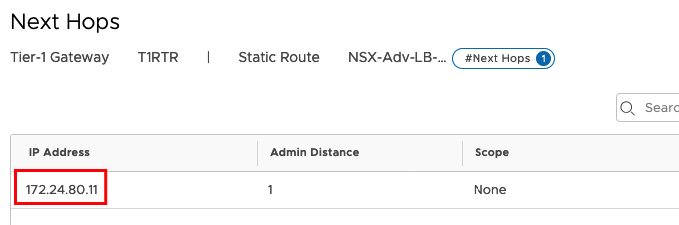
The next Hop Address is the real IP Address from the Service Engine and should be reachable from your WEB Servers
Connect to one of your Web Servers and try to ping the VIP and also the Real IP Address. You should get an answer from Both IP Addresses.
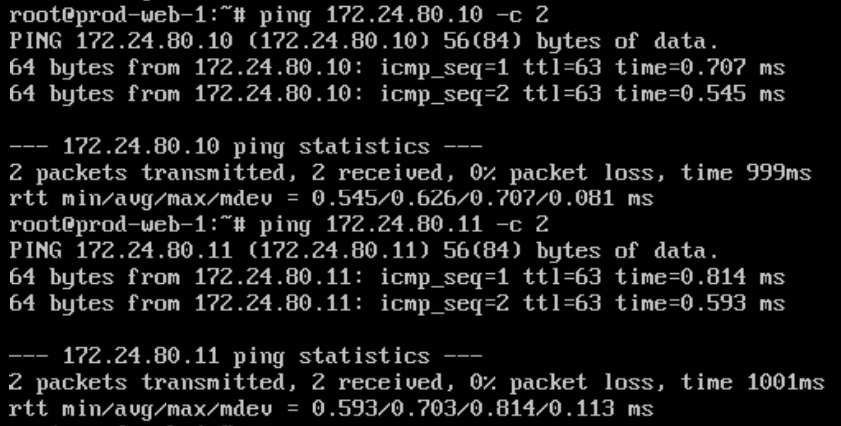
You can also do a Traceroute/path

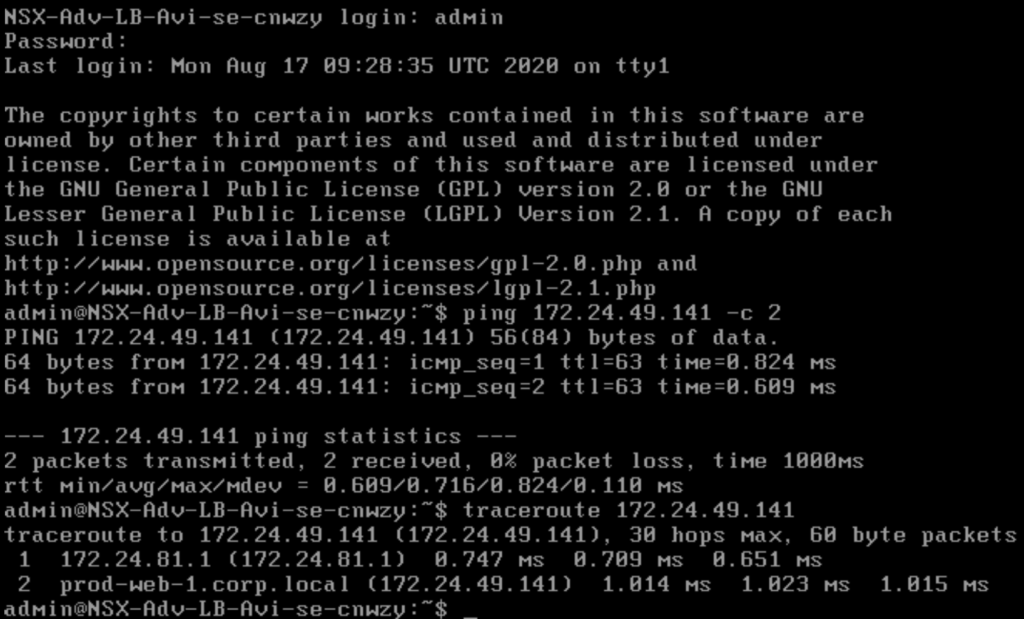
And we will do the same from the Service Engine. Username and Password are the same you are using for your Controller Login

- VCF9 NSX-Edge Setup – What has changed - 11. July 2025
- VCF NSX-Edge setup from a network perspective - 2. June 2025
- VCF Workload Domain Setup from a network perspective - 2. June 2025