


This post shows how to integrate Kubernetes (1.18) running in vSphere 6.7 hosted Ubuntu 18.04 VMs with VMware NSX-T 3.0
This example uses the NSX NCP “shared Tier 1” topology meaning that all namespaces of the k8s cluster use the same T1 Gateway. Stateful services like Load-Balancing and NAT are applied to this T1 gateway. Another option would be to have a T1 Gateway for each k8s namespace and have the T0 gateway to run stateful services. If youre interested in the pros and cons of each option just let me know 😉
VM Preparation
Create 3 empty VMs: k8s-master, k8s-node1, k8s-node2
VM settings: Ubuntu 64-Bit VMs, 2 CPU, 4GB RAM, 16GB Disk, 2 vnic (at creation connected to any network)
NSX Preparation
Get NSX-T 3.0 Up and running.
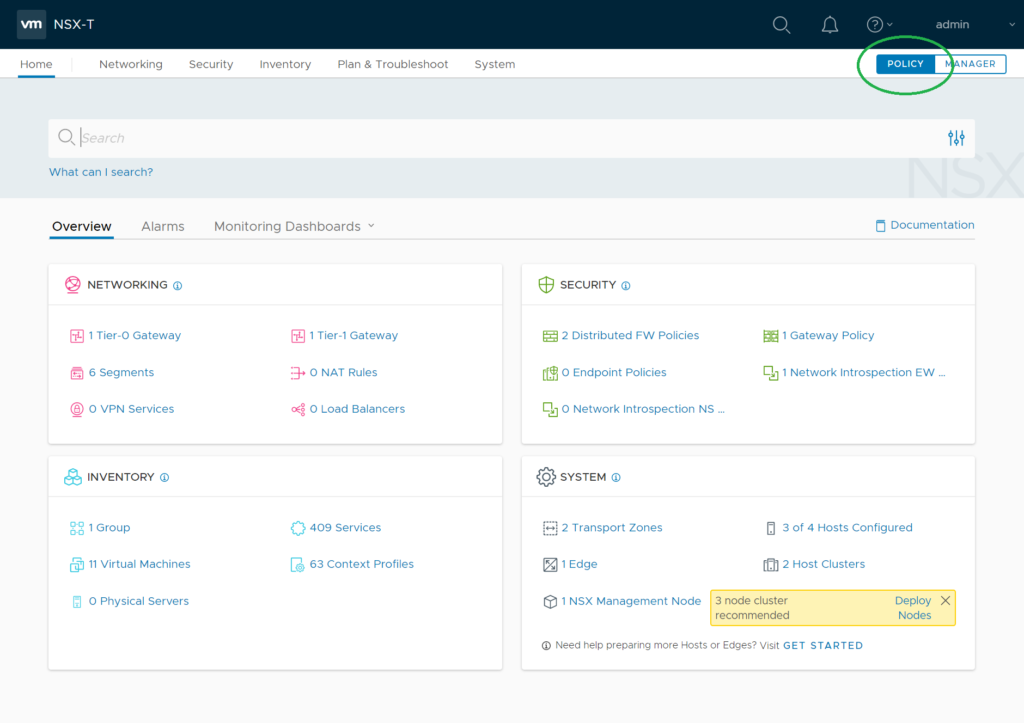
Note: All elements are being created using the Policy UI (so don’t use “Manager”)
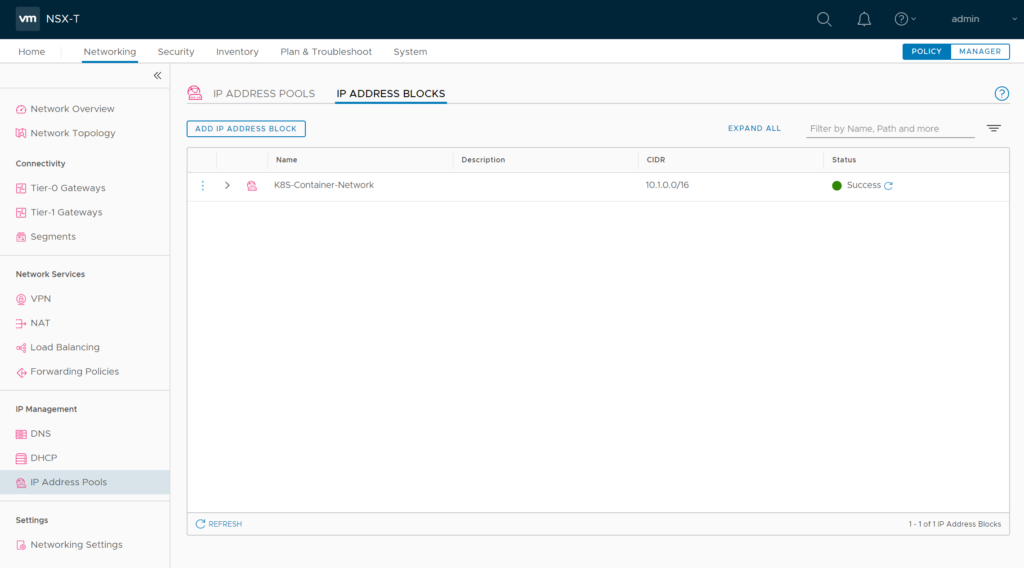
Create a NSX IP address block for container networking. This will be used to apply subnets to the K8S PODs. Can be private IPs as they will not leave the NSX environent. I named it “K8S-Container-Network“
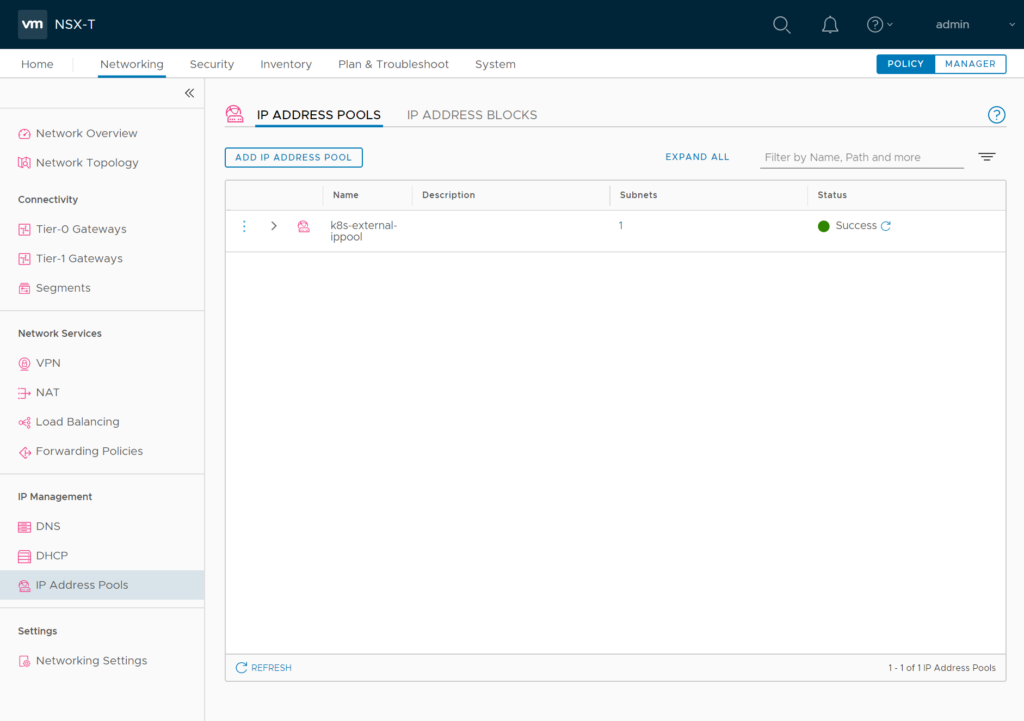
Create a NSX IP address pool for external container networking. Container networks of a namespace will be NAT’ed behind these addresses. So these should be routable in your datcenter. I named it “k8s-external-ippool“
Management Connection
Have a NSX T0 logical gateway created & configured (North-South traffic / internet access for logical networks should work)
Create a logical segment “LS_K8S_MGMT” for VM management access and connect it to the first vnic of the VMs (later shown in linux as ens160).
As Ubuntu & K8S installation will use this logical segment for management, installation and updates there should be internet access. So connect it to your T0 Gateway
Overlay Connection
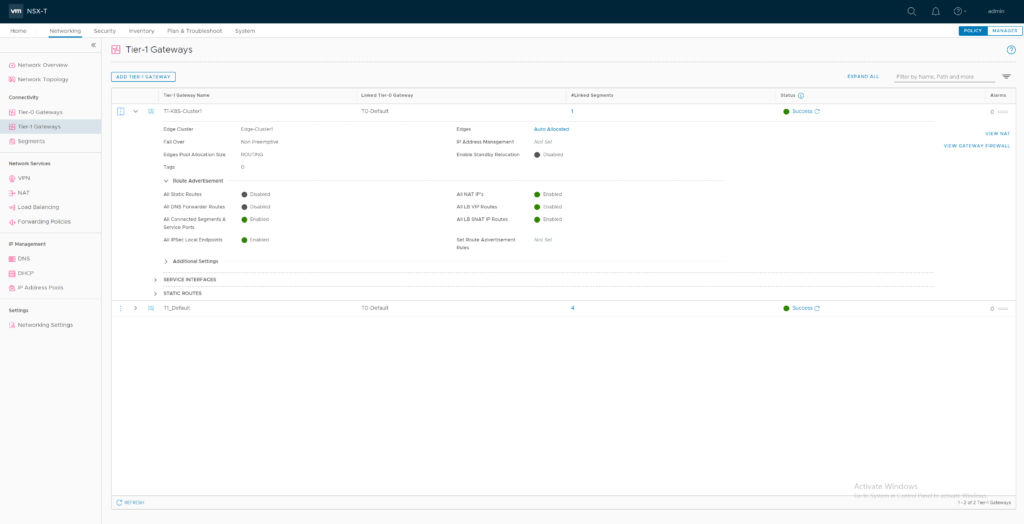
Create a T1 gateway and name it “T1-K8S-Cluster1”. Connect it to your T0 router and enable route Advertisement for all connected Segments, NAT IPs and LB VIP Routes and LB SNAT IP Routes.
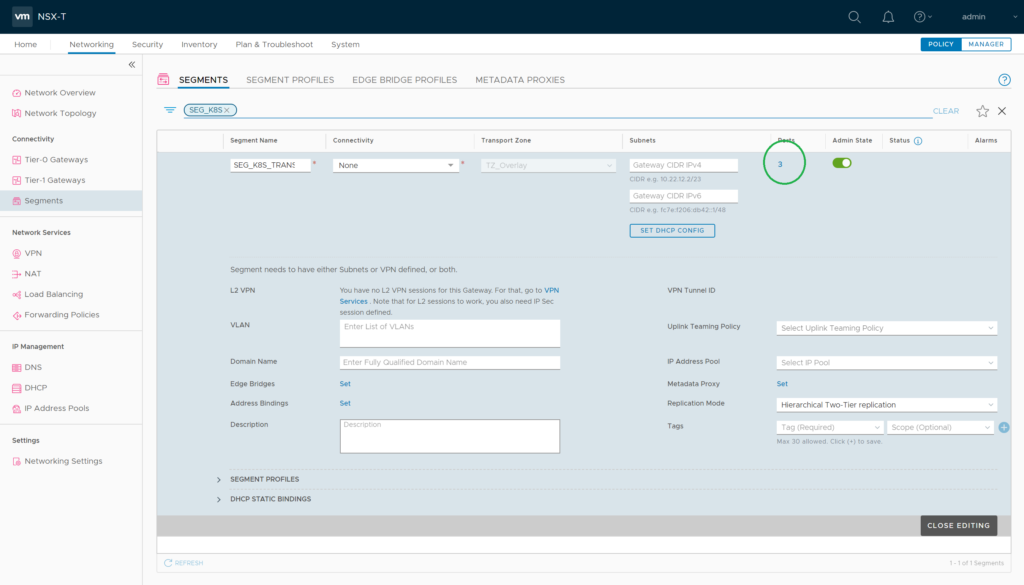
Create a logical segment “SEG_K8S_TRANSPORT” and connect it to the second vnic of the VMs (shown in Linux as ens192). This segment needs to be connected to the previously create T1 gateway. Give it an IP Address that does not conflict with the IP Addresses of the Kubernetes nodes.
NSX-T CNA plugin will later use this segment to tunnel overlay traffic thru the ESXi hyperbus interface.
Your VM/NSX setup should now look like this (IP Adresses will be setup later):
NSX Port Tagging
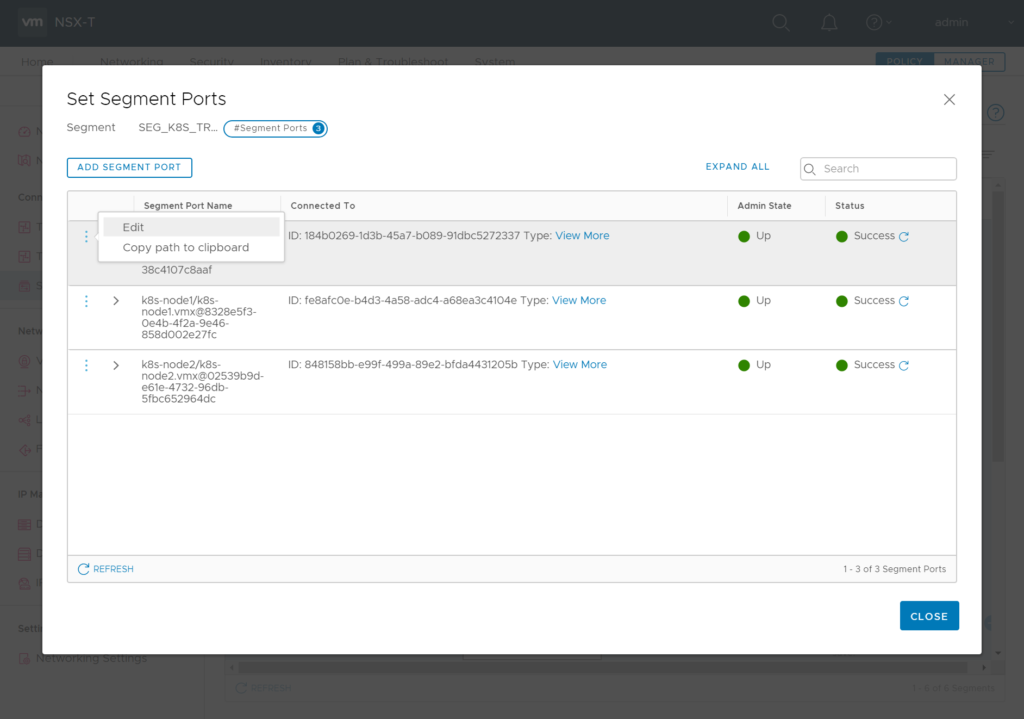
Now as the second vnic is connected to the “SEG_K8S_TRANSPORT” you need to tag all VM Ports there.
Each VM-connected logical port needs two tags in format:
Tag: [VM-Name] Scope: ncp/node_name
Tag: [k8s Cluster Name] Scope: ncp/cluster
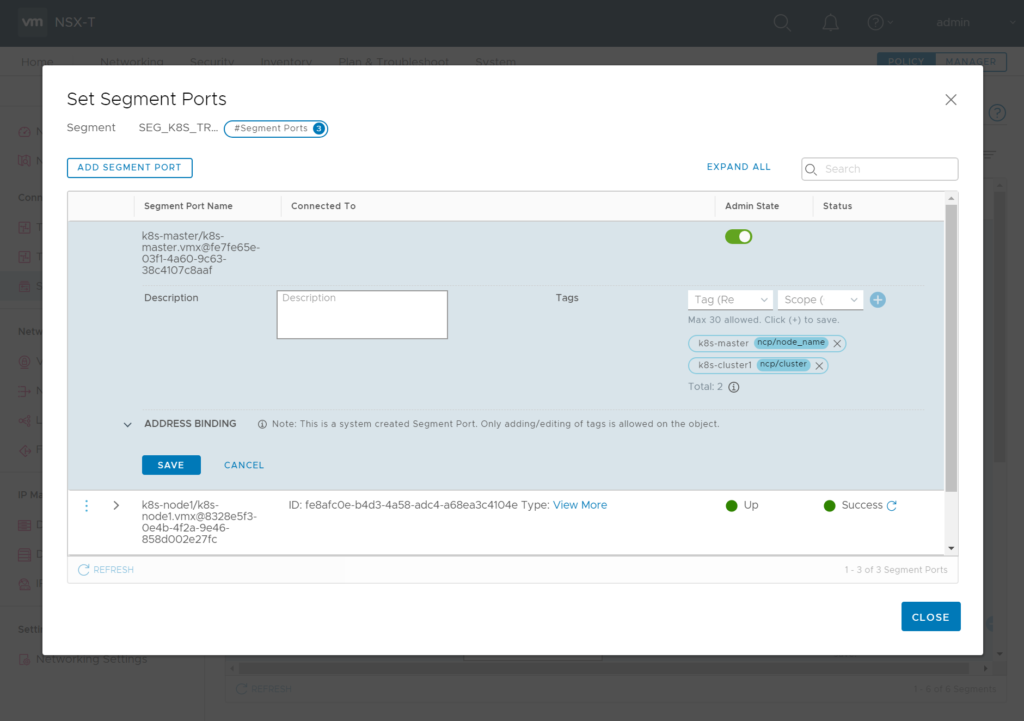
For k8s-master:
Tag: “k8s-cluster1” / Scope “ncp/cluster”
Tag: “k8s-master” Scope “ncp/node_name”
For k8s-node1:
Tag: “k8s-cluster1” / Scope “ncp/cluster”
Tag: “k8s-node1” Scope “ncp/node_name”
For k8s-node2:
Tag: “k8s-cluster1” / Scope “ncp/cluster”
Tag: “k8s-node2” Scope “ncp/node_name”
Linux Setup
Common Tasks for all three VMs. (you could think about doing it for one VM and clone it)
Linux Setup
Install Ubuntu 18.04 (I just did a minimal install with OpenSSH Server)
Install without SWAP or delete SWAP later in /etc/fstab and reboot.
Additional packages needed:
vm@k8s-master:~$: sudo apt-get install docker.io open-vm-tools apt-transport-https python linux-headers-$(uname -r)
Configure the first network interface with the network settings you need for managing the VMs, leave the second unconfigured. Now you should be able to ssh into the VM.
Check Docker Status
vm@k8s-master:~$: sudo systemctl status docker
If not already enabled just do so
vm@k8s-master:~$ sudo systemctl enable docker.service
vm@k8s-master:~$: docker version
If this gives you a “Got permission denied while trying to connect to the Docker daemon socket”
Your current user should get a member of the docker group:
vm@k8s-master:~$: sudo usermod -a -G docker $USER
re-login, check with “groups” command if you’re now member of the group
Install Kubelet
vm@k8s-master:~$: curl -s https://packages.cloud.google.com/apt/doc/apt-key.gpg | sudo apt-key add
vm@k8s-master:~$: sudo touch /etc/apt/sources.list.d/kubernetes.list
vm@k8s-master:~$: echo "deb http://apt.kubernetes.io/ kubernetes-xenial main" | sudo tee -a /etc/apt/sources.list.d/kubernetes.list
vm@k8s-master:~$: sudo apt-get update
As the currently latest NSX-T 3.0 supported K8S version is 1.18 lets now install it
Find the latest 1.18 sub-version by
vm@k8s-master:~$: apt-cache show kubelet | grep "Version: 1.18"
In my case this is 1.18.3-00
vm@k8s-master:~$: sudo apt-get install -y kubelet=1.18.3-00 kubeadm=1.18.3-00 kubectl=1.18.3-00
Prepare NSX-T NCP Plugin
Download NSX-T 3.0 container plugin on your management host, unzip it and copy the directory to the VM
Load NCP Image into local docker repository
vm@k8s-master:~$: docker load -i ~/nsx-container-3.0.1.16118386/Kubernetes/nsx-ncp-ubuntu-3.0.1.16118386.tar
Note the Docker Image Repository output: “Loaded image: registry.local/3.0.1.16118386/nsx-ncp-ubuntu:latest”
This finishes the common tasks for all VMs
Edit ncp-ubuntu.yaml
This only needs to be done at the k8smaster VM. Open “~/nsx-container-3.0.1.16118386/Kubernetes/ncp-ubuntu-policy.yaml” in your favorite editor. After all the CustomResource/Cluster Role/Service Accounts/Cluster Roles you’ll find the ConfigMap for ncp.ini (around line 415)
Following are the changes I set in my demo environment. Not recommended for production environments. Green entries might be added, for all others just remove the # and edit the setting.
[coe]
adaptor = kubernetes
cluster = k8s-cluster1
node_type = HOSTVM
[nsx_v3]
policy_nsxapi = True
nsx_api_managers = 192.168.110.201
nsx_api_user = admin
nsx_api_password = NsxAdminPassword
insecure= True
subnet_prefix = 28
use_native_loadbalancer = True
pool_algorithm = ROUND_ROBIN
service_size = SMALL
container_ip_blocks = K8S-Container-Network
external_ip_pools = k8s-external-ippool
overlay_tz = UUID_of_your_Overlay_TZ
top_tier_router = T1-K8S-Cluster1
single_tier_topology = True
[k8s]
apiserver_host_ip = 172.16.30.10
apiserver_host_port = 6443
ingress_mode = nat
There is a second ncp.ini ConfigMap around Line 1100. This is used for the Node Agent POD
[k8s]
apiserver_host_ip = 172.16.30.10
apiserver_host_port = 6443
ingress_mode = nat
[coe]
adaptor = kubernetes
cluster = k8s-cluster1
node_type = HOSTVM
[nsx_node_agent]
ovs_bridge = br-int
ovs_uplink-port = ens192
After this locate all of the
image: nsx-ncp
imagePullPolicy: IfNotPresent
entries and replace the “image: nsx-ncp” with the image you loaded into the local docker registry:
image: registry.local/3.0.1.16118386/nsx-ncp-ubuntu
imagePullPolicy: IfNotPresent
(should appear six times in the ncp-ubuntu-policy.yaml)
Create K8S Cluster
On k8s-master you now can run
vm@k8s-master:~$: sudo kubeadm init
Note the output after successful run. Now you can join the nodes by running the command from the output of your (!) “init” command on each of your nodes. My example:
vm@k8s-node1:~$ sudo kubeadm join 172.16.30.10:6443 --token cgddsr.e9267hxkkds12dr1 --discovery-token-ca-cert-hash sha256:7548767f814c02230d9722d6fb1a0e9c57043e0a9feb9aaffd30d77ae7b9d145
In case you lost the output of the “init” command here’s how to re-display it
vm@k8s-master:~$ kubeadm token create --print-join-command
On k8s-master allow your regular user to access the cluster:
vm@k8s-master:~$ mkdir -p $HOME/.kube
vm@k8s-master:~$ sudo cp -i /etc/kubernetes/admin.conf $HOME/.kube/config
vm@k8s-master:~$ sudo chown $(id -u):$(id -g) $HOME/.kube/config
Check your Cluster. (“NotReady” can be okay, we haven’t configured NCP right now)
vm@k8s-master:~$ kubectl get nodes
NAME STATUS ROLES AGE VERSION
k8s-master NotReady master 5m48s v1.18.3
k8s-node1 NotReady 2m48s v1.18.3
k8s-node2 NotReady 2m30s v1.18.3
On the master you can now apply the ncp-ubuntu.yaml file
vm@k8s-master:~$ kubectl apply -f ./nsx-container-3.0.1.16118386/Kubernetes/ncp-ubuntu-policy.yaml
When all PODs are running in namespace nsx-system NCP should be ready. If not it’s time for troubleshooting….
vm@k8s-master:~$ kubectl get pods -n nsx-system -owide
NAME READY STATUS RESTARTS AGE IP NODE NOMINATED NODE READINESS GATES
nsx-ncp-7cfcbfdd58-n65s8 1/1 Running 0 12m 172.16.30.12 k8s-node2
nsx-ncp-bootstrap-cv8qj 1/1 Running 0 12m 172.16.30.11 k8s-node1
nsx-ncp-bootstrap-j57sl 1/1 Running 0 12m 172.16.30.10 k8s-master
nsx-ncp-bootstrap-wndxb 1/1 Running 0 12m 172.16.30.12 k8s-node2
nsx-node-agent-bhr4f 3/3 Running 0 12m 172.16.30.10 k8s-master
nsx-node-agent-fzw67 3/3 Running 0 12m 172.16.30.12 k8s-node2
nsx-node-agent-hg5vh 3/3 Running 0 12m 172.16.30.11 k8s-node1
You should check now if you can create deployments, services and ingress controllers. Please also check if kube-dns is working properly as described here.
Pingback: Troubleshooting DNS on Kubernetes with NSX-T » vrealize.it - TechBlog VMware SDDC