


Special thanks go to Martin Petkov for his help on API questions.
Self-Service offerings typically bring up the question: Who’s the consumer for the services offered? While in many cases this might be some type of end-users who don’t care much where the service is running there’s also a lot of use cases where skilled IT departments use the portal to provision infrastructure resource VMs. IT departments usually have a good knowledge about the infrastructure and can judge which infrastructure parameters they want to leverage. One aspect of this is the selection of the target network for a VM.
An automation solution like vRealize Automation has the capabilities to do decisions on which network to place workloads without asking the user for it, but in some cases it might be desired to give the user the choice of the network to use for provisioning. When users do have the option to select the network of choice in their request this easily can be done by a static list of available networks. However, in companies with multiple organizations usually not all departments have access to all available networks. They rather need to be presented with the one’s they have permissions for.
vRA 7 provided some Orchestrator actions to do this by leveraging reservations and reservation policies. In vRA 8 and vRA Cloud the architecture has changed completely which requires new thinking by using tags, custom properties and api calls.
This blog article shows how a network selection in request form can be achieved with vRA 8 and vRA Cloud. The steps shown here are using vRA 8.1 as an example but can be applied to vRA Cloud as well with slight modifications.
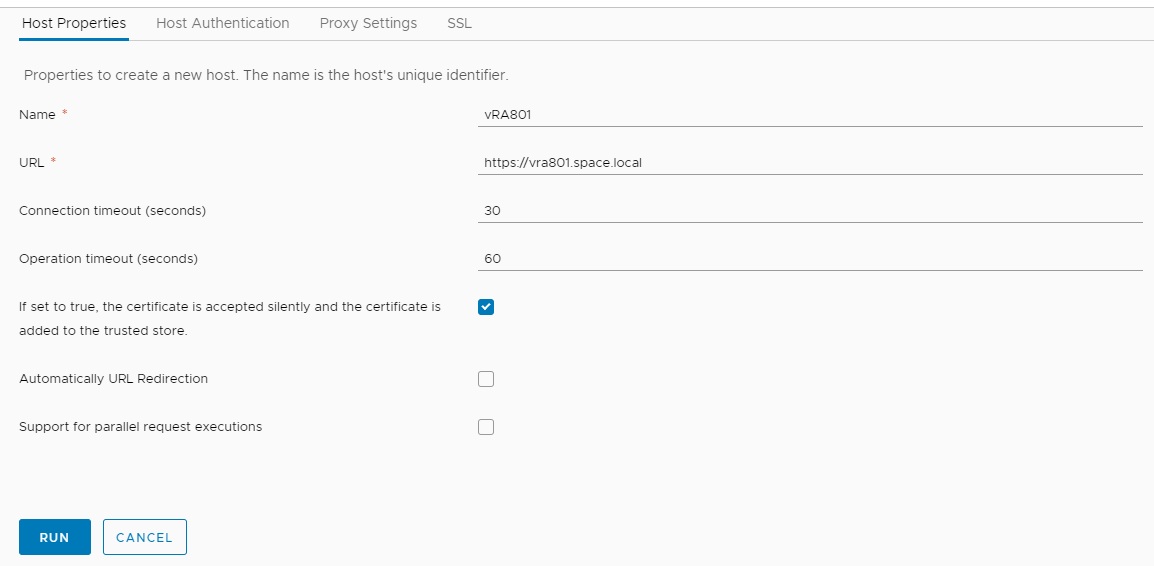
Add REST Host to vRealize Orchestrator
The integration needs to retrieve some information from vRA8 API, hence a vRA8 Rest Host needs to be added to vRO by running the OOTB workflow “Add a REST host” (see screenshots below). For vRA Cloud a different URL must be used. This is https://api.mgmt.cloud.vmware.com for accessing the US vRA Cloud platform. Please take a note of the name specified as it is needed in a later step to modify the related action.

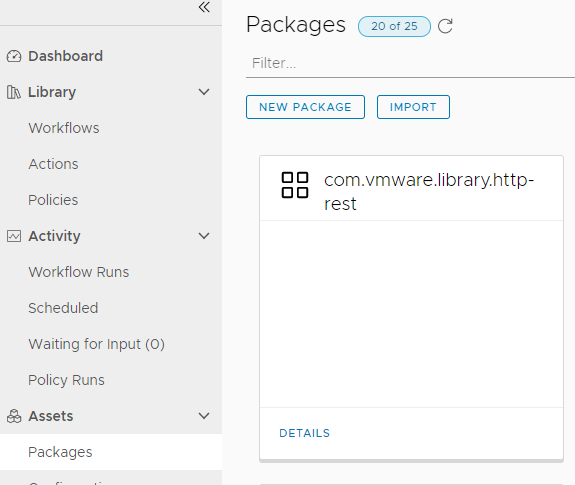
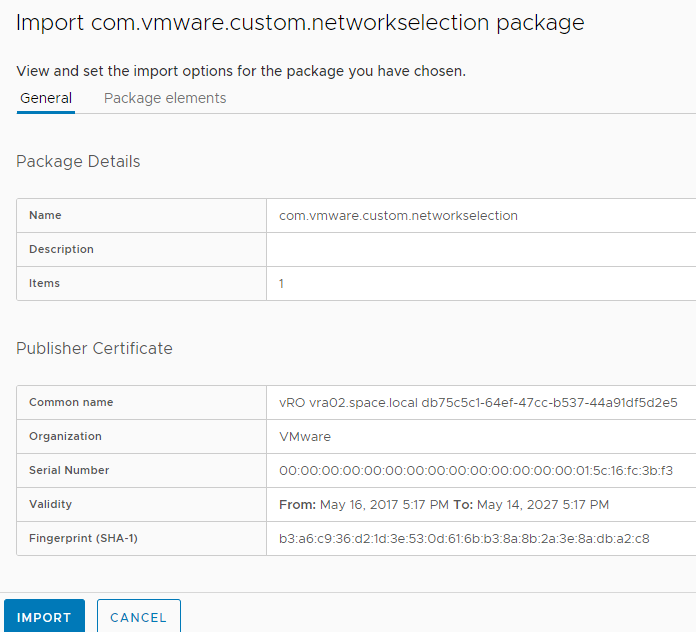
Import Orchestrator action
Download the Orchestrator action for vRA8 or for vRA Cloud.
Now you must unzip and import the action package into vRO. I will now not walk through all required steps for package/action import in this blog post.
Modify Orchestrator action
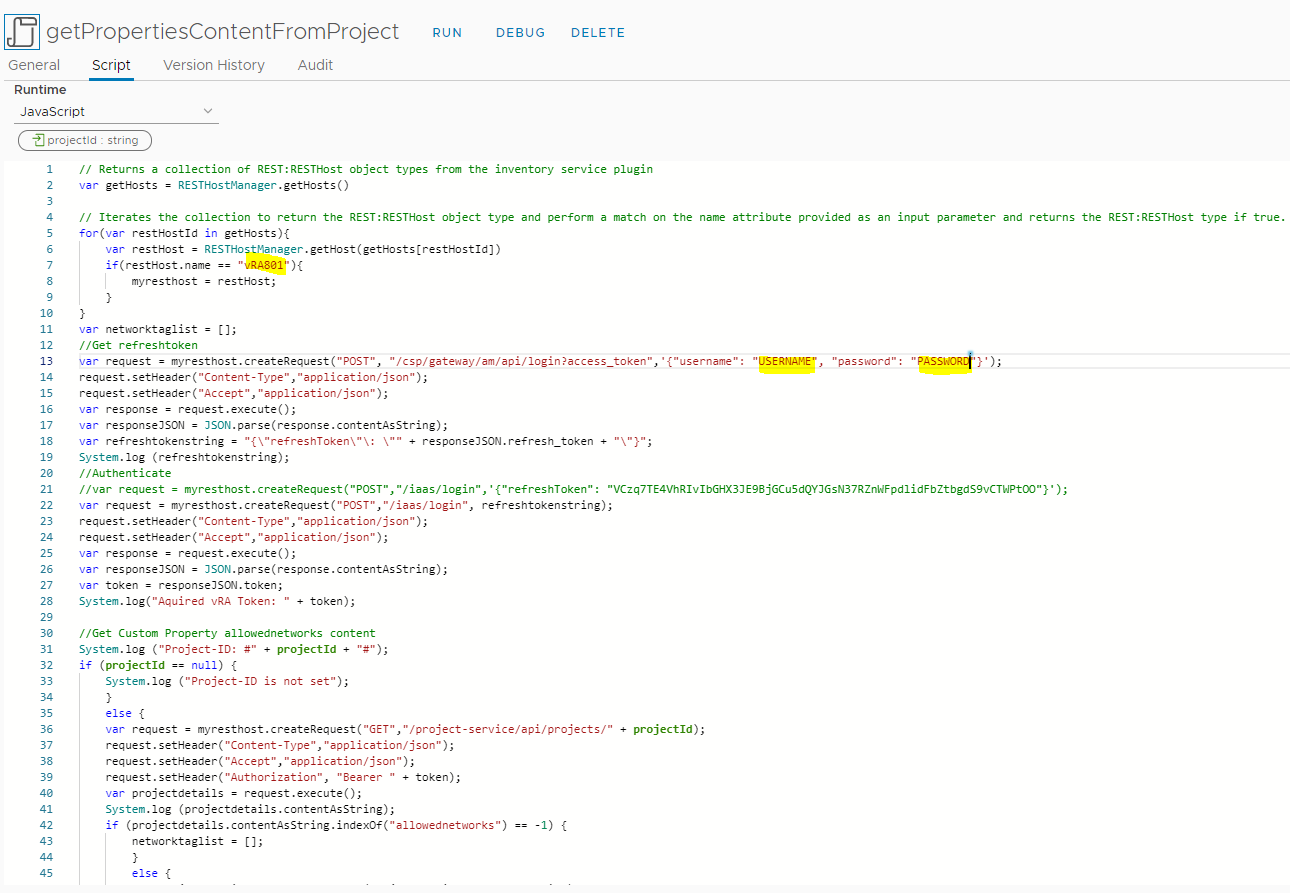
After successful import you should find a vRealize Orchestrator action getPropertiesContentFromProject in the action list. This action needs few modifications which are marked in yellow (see below screenshot) to work in your environment. In detail you must add the REST Host name (see section 2) and add username and password to do api calls. Please make sure that his user has administrative permissions to CloudAssembly and can retrieve details from all projects.
Create network profile
The principle of placing resources into networks for vRA 8 is based on network profiles. To leverage existing networks in an on-premise vSphere deployment you must create a network profile where all networks are added from the available ones. vRA 8 uses internal tags to mark the networks in question and further uses those to do the actual placement. In this example we are using tags with the name “network” and the related value like “developer” separated by a colon: network:developer
You must use the same principle and choose a common name with custom value for each network. There might be other ways doing it as well (e.g. using multiple profiles with individual tags) but I haven’t tested all combinations so far.
To specify a tag, you have to add the network in question, then check the hook in front of it and click on the “tags” button in the menu on top

Add custom property to the projects used
As mentioned in the introduction the goal is to assign networks to projects where each project only has permissions to a subset of the available networks. To achieve this, we are using a custom property called “allowednetworks” which is filled with a comma-separated list of the network tags the project is given permission to.
On request of a blueprint the Orchestrator action will read this property from the project and present the user with a list of the available networks to select from. After selection the property will be put as network constraint in the blueprint and force provisioning into the desired network. If the project does not contain this property, the list will simply be empty, and provisioning will run into a failure.

Create Blueprint
Find below a blueprint example you can use. Image/imageRef part must be modified. In general, you can use any of your existing blueprints. The most important part is adding the input property and proper constraint to the network section.
After creation, a new version of the blueprint must be created which is also released to the catalog. I will not dig deeper on how you share a blueprint in Service Broker. Please consult Service Broker documentation in case you are not familiar with it.
name: CentOS Server
formatVersion: 1
inputs:
select-network:
type: string
title: Select Network
resources:
CentOS-VM-01:
type: Cloud.vSphere.Machine
properties:
imageRef: TEMP-CentOS7-for-vRA2/snap-vRA8
cpuCount: 1
totalMemoryMB: 1024
networks:
– network: ‘${resource.Cloud_vSphere_Network_1.id}’
Cloud_vSphere_Network_1:
type: Cloud.vSphere.Network
properties:
networkType: existing
constraints:
– tag: ‘${input.select-network}’
Enabling custom forms on the blueprint
vRealize Automation provides custom forms functionality. This allows to tailor the request form beyond what the Cloud Assembly blueprint can provide. Especially if external data needs to be included in the request form the only means realizing it is by custom forms.
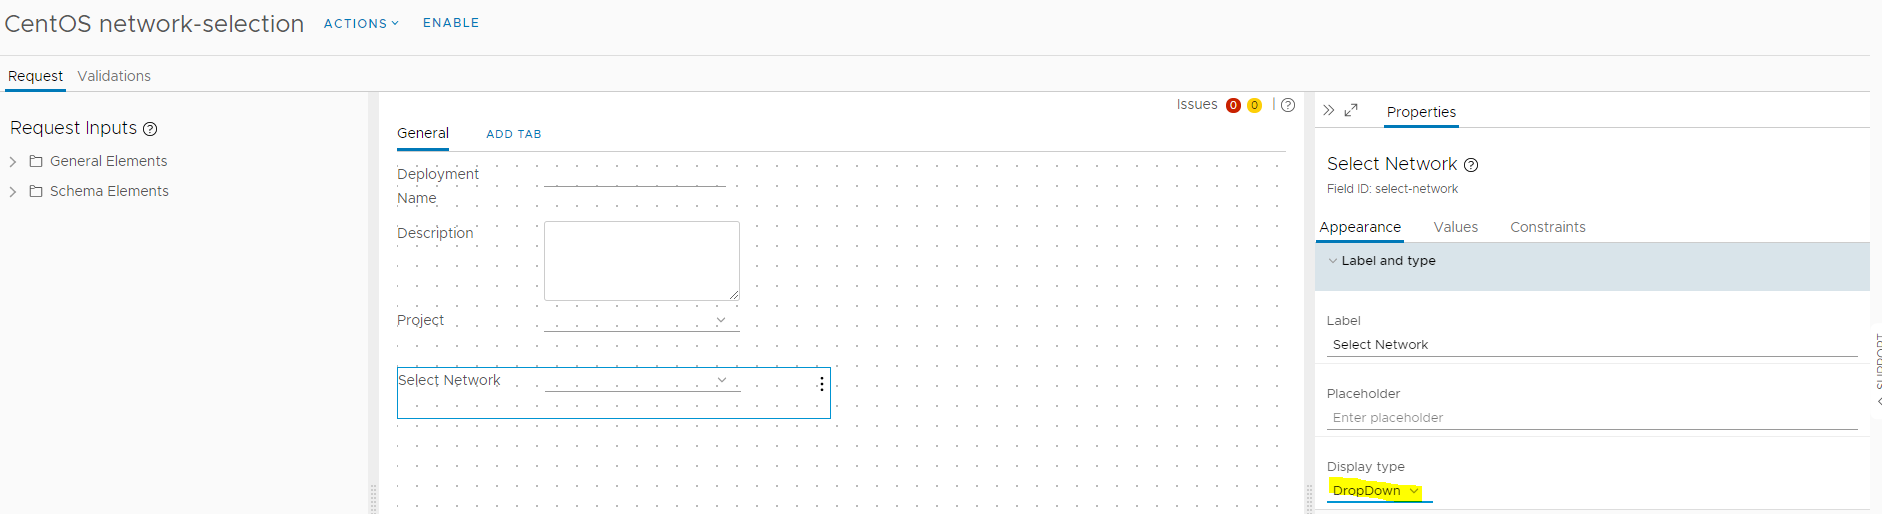
If the blueprint has been created correctly you should see a “Select Network” form element appears. For this element the suggested display type should be “Dropdown”.
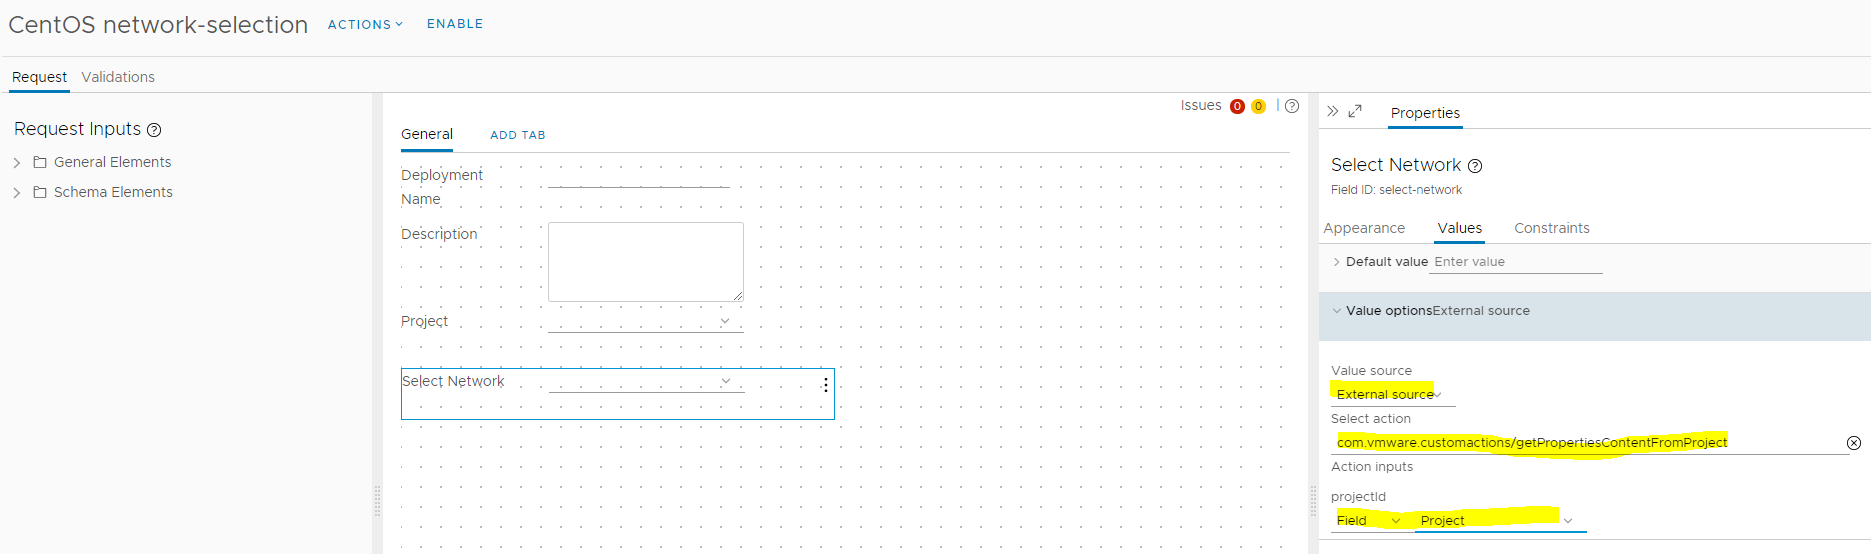
In the “value” section you must select “external source” as “value source” and search for the action getPropertiesContentFromProject. This action requires the projectID as input which is automatically provided by a field reference to “Project” when selected correctly.
Please make sure you click the “ENABLE” button in the top of the screen before saving the custom form modifications.
Testing the blueprint
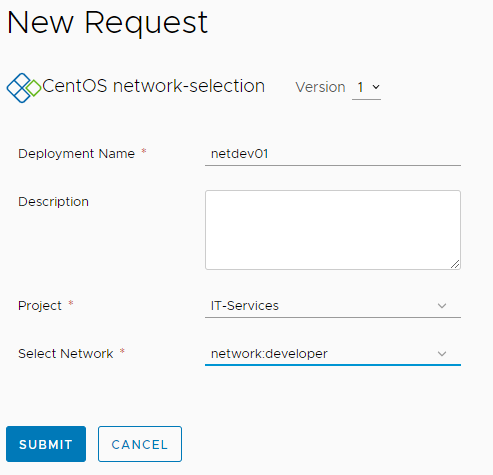
If everything has been prepared properly you should be able to request the blueprint and see a “Select Network” field which lists the tags specified in project’s custom properties. By selecting a different project, the “Select Network” content should be updated accordingly. After provisioning you will see the VM being deployed in the correct network related to the selection done in request screen.

- Approval with Jira change ticket - 4. January 2024
- Automated SaltStack Minion Updates through winrepo - 9. November 2023
- Automated SaltStack Minion Updates - 27. October 2023
Most people will probably need to change the “getPropertiesContentFromProject” line 13 in order to login to:
var request = myresthost.createRequest(“POST”, “/csp/gateway/am/api/login?access_token”,'{“username”: “my-user”, “password”: “my-password”, “domain”: “my-domain”}’);
Validation happens only within Service Broker and will not prevent users to provision to unassigned networks via REST API.
Yes, that’s correct. There’s 2 potential solutions for this:
1.) Add validation workflow into custom form which should then also be honored by API (haven’t verified).
2.) Change architecture like this:
– add network tags to networks (same as here)
– create 1 network profile per project
– tag network profile with project-id
– add project-id tag into network constraints on project
– filter available network tags in custom forms based on project-assigned network profile
The 2nd approach is probably the more secure and structured one compared to the solution shown in this blog. This blog was supposed to show and example solution which opens up ideas for similar implementations.
I implemented the second approach and it works fine. Thank you for the guidance.
Hi i am having issues with the constraints in the blueprint, is that the proper syntax?
I think you are referring to the network constraint? Yes, this is proper syntax. It’s an array of values and in this case it constrains the blueprint to use the network profile that has the tag associated which was selected by the user input. This requires however that you have set the tag properly on the network as explained in the previous sections.
Pingback: Dynamic Network Selection in request form with vRealize Automation 8 (part 2) » vrealize.it - TechBlog VMware SDDC