


Introduction
In my previous post, we implemented NSX-T with Openshift 4 based without NCP’s support for Openshift operators (see https://www.vrealize.it/2020/07/15/nsx-t-ncp-integration-with-openshift-4-3-the-hard-way/).
In the meantime, NCP 3.0.2 was released, which is implemented using an Openshift operator. The operator is also published on the Redhat Openshift Operator Hub (https://catalog.redhat.com/software/operators/detail/5ef0f362701a9cb8c147cf4b). That makes the installation way more simple, as you will see below.
As an update as well, I will demonstrate the installation using the lastest Openshift 4.4 version, but NCP 3.0.2 also supports Openshift 4.3, in case you want to run that version.
High-Level Installation Walkthrough
Let’s first review what the high-level tasks are to get it working:
- Prepare a small jumphost VM for all the installation tasks and install the required installer files
- Prepare the required DNS host entries
- Configure NSX-T networking constructs to host the cluster
- Deploy a Redhat Container Host image as template within your vSphere environment
- Prepare the Openshift install config and modify it for NCP. This will create the cluster manifests and ignition files.
- Deploy an Openshift cluster as user-provided infrastructure with bootstrap, control-plane and compute hosts using Terraform
- Let the bootstrap host provision the cluster and finalize the remaining cluster deployment.
Detailed Installation Walkthrough
1. Jumphost Preparation and Pre-Requisites
For my lab, I have downloaded a CentOS 7.8 minimal ISO and created a VM based on it. If you like, you can grab the ISO here: http://isoredirect.centos.org/centos/7/isos/x86_64/, but any other linux-based VM should work as well.
As we are going to use a couple of scripts and Terraform as well, it makes sense to have at least Python and Terraform installed:
sudo yum install python-pip
sudo yum install unzip
sudo yum install wget
export TERRAFORM_VERSION=0.11.14
curl -O -L https://releases.hashicorp.com/terraform/${TERRAFORM_VERSION}/terraform_${TERRAFORM_VERSION}_linux_amd64.zip
unzip terraform${TERRAFORM_VERSION}_linux_amd64.zip -d ~/bin/
terraform -v
Terraform v0.11.14
To keep things tidy, let’s create a directory structure for the Openshift deployment. You don’t have to, but since you might want to deploy separate deployments, it makes sense to have at least one directory for each deployment:
[localadmin@oc-jumphost ~]$ tree openshift/ -L 1
openshift/
├── config-files
├── deployments
├── downloads
├── installer-files
└── scripts
Download the following items to the downloads folder, extract them into the install-files directory, and move the clients and installer to your binary folder (At the time of this writing, the current version of Openshift 4.4 is 4.4.25, so that is what I have used for the installer and clients). We are also going to use the terraform installer for the vSphere UPI deployment. As the terraform-part is pretty version-independent, but version 4.3 allows an easy way to configure DNS and Default Gateways, I used the 4.3 terraform scripts.
cd openshift/downloads
wget -c https://mirror.openshift.com/pub/openshift-v4/clients/ocp/4.4.25/openshift-install-linux.tar.gz
wget -c https://mirror.openshift.com/pub/openshift-v4/clients/ocp/4.4.25/openshift-client-linux.tar.gz
cd ../installer-files
tar -xf ../downloads/openshift-client-linux.tar.gz
tar -xf ../downloads/openshift-install-linux.tar.gz
sudo cp {oc,kubectl,openshift-install} /usr/bin/
git clone -b release-4.3 https://github.com/openshift/installer.git
Now, you should have the openshift installer and kubectl commands available.
Next step is to create ssh keys, as we will need them to ssh to the RHCOS container hosts:
ssh-keygen -t rsa -b 4096 -N '' -f ~/.ssh/id_rsa
eval "$(ssh-agent -s)"
ssh-add ~/.ssh/id_rsa
Next, we also need the RHCOS 4.4 OVA and the NSX-T NCP containers.
Download the RHCOS OVA from here:
https://mirror.openshift.com/pub/openshift-v4/dependencies/rhcos/4.4/4.4.17/rhcos-4.4.17-x86_64-vmware.x86_64.ova
Most likely, you might want to download it to a location from where you have access to upload the OVA to your VMware vCenter.
As for NSX-T NCP container, you need a myVMware account and you can download it from here:
https://my.vmware.com/web/vmware/downloads/details?downloadGroup=NSX-T-PKS-302&productId=982.
We will also need the configuration files for the NCP network operator. These can be downloaded using git from this location:
cd ~/openshift/installer-files/
git clone https://github.com/vmware/nsx-container-plugin-operator.git
Put the ncp container image into the download folder as well and extract it to the installer folder. In the ncp folder, we are going to need the ncp Redhat container image, the other items are not needed, so we can remove a couple of files as well.
cd ~/openshift/installer-files/
unzip ../downloads/nsx-container-3.0.2.16863080.zip
rm -r nsx-container-3.0.2.16863080/PAS/
rm -r nsx-container-3.0.2.16863080/OpenvSwitch/
rm nsx-container-3.0.2.16863080/Kubernetes/nsx-ncp-ubuntu-3.0.2.16863080.tar
rm nsx-container-3.0.2.16863080/Kubernetes/nsx-ncp-photon-3.0.2.16863080.tar
During the Openshift installation process, the ncp operator container image will be automatically downloaded as the image is public available on docker hub, but the NCP container image is required as well, which is not public available. Therefore, you will have to provide the ncp container image on a private image registry, or temporarily deploy it on a private docker hub location.
In my case, I already have a private image registry running, based on Harbor (see https://goharbor.io/), so I placed the NCP image there:
cd ~/openshift/installer-files/nsx-container-3.0.2.16863080/Kubernetes/
docker image load -i nsx-ncp-rhel-3.0.2.16863080.tar
docker tag registry.local/3.0.2.16863080/nsx-ncp-rhel harbor.corp.local/library/nsx-ncp
docker push harbor.corp.local/library/nsx-ncp
Last, we need to get a pull-secret from Redhat, which will allow the container hosts to download the needed containers during the deployment. The pull secret requires a Redhat account (you might as well register for a developer account for free, if you don’t have a corporate subscription).
Go to https://cloud.redhat.com/openshift/install/vsphere/user-provisioned and download your pull secret:

2. DNS Preparation
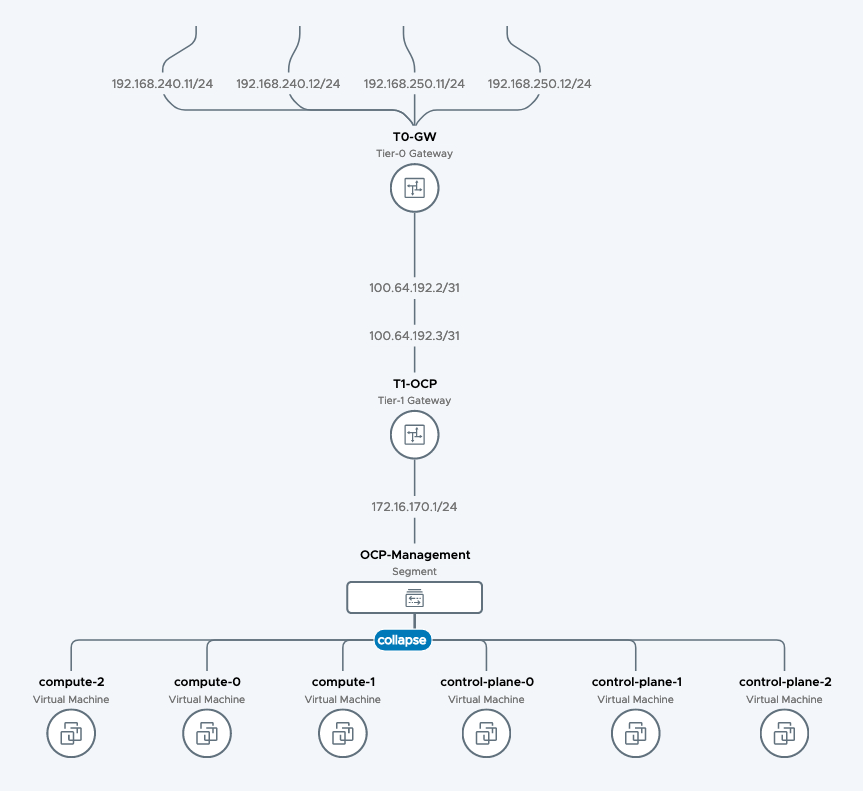
Let’s first take a look at what we are planning to deploy. The default set consists of 3 control-plane nodes and 3 compute nodes. As we are going to use the user-provisioned way of deploying the cluster in vSphere, we also need to take care of the DNS entries.
We are also going to use the NSX-T infrastructure for all possible elements, like network, loadbalancing and DHCP Server, except for DNS, which is most likely already existing in your environment. Our final topology will be looking like this (during bootstrap, one more VM is needed, called bootstrap):
Openshift expects each deployment to have separate cluster id, which needs to correlate with the respective DNS zone. So in my example, my base DNS domain is corp.local. My Openshift cluster name will be openshift4.
Therefore, I have to create DNS entries for each node (control-plane-0 – 2, compute-0 – 2, bootstrap) in a DNS zone called openshift4.corp.local.
In addition, we need to create records for etcd hosts, for openshift API and also service-records for the etcd service. Here’s the complete list of DNS records that are needed:
control-plane-0.openshift4.corp.local 172.16.170.100
control-plane-1.openshift4.corp.local 172.16.170.101
control-plane-2.openshift4.corp.local 172.16.170.102

compute-0.openshift4.corp.local 172.16.170.110
compute-1.openshift4.corp.local 172.16.170.111
compute-2.openshift4.corp.local 172.16.170.112

bootstrap.openshift4.corp.local 172.16.170.99

etcd-0.openshift4.corp.local 172.16.170.100
etcd-1.openshift4.corp.local 172.16.170.101
etcd-2.openshift4.corp.local 172.16.170.102

The following 2 entries point to the bootstrap host during the bootstrap deployment:

api.openshift4.corp.local 172.16.170.99
api-int.openshift4.corp.local 172.16.170.99

A wildcard DNS entry needs to be in place for the OpenShift 4 ingress router, which is also a load balanced endpoint.

*.apps.openshift4.corp.local 172.16.170.110
*.apps.openshift4.corp.local 172.16.170.111
*.apps.openshift4.corp.local 172.16.170.112

In addition, you’ll also need to add SRV records.

_etcd-server-ssl._tcp.openshift4.corp.local

0 10 2380 etcd-0.openshift4.corp.local.

0 10 2380 etcd-1.openshift4.corp.local.

0 10 2380 etcd-2.openshift4.corp.local.
As you can see above, we currently use DNS to loadbalance the corresponding records, which works for PoC deployment. I will enhance this post to also use NSX-T LB for these topics.
One important point is the entry for api and api-int. These need to point to the bootstrap host during the first installation phase. As soon as the bootstrap host is removed, the DNS entries need to be changed to point to the control plane nodes and I will point this out down below at the right step.
3. Configure NSX-T networking constructs to host the cluster
Let’s refer to the topology:
In NSX-T, we will create a base topology where the cluster hosts will be attached to. For that, we create a separate T1-Router where all OCP segments will be attached to. We will also create a segment where the hosts will be attached to. Last, a DHCP server will be created for the cluster hosts to get dynamic IP adresses during bootup.
As an optional exercice, I have also created an Ingress-IP-Pool and Egress-NAT-Pool for NCP to consume. This can be done dynamically by NCP as well, but I prefer the pre-provisioned way to be on the safe side.
Assuming you have configured a T0-router already and deployed NSX-T on the vSphere cluster already, let me quickly walk you through the creation of the components above:
Configure T1 for OCP Hosts
– Log in to NSX-T Manager
– Click on the Networking tab
– Connectivity > Tier-1 Gateways
– Add Tier-1 Gateway

Configure Segment for OCP Hosts
– Click on the Networking tab
– Connectivity > Segments
– Add Segment

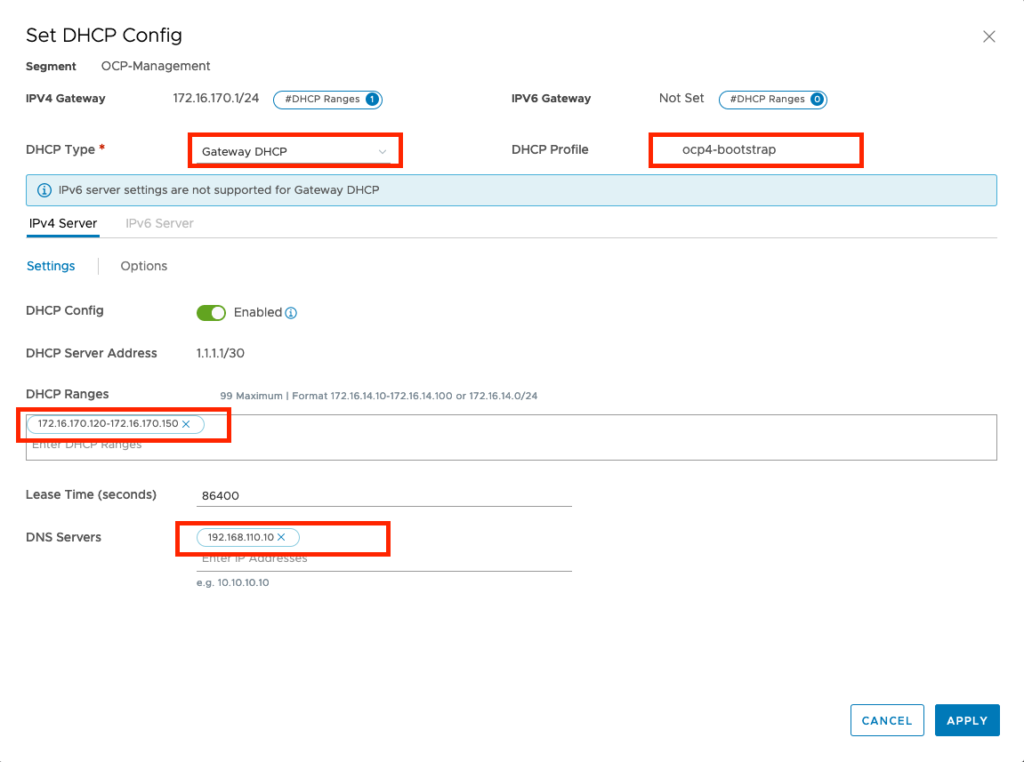
Configure DHCP Server
– Click on the Networking tab
– IP Management > DHCP
– Add DHCP Profile

Attach the DHCP Server to the OCP-Management segment
– Click on the Networking tab
– Connectivity > Segments
– click edit on the OCP-Management segment
– click edit DHCP config
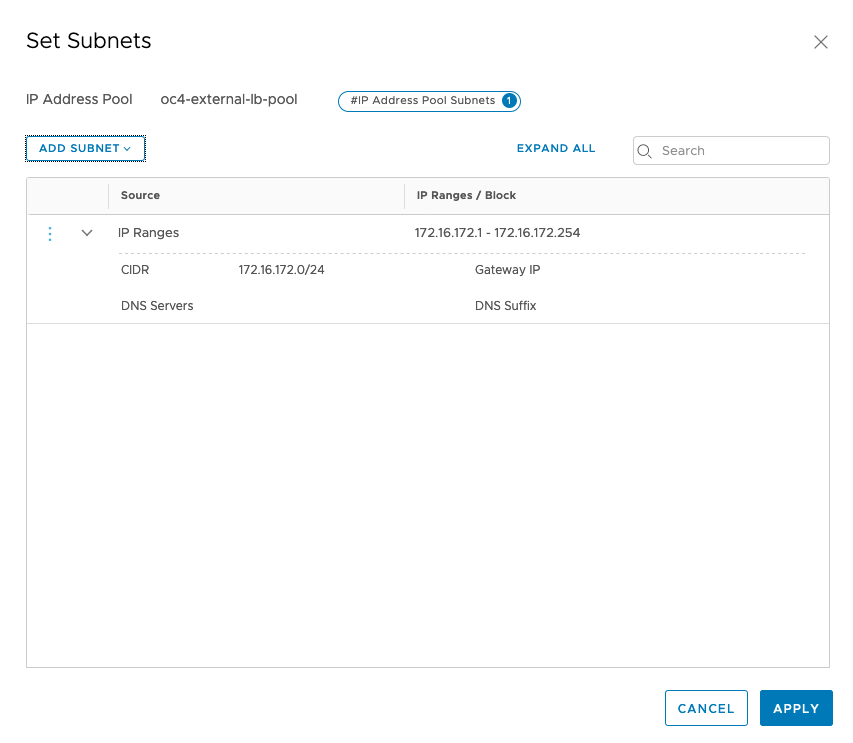
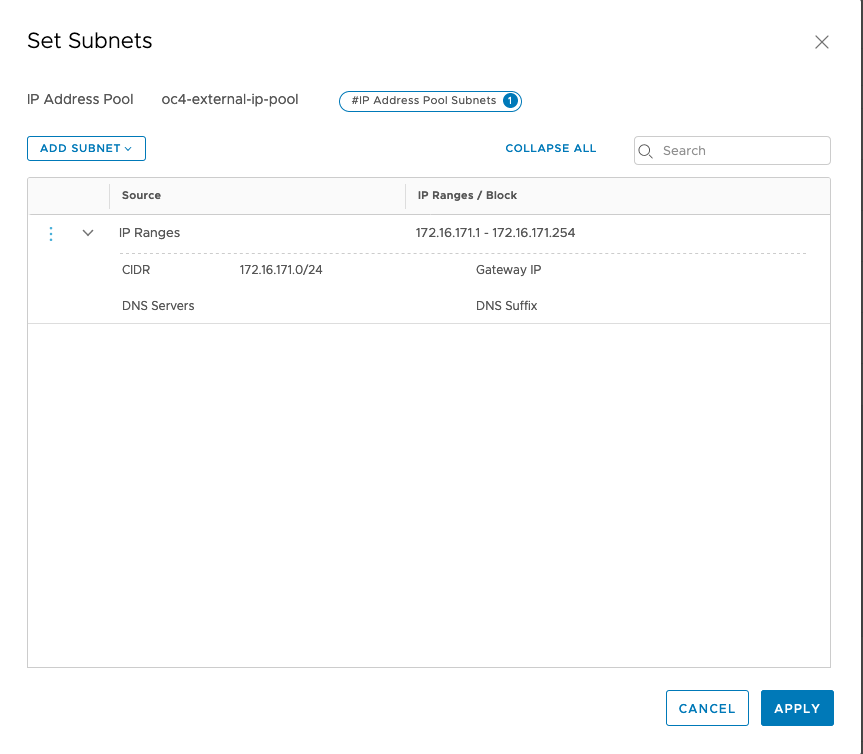
Configure Ingress IP Pool and Egress NAT Pool
– Click on the Networking tab
– IP Management -> IP Address Pools
– add 2 IP Address Pools


Just make sure that your have configured your T1 propagation settings correctly (advertising Connected Segments, NAT and LB IPs) and verify what your redistribution settings for T0 are. If you use BGP routing, you need to advertise the corresponding settings as well.
4. Deploy a Redhat Container Host image as template within your vSphere environment
After all these preparation steps, we can now start to get things up and running on the vSphere side.
Upload the RHCOS OVA from step 1 into your vCenter. I guess you know how to do it, just navigate to the vCenter WebUI, choose the vSphere cluster where you would like to deploy the VM and click on Deploy OVF template.
During the OVF Template wizard, just be sure to select the OCP Management Segment that we just created on NSX-T as destination network:
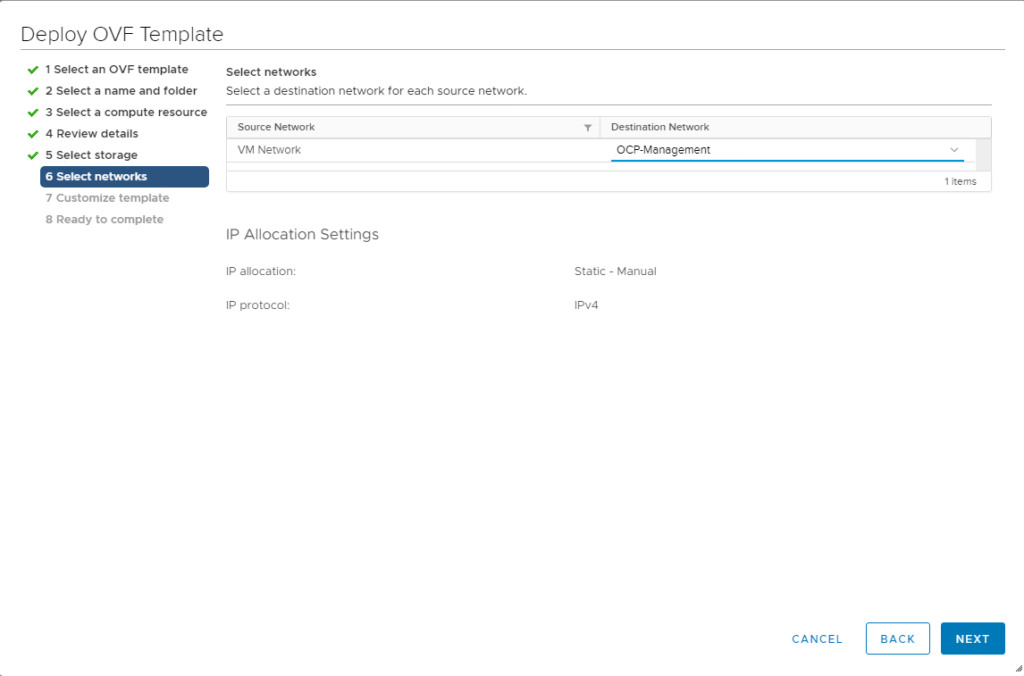
You can leave the settings regarding ignition empty, as these will be configured by the terraform installer later.
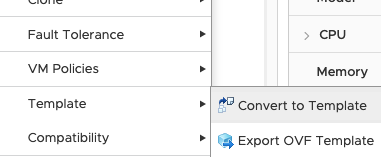
After the VM has been uploaded, convert it to a template and name the template “rhcos-4.4” (we need to refer to that name for the terraform installer).
5. Prepare the Openshift install config and modify it for NCP
In this step, we are going to configure the openshift installation files on your linux jumphost that we prepared in step 1.
Referring to the directory structure, move to directory openshift/config-files and create a install-config.yaml file.
[localadmin@oc-jumphost ~]$ tree openshift/ -L 1
openshift/
├── config-files
├── deployments
├── downloads
├── installer-files
└── scripts
[localadmin@oc-jumphost ~]$ cd ~/openshift/config-files/
Here’s what my install-config.yaml looks like:
apiVersion: v1
baseDomain: corp.local
compute:
- hyperthreading: Enabled
  name: worker
  replicas: 0
controlPlane:
  hyperthreading: Enabled
  name: control-plane
  replicas: 3
metadata:
  name: openshift4
networking:
  networkType: ncp
  clusterNetwork:
  - cidr: 10.4.0.0/16
    hostPrefix: 23
  machineCIDR: 172.16.170.0/24
  serviceNetwork:
  - 172.30.0.0/16
platform:
  vsphere:
    vcenter: vcsa-01a.corp.local
    username: administrator@corp.local
    password: VMware1!
    datacenter: DC-SiteA
    defaultDatastore: ds-site-a-nfs03
fips: false
pullSecret: 'ENTER YOUR PULL-SECRET HERE'
sshKey: 'ENTER YOUR SSH KEY HERE'
proxy:
additionalTrustBundle: |
    -----BEGIN CERTIFICATE-----
    'ENTER YOUR REGISTRY CA CERT HERE'
-----END CERTIFICATE-----| Couple of comments regarding these settings: | |
| Compute replicas: 0 | As we provide the VMs ourselves, we can choose 0 here. |
| clusterNetwork | this is the pod network that will be deployed through NCP for the internal pod communication. |
| machineCIDR | this needs to match with the OCP Segment IP Range that we configured on NSX-T (in this case: 172.16.170.0/24) |
| password | enter your vSphere Password here |
| pullSecret | enter the Redhat pull secret that you obtained in step 1. Make sure you put it in ‘ |
| sshKey | enter the contents of your ~/.ssh/id_rsa.pub file from step 1. Make sure you put it in ‘ |
| proxy: | Only needed if you deploy the ncp container image from a private registry. As of Openshift 4.4, the only way to provide additional trusted CA certificates is through the proxy configuration, even if the proxy setting itself is empty. You can remove the proxy setting if you deploy the ncp container image on the public docker hub. |
| additionalTrustBundle: | Only needed if you deploy the ncp container image from a private registry. Here, you enter the CA cert that can verify the private registry server certificate (in my case, the CA cert that signed the server certificate for harbor.corp.local). This is needed, otherwise the NCP download will fail since the openshift hosts can’t validate the private registry certificate. You can remove the additionalTrustBundle setting if you deploy the ncp container image on the public docker hub. |
Next step is to prepare the NCP operator config files accordingly. These are located in the deploy folder of the ncp-operator git directory.
[localadmin@oc-jumphost config-files]$ cd ~/openshift/installer-files/nsx-container-plugin-operator/deploy/
[localadmin@oc-jumphost deploy]$ ls
configmap.yaml
namespace.yaml
operator.nsx.vmware.com_ncpinstalls_crd.yaml
operator.yaml
role.yaml
lb-secret.yaml
nsx-secret.yaml  operator.nsx.vmware.com_v1_ncpinstall_cr.yaml  role_binding.yaml
service_account.yaml
With the operator support, we only need to modify 2 files:
Modify configmap.yaml
apiVersion: v1
kind: ConfigMap
metadata:
  name: nsx-ncp-operator-config
  namespace: nsx-system-operator
data:
  ncp.ini: |

    [vc]

    [coe]


    adaptor = openshift4

    cluster = openshift4

    loglevel = WARNING

    nsxlib_loglevel = WARNING

    enable_snat = True

    [DEFAULT]


    [nsx_v3]


    policy_nsxapi = True

    nsx_api_managers = 192.168.110.200

    nsx_api_user = admin

    nsx_api_password = ENTER_YOUR_NSX_PW_HERE

    insecure = True

    subnet_prefix = 24

    log_dropped_traffic = True

    log_firewall_traffic = DENY

    use_native_loadbalancer = True

    l4_lb_auto_scaling = True

    pool_algorithm = WEIGHTED_ROUND_ROBIN

    service_size = SMALL

    external_ip_pools = oc4-external-ip-pool

    top_tier_router = T1-OCP

    single_tier_topology = True

    external_ip_pools_lb = oc4-external-lb-pool

    overlay_tz = 1b3a2f36-bfd1-443e-a0f6-4de01abc963e

    edge_cluster = a3a95653-5d1c-44b2-86e4-d9a279370618


    [ha]


    [k8s]


    apiserver_host_ip = api-int.openshift4.corp.local

    apiserver_host_port = 6443

    client_token_file = /var/run/secrets/kubernetes.io/serviceaccount/token

    ca_file = /var/run/secrets/kubernetes.io/serviceaccount/ca.crt

    loglevel = WARNING


    [nsx_kube_proxy]


    [nsx_node_agent]

    ovs_bridge = br-int

    ovs_uplink_port = ens192
All the other settings are commented out, so NCP takes the default values for everything else. If you are interested in all the settings, the original file in the directory is quite large and has each config item explained.
| Couple of comments regarding these settings: | |
| nsx_api_password | Put the NSX admin user password here |
| overlay_tz | Put the UUID of the Overlay-Transport-Zone here |
| service_size | For PoC, having a small LB deployed should be fine. For production deployment, you would rather want to use medium or large LB. |
Modify operator.yaml. The only thing you need to modify here is the location where you have placed the NCP image.
apiVersion: apps/v1
kind: Deployment
metadata:
  name: nsx-ncp-operator
  namespace: nsx-system-operator
spec:
  replicas: 1
  selector:
    matchLabels:
      name: nsx-ncp-operator
  template:
    metadata:
      labels:
        name: nsx-ncp-operator
    spec:
      hostNetwork: true
      serviceAccountName: nsx-ncp-operator
      tolerations:
      - effect: NoSchedule
        key: node-role.kubernetes.io/master
      - effect: NoSchedule
        key: node.kubernetes.io/not-ready
      containers:
        - name: nsx-ncp-operator
          image: vmware/nsx-container-plugin-operator:latest
          command: ["/bin/bash", "-c", "nsx-ncp-operator --zap-time-encoding=iso8601"]
          imagePullPolicy: Always
          env:
            - name: POD_NAME
              valueFrom:
                fieldRef:
                  fieldPath: metadata.name
            - name: OPERATOR_NAME
              value: "nsx-ncp-operator"
            - name: NCP_IMAGE
              value: "harbor.corp.local/library/nsx-ncp:latest"
            - name: WATCH_NAMESPACE
              value: "nsx-system-operator"
Now, we are ready to create the openshift installer manifests and ignition files. For each deployment, the openshift installer will create files in a specific folder structure. So let’s create a new directory for this deployment and copy the install-config.yaml into that folder.
cd ~/openshift/deployments/
mkdir ncp-oc4-vsphere
cp ../config-files/install-config.yaml ncp-oc4-vsphere/
With the next step, we create the openshift manifests:
openshift-install create manifests --dir=ncp-oc4-vsphereDepending on whether you would like to have pods scheduled on the control-plane nodes, the openshift docs suggest you do the following:
nano ncp-oc4-vsphere/manifests/cluster-scheduler-02-config.yml
Set mastersScheduleable: false.
Next we need to move the NCP operator config files into the manifest folder and then create the ignition configs:
cp ../installer-files/nsx-container-plugin-operator/deploy/* ncp-oc4-vsphere/manifests
openshift-install create ignition-configs --dir=ncp-oc4-vsphere
If you now take a look in the ncp-oc4-vsphere folder, you find 3 important files: bootstrap.ign, master.ign and worker.ign. We need to do a couple of things with these files, as they are required to bring the bootstap cluster up and running.
-> bootstrap.ign: This file needs to be positioned on a web server and be reachable from the bootstrap host that we are going to deploy. You are free to pick whatever web server you like.
-> master.ign: The file contents are needed in the next step in the terraform deployment.
-> worker.ign: The file contents are needed in the next step in the terraform deployment.
Important Notes:
(1) The Openshift installer includes a certificate in these ign files for the initial deployment. That certificate is only valid for 24 hours. If you don’t get your cluster up and running within 24 hours, you need to generate new manifests and ignition configs.
(2) If you have to start over again from a previous deployment, you can simply delete contents of the ncp-oc4-vsphere folder, but there are 2 hidden files: .openshift_install.log and .openshift_install_state.json where Openshift keeps installation information. Unless you also delete these two files, the certificates will not be renewed.
6. Deploy an Openshift cluster as user-provided infrastructure with bootstrap, control-plane and compute hosts using Terraform
We are now ready to deploy the bootstrap, control-plane and compute nodes to our vSphere environment and we will use terraform to adjust all the settings for us. To that end, we need to tell terraform what it needs to do. Let’s move into the vsphere upi folder of the openshift installer.
cd ~/openshift/installer-files/installer/upi/vsphere/In this folder, we need to create a file called terraform.tfvars
// ID identifying the cluster to create. Use your username so that resources created can be tracked back to you.
cluster_id = "openshift4"

// Domain of the cluster. This should be "${cluster_id}.${base_domain}".
cluster_domain = "openshift4.corp.local"

// Base domain from which the cluster domain is a subdomain.
base_domain = "corp.local"

// Name of the vSphere server. The dev cluster is on "vcsa.vmware.devcluster.openshift.com".
vsphere_server = "vcsa-01a.corp.local"

// User on the vSphere server.
vsphere_user = "administrator@corp.local"

// Password of the user on the vSphere server.
vsphere_password = "ENTER_YOUR_VSPHERE_PW_HERE"

// Name of the vSphere cluster. The dev cluster is "devel".
vsphere_cluster = "Compute-Cluster"

// Name of the vSphere data center. The dev cluster is "dc1".
vsphere_datacenter = "DC-SiteA"

// Name of the vSphere data store to use for the VMs. The dev cluster uses "nvme-ds1".
vsphere_datastore = "ds-site-a-nfs03"

// Name of the VM template to clone to create VMs for the cluster. The dev cluster has a template named "rhcos-latest".
vm_template = "rhcos-4.4"

// The machine_cidr where IP addresses will be assigned for cluster nodes.
// Additionally, IPAM will assign IPs based on the network ID.
machine_cidr = "172.16.170.0/24"

// The number of control plane VMs to create. Default is 3.
control_plane_count = 3

// The number of compute VMs to create. Default is 3.
compute_count = 3

// Set bootstrap_ip, control_plane_ip, and compute_ip if you want to use static
// IPs reserved someone else, rather than the IPAM server.

// The IP address to assign to the bootstrap VM.
bootstrap_ip = "172.16.170.99"

// The IP addresses to assign to the control plane VMs. The length of this list
// must match the value of control_plane_count.
control_plane_ips = ["172.16.170.100", "172.16.170.101", "172.16.170.102"]

// The IP addresses to assign to the compute VMs. The length of this list must
// match the value of compute_count.
compute_ips = ["172.16.170.110", "172.16.170.111", "172.16.170.112"]

// The network interface to be used for the VMs
vm_network = "OCP-Management"

// URL for bootstrap ignition
bootstrap_ignition_url = "http://192.168.110.10/bootstrap.ign"

control_plane_ignition = <<END_OF_MASTER_IGNITION
***ENTER THE CONTENTS OF YOUR MASTER.IGN FILE HERE***
END_OF_MASTER_IGNITION

compute_ignition = <<END_OF_WORKER_IGNITION
***ENTER THE CONTENTS OF YOUR WORKER.IGN FILE HERE***
END_OF_WORKER_IGNITION
| Couple of comments regarding these settings: | |
| vsphere_password | Put the vSphere admin user password here |
| bootstrap_ip, control_plane_ips, compute_ips | For my setup, I have chosen to use static IP adresses for the nodes. Even if you do this, you still need the DHCP server in step 3 to hand out dynamic IP adresses during RHCOS bootup. If you don’t want to use static IP adresses, you can also configure static MAC binding in the NSX-T DHCP server to achieve the same. |
| bootstrap_ignition_url | This is the web server address where you supply the bootstrap.ign file from the previous step. |
| control_plane_ignition | Here, you need to copy the contents for the master.ign file from the previous step |
| compute_ignition | Here, you need to copy the contents for the worker.ign file from the previous step |
| vm_template | this needs to match how you named the RHCOS template in step 4 |
Next, modify the main.tf file. Comment out everything for the DNS module as the installer is trying to configure Amazon’s Route53:
...
//module "dns" {
//  source = "./route53"
//
//  base_domain         = "${var.base_domain}"
//  cluster_domain      = "${var.cluster_domain}"
//  bootstrap_count     = "${var.bootstrap_complete ? 0 : 1}"
//  bootstrap_ips       = ["${module.bootstrap.ip_addresses}"]
//  control_plane_count = "${var.control_plane_count}"
//  control_plane_ips   = ["${module.control_plane.ip_addresses}"]
//  compute_count       = "${var.compute_count}"
//  compute_ips         = ["${module.compute.ip_addresses}"]
//}
Also, modify the file machine/ignition.tf. Change the gw setting to use the GW address of NSX-T and set the DNS setting according to your DNS server (if you only have 1, just use the DNS1 setting and remove DNS2):
...
  gw   = "172.16.170.1"
...
DNS1=192.168.110.10
...
Last (not required, but was necessary in my setup), modify the file machine/main.tf to have a longer time-out for the VM cloning. Terraform has a default setting of 30 Minutes for the cloning. In my lab, it took longer, which made Terraform abort. So I have set it to 120 minutes to be on the safe side.
...
clone {
    template_uuid = "${data.vsphere_virtual_machine.template.id}"
    timeout = 120
}
...
Finally, let’s get things rolling and make Terraform deploy the nodes:
cd ~/openshift/installer-files/installer/upi/vsphere/
terraform init
terraform apply -auto-approve
In your vSphere environment, you should now see cloning tasks spawning. Eventually, you will see there these items:
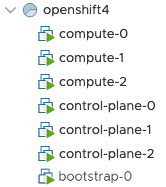
Sidenote: In case something went wrong or the deployment did not succeed, you have the option to rollback. Use the command terraform destroy -auto-approve to remove those items. If you need to restart the terraform deployment again, first delete all the terraform.tfstate* files in the upi/vsphere directory.
Compared to the previous installation without operator support, there are no further steps to be taken. We don’t need to place the ncp images manually and we don’t need to tag any VMs in NSX-T anymore. This is all done automatically through the operator.
7. Let the bootstrap host provision the cluster and finalize the remaining cluster deployment.
We are pretty close now. First, the bootstrap node will start deploying the openshift cluster on the control-plane nodes. We can monitor that process with the following command:
cd ~/openshift/deployments/
openshift-install wait-for bootstrap-complete --dir=ncp-oc4-vsphere --log-level debug
Let’s wait now until the openshift installer signals that the bootstrap process is complete:
DEBUG Bootstrap status: complete
INFO It is now safe to remove the bootstrap resources
You can now remove the bootstrap node through terraform:
cd ~/openshift/installer-files/installer/upi/vsphere/
terraform apply -auto-approve -var 'bootstrap_complete=true'
As this point, you also need to modify the DNS entries for api.openshift4.corp.local and api-int.openshift4.corp.local to point to the three control-plane IPs (172.16.170.100, -101 and -102).
Let’s finalize the deployment:
cd ~/openshift/deployments/
openshift-install --dir=ncp-oc4-vsphere/ wait-for install-complete --log-level=DEBUG
There are a couple of commands that you can use during the installation phase to see details on the progress:
export KUBECONFIG=~/openshift/deployments/ncp-oc4-vsphere/auth/kubeconfig
oc get nodes
oc project nsx-system
oc get pods (this should show you all NCP pods)
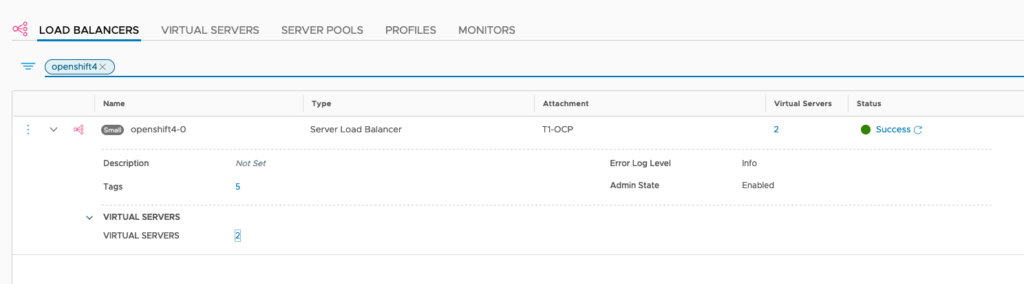
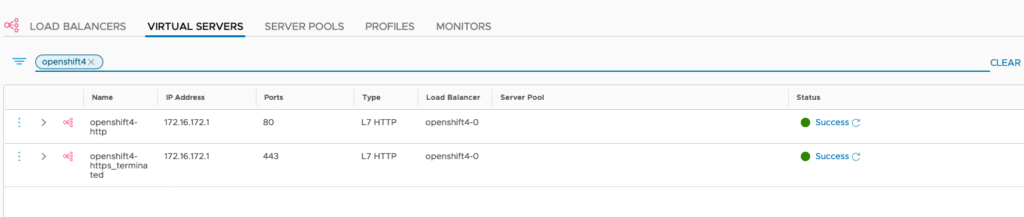
watch -n5 oc get clusteroperatorsAs NCP fires up, it implements all the required networks and loadbalancers in NSX-T for this installation. In segments, you should find a segment for each Openshift project. If all the operators are running, there should be 49 segments (including the OCP-Management segment).
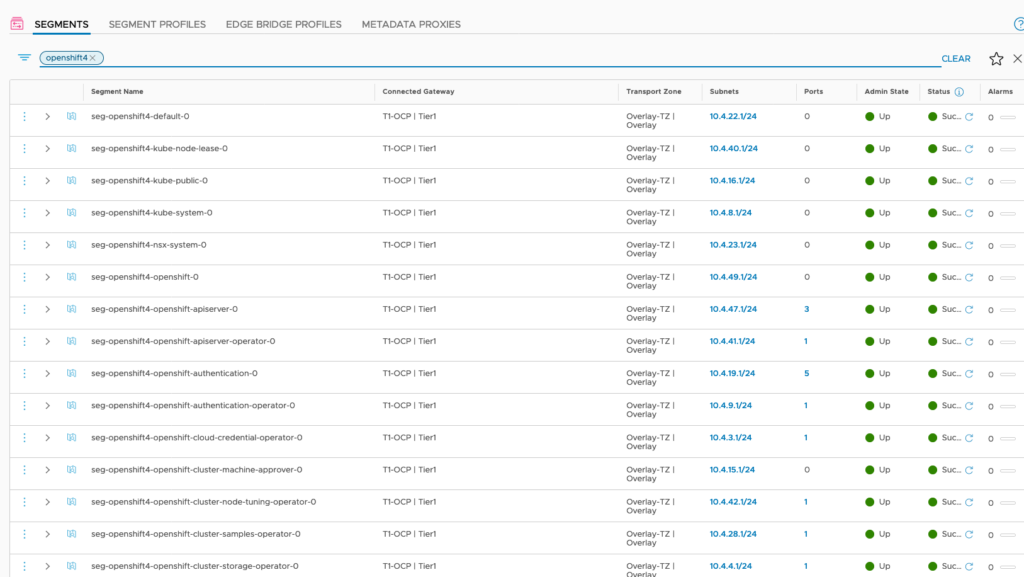
In Loadbalancers, there are now 2 Ingress-Loadbalancers deployed as well. NCP has auto-allocated an IP adress from the LB-Pool for it.
DONE!!
(well, almost. You need to tell Openshift things about image registry and where to find storage in your vSphere cluster. Please refer to https://docs.openshift.com/container-platform/4.4/installing/installing_vsphere/installing-vsphere-network-customizations.html#installation-vsphere-config-yaml_installing-vsphere-network-customizations. I did the following:
Tell OC that image registry is managed

oc project openshift-image-registry
oc patch configs.imageregistry.operator.openshift.io cluster --type merge --patch '{"spec":{"managementState": "Managed"}}'

Fake image repository for PoCs
oc patch configs.imageregistry.operator.openshift.io cluster --type merge --patch '{"spec":{"storage":{"emptyDir":{}}}}'
Further Links
I focussed in this blog on the NSX-T integration part. Therefore, I did not elaborate any further on Openshift specifics or config variables. If you like to drill-down further, or use HA-Proxy to handle the API-LB, here are a couple of links:
https://labs.consol.de/container/platform/openshift/2020/01/31/ocp43-installation-vmware.html
https://github.com/yasensim/nsxt-ocp4
- NSX-T – NCP Integration with Openshift 4.8 – The Super-Easy Way - 6. December 2021
- NSX-T – NCP Integration with Openshift 4.6 – The Easy Way - 24. March 2021
- NSX-T – NCP Integration with Openshift 4.4 – The Easy Way - 29. September 2020
Thanks so much for the post, this is simply awesome. The post is very detailed and really helps. I followed the hard-way and the easy-way. My compute nodes however do not seem to come up , with an error GET https://api-int.openshift4.labs.org:22623/config/worker Internal Server error. Am I missing something.
Thanks again for a great post.
Hi Riaz. Sorry for the late response. From what I can tell, the error points to a problem with the machine config provisioning. Did you configure the DNS records correctly, or did you use the NSX-T loadbalancer?
Pingback: NSX-T – NCP Integration with Openshift 4.6 – The Easy Way » vrealize.it - TechBlog VMware SDDC